Unboxing & Installation of the MSI MPG X870E Carbon WIFI – A Technical Deep Dive
- Introduction: When a Motherboard Defines the Entire System
- The Packaging: A Heavyweight with a Clear Message
- The Unboxing: From Box to Hardware
- First Physical Impression: Design, Layout, and Feel
- I/O Panel: Bandwidth Without Apologies
- Preparing the Build: From Empty Case to New Platform
- Installing the MSI MPG X870E Carbon WIFI
- Integrating the GPU, M.2 Storage, and Cooling
- Cabling and Final Adjustments
- First Boot and Hardware Check
- Transparency Notice (as requested, unchanged except for product name)
Introduction: When a Motherboard Defines the Entire System
Unboxing a high-end motherboard is rarely just opening a product. In the case of the MSI MPG X870E Carbon WIFI, it feels more like laying down the foundation for a full system concept. This board is built for AMD’s AM5 platform and supports not only the Ryzen 7000 and 8000 series but is already prepared for the Ryzen 9000 generation. MSI clearly aims at users who don’t want to replace their motherboard with every CPU refresh, but instead want a platform that can carry them through several upgrade cycles.
Everything begins with a simple package — yet as soon as the outer box is removed, the actual product packaging lands on the desk with a presence that leaves no doubt about its ambitions. Glossy accents, holographic logos, a large depiction of the motherboard, and prominent feature highlights like DDR5 support up to 8400 MT/s, an 18+2+1 Duet Rail Power System, PCIe 5.0, USB4 at 40 Gbps, Wi-Fi 7, and 5G LAN aren’t just marketing fluff. They’re essentially the spec sheet printed right on the cover.
Paul Virilio once wrote that every new technology brings with it a new form of accident. Fortunately, this has nothing to do with disasters — quite the opposite. This board offers so much bandwidth and power headroom that bottlenecks aren’t even part of the conversation.
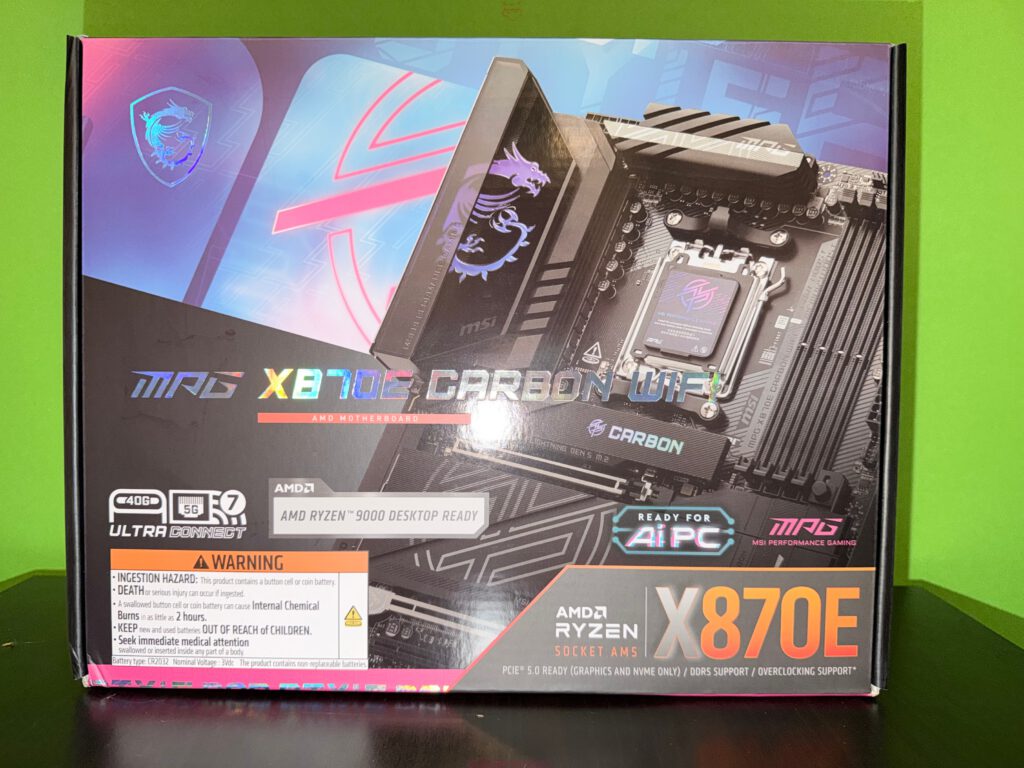
The Packaging: A Heavyweight with a Clear Message
The front of the box is dense, but not chaotic. MSI’s dragon logo sits in a shimmering holographic finish on the upper left. On the right, the motherboard dominates the artwork with its illuminated I/O cover and the bold “Carbon” lettering. Below it, you’re greeted with “AMD Ryzen 9000 Desktop Ready” and “X870E” in unmistakable letters. MSI makes no attempt to disguise what kind of product this is. It’s not built for budget rigs.
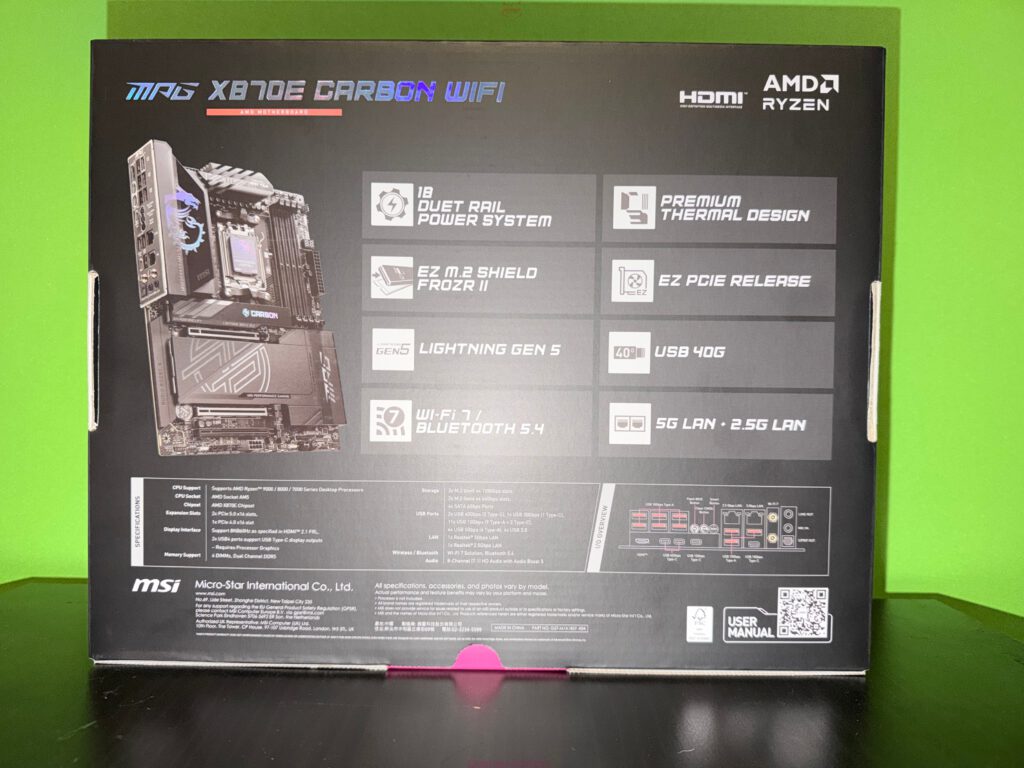
Turning the box around reveals a full-scale layout of the motherboard. To the right, MSI presents its major features in a clean block layout: the 18-phase CPU power delivery system, the premium thermal design, the EZ-M.2 mounting system with its tool-free approach, PCIe Gen 5 support, USB 40G, dual high-speed LAN, and Wi-Fi 7 with Bluetooth 5.4. Beneath this overview is the full spec sheet with AM5 socket compatibility, memory support for up to 256 GB of DDR5, and the configuration of the PCIe and M.2 slots.
The packaging is sturdy, cleanly printed, and doesn’t flex. It’s immediately obvious that MSI does not treat this as a generic mass-market part. This is a board you deliberately choose — not something that happens to be available.
The Unboxing: From Box to Hardware
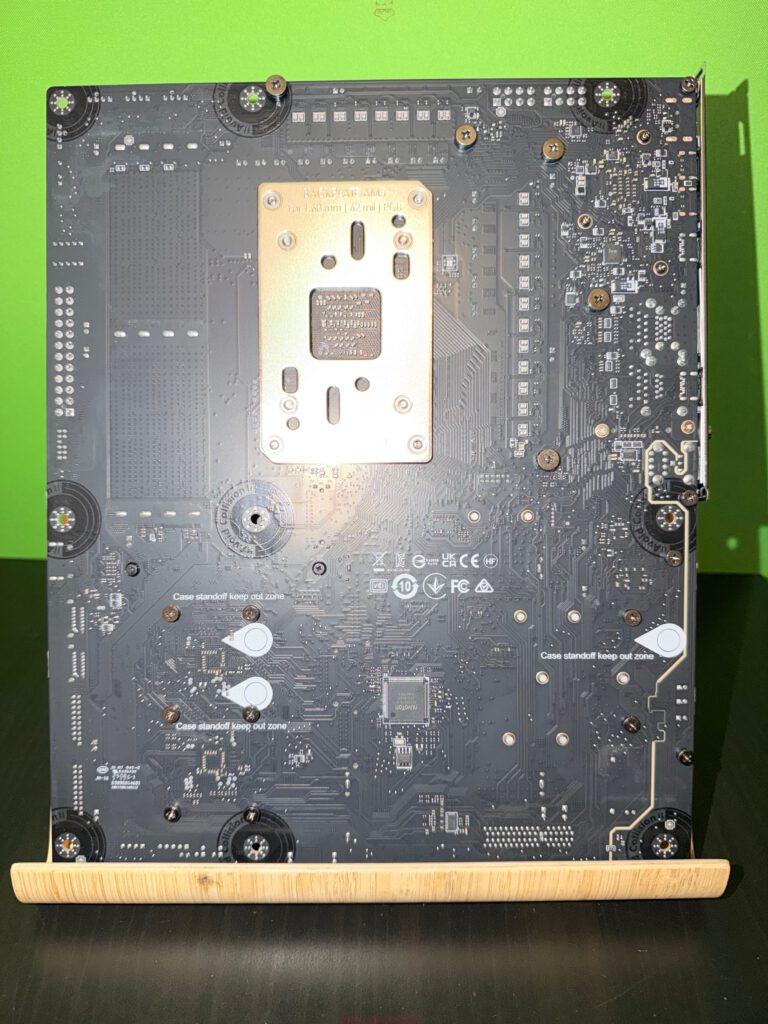
After lifting the lid, the motherboard lies right at the top, sealed inside an anti-static bag and supported by a thick white cardboard frame. Even through the packaging, the heavy heatsinks stand out. The VRM area is covered by a deep, dark aluminum block that flows seamlessly into the I/O shroud, carrying the MSI logo. The large M.2 area on the lower-right section of the PCB is hidden beneath full-length structural covers that resemble armor plating more than simple heatsinks.

Once the board is lifted out, the first thing you notice is its weight. Some of that comes from the eight-layer PCB with thick copper, but the majority comes from the heatsinks. MSI uses an 18+2+1 Duet Rail Power System, supported by dual 8-pin EPS connectors and high-end 110-amp power stages. This is a VRM design built to comfortably feed a fully stressed Ryzen 9 CPU under overclocked loads.
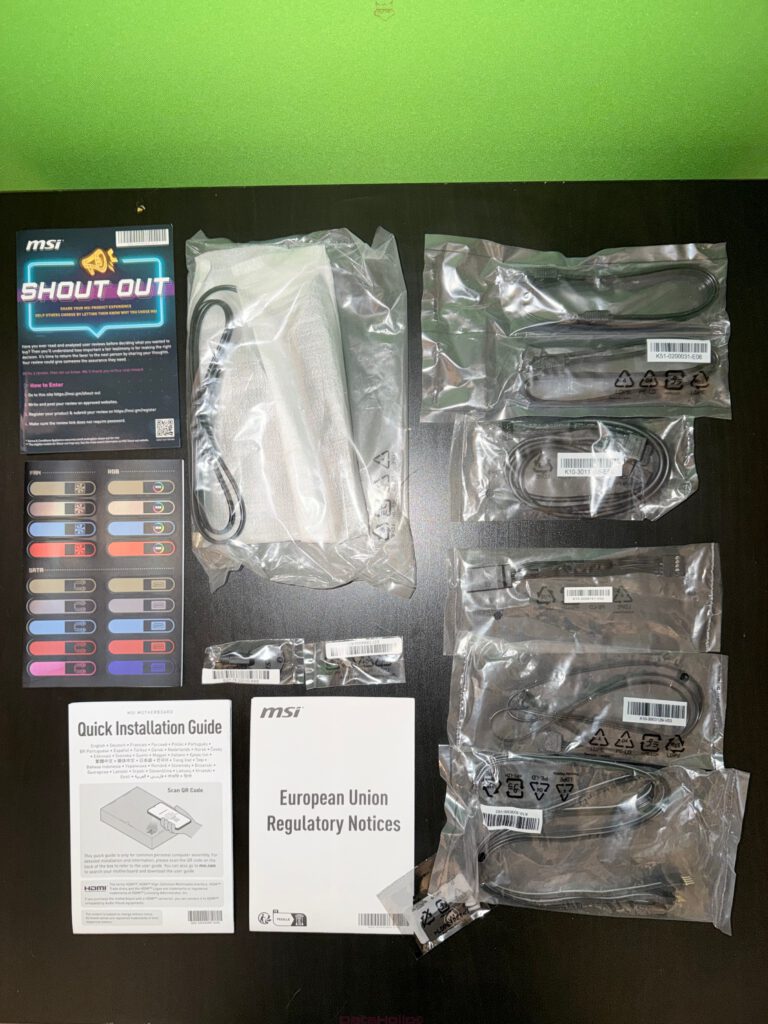
Underneath the mainboard layer, the accessory section reveals itself. MSI divides it into separate compartments. The Wi-Fi 7 antenna comes in a dedicated pouch, four SATA cables are rolled neatly, RGB and ARGB extension cables are included, along with a front-panel adapter, a USB header cable, and several cable ties. A printed quick installation guide and EU regulatory notices sit beside a “Shout Out” card inviting users to share feedback online.
Nothing in this accessory set is flashy, but that’s precisely why it works. Everything included has a purpose. Nothing feels like filler. MSI delivers exactly what you need for a modern build and avoids unnecessary clutter.
First Physical Impression: Design, Layout, and Feel
With the anti-static bag removed, the design becomes far clearer. The board uses a deep matte-black PCB, paired with brushed-metal heatsinks and carbon-inspired diagonal patterns. The illuminated “Carbon” badge and RGB-lit MSI dragon on the I/O shroud sit subtly in the upper-left corner.
The layout is clean and intentional. The AM5 socket is positioned slightly higher than center, framed by a robust VRM section with neatly aligned chokes and capacitors. To its right sit the four DDR5 DIMM slots capable of up to 256 GB and extreme memory speeds above 8400 MT/s via overclocking — a strong indicator that this board caters to memory tweakers and enthusiasts who enjoy pushing EXPO profiles and fine-tuning timings.
Below the CPU socket is where the board’s future-ready design becomes most visible. The primary PCIe x16 slot is PCIe 5.0 capable and wired directly to the CPU. Below it is another mechanical x16 slot also on PCIe 5.0, and further down is a PCIe 4.0 slot connected to the chipset. For storage, four M.2 slots line the lower-right area, two of which support PCIe 5.0 x4. All of them come equipped with MSI’s Shield Frozr heatsinks and use the tool-free EZ M.2 Clip system — no tiny screws required.
The bottom section houses headers for front audio, USB 2.0 and USB 3.2, fan and pump headers, and RGB connectors. Everything is clearly labeled and easily reached, which becomes incredibly helpful during installation. MSI also includes plenty of PWM and pump headers to support more sophisticated cooling setups.
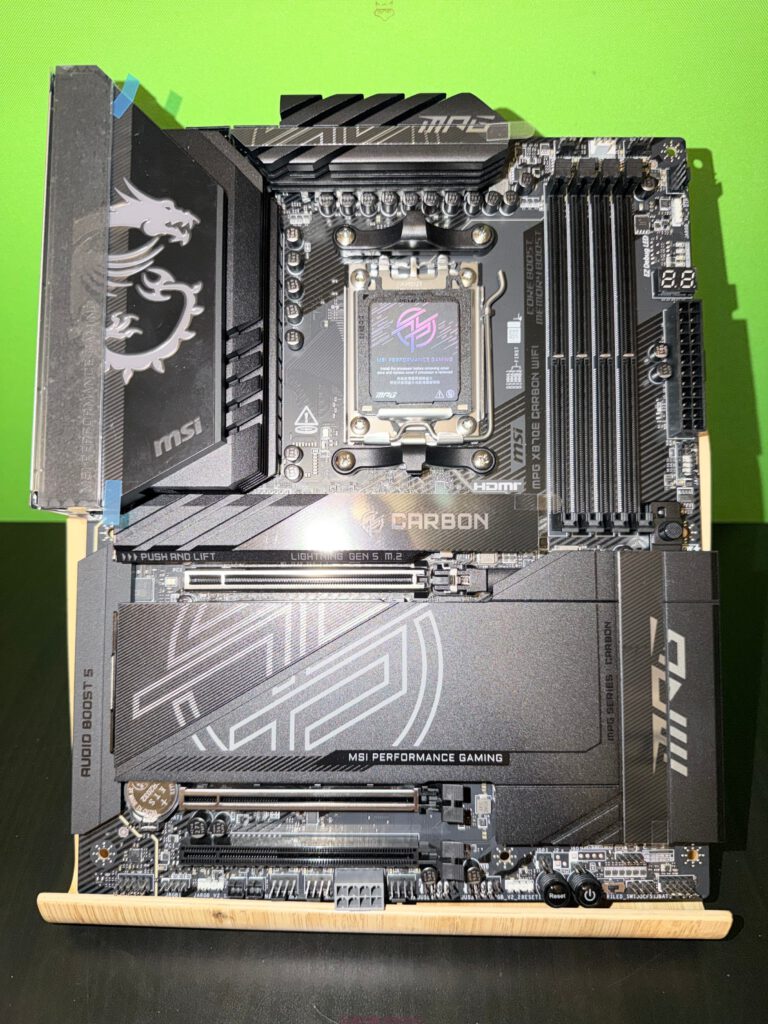
Flipping the board over reveals a sturdy backplate around the socket, providing structural reinforcement and aiding thermal distribution. “Keep-Out” zones mark exactly where case standoffs should and should not be placed — a detail that prevents accidental shorts and makes fast builds a lot safer.
I/O Panel: Bandwidth Without Apologies
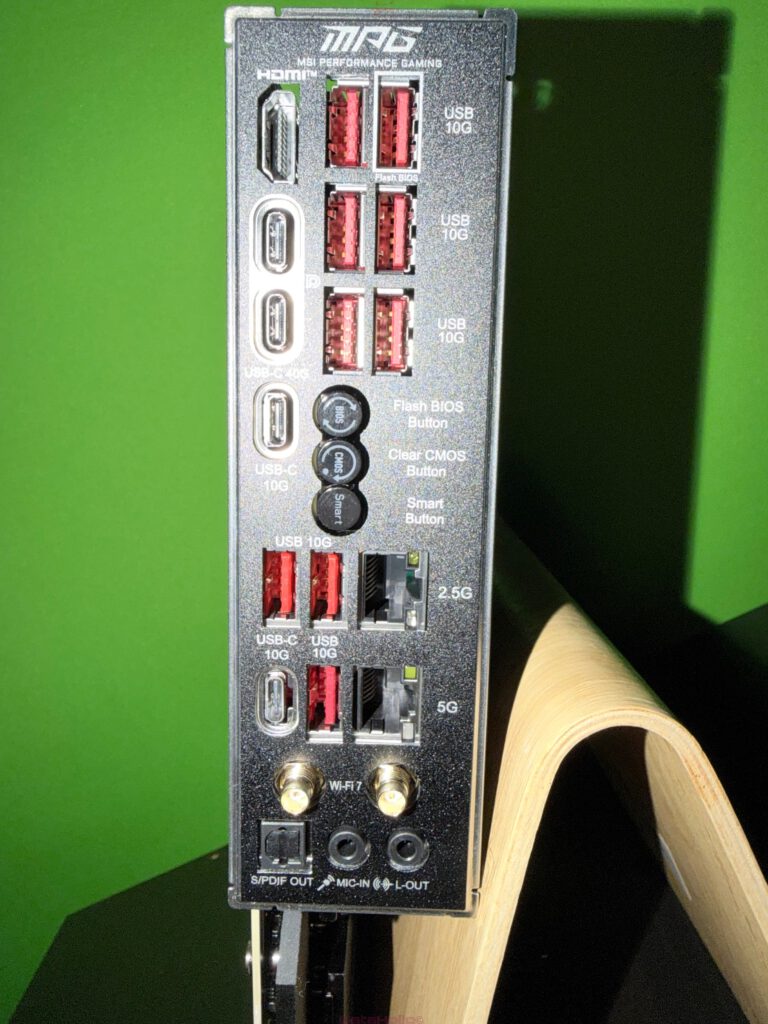
The pre-installed I/O shield is densely populated. A single HDMI port provides output for APUs, but the real highlight is the USB array. Two USB4 ports deliver full 40 Gbps speeds via USB-C. Eight additional 10 Gbps USB 3.2 ports (both Type-A and Type-C) ensure that external SSDs, capture cards, audio interfaces, and other peripherals can all run concurrently without choking the controller.
LAN connectivity is equally ambitious. In addition to the standard 2.5G LAN port, MSI adds a second port capable of 5G speeds. Combined with Wi-Fi 7 and Bluetooth 5.4, the board offers every modern connectivity option available today.
Flash BIOS and Clear CMOS buttons are tucked in neatly beside the USB ports, making recovery and resets painless — no need to fish for tiny jumpers inside the case. Audio is handled via standard jacks and an optical S/PDIF output.
Arthur C. Clarke famously said that any sufficiently advanced technology is indistinguishable from magic. Looking at the sheer amount of data this I/O panel can push simultaneously, the quote fits surprisingly well.
Preparing the Build: From Empty Case to New Platform
Before the X870E Carbon goes into the system, the white ATX case gets a complete reset. Old hardware is removed, dust filters cleaned, PSU cables sorted. This isn’t overkill — it’s the best way to avoid headaches once the heavy components are installed and cable routing becomes tighter.
The power supply remains mounted in the lower chamber. Modular connectors are pre-sorted: one 24-pin main cable, two EPS cables, multiple PCIe leads for the Radeon RX 6800 XT, and SATA lines for drives. Doing this pre-routing saves time later when space around the board is at a premium.
Installing the MSI MPG X870E Carbon WIFI
With the standoffs checked and aligned to the ATX layout, the board is carefully lowered into the case. The integrated I/O shield slides smoothly into the rear cutout with no resistance. Once aligned, the board rests securely on the standoffs. The first screw is placed in the center to anchor it, followed by the rest in a clockwise pattern.
The rigidity of the PCB is immediately noticeable. There’s no flex, no uncomfortable creaking. Every mounting point aligns cleanly.
Next up is the CPU. The AM5 socket mechanism resembles Intel’s LGA approach: the processor drops into place without pressure, guided by the notches, and is locked with the retention arm. Thermal paste is applied, and the AIO waterblock is mounted on top, secured against the backplate. The hoses face the front-upper region of the case, clearing the RAM slots and VRM heatsinks with room to spare — a sure sign of a well-planned component layout.
Integrating the GPU, M.2 Storage, and Cooling
Before installing the GPU, the M.2 slots receive their drives. The tool-free mechanism makes this painless. The primary PCIe 5.0 slot gets the first NVMe drive, clipped securely without any screws. After reattaching the Shield Frozr cover, the thermal pad makes proper contact.
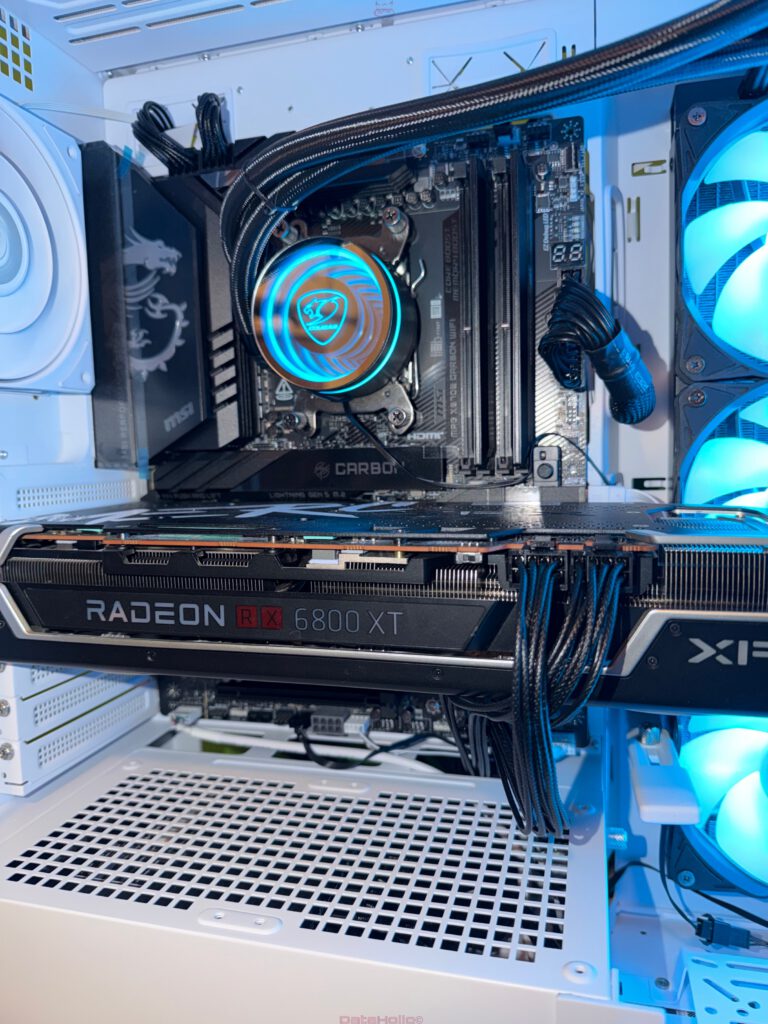
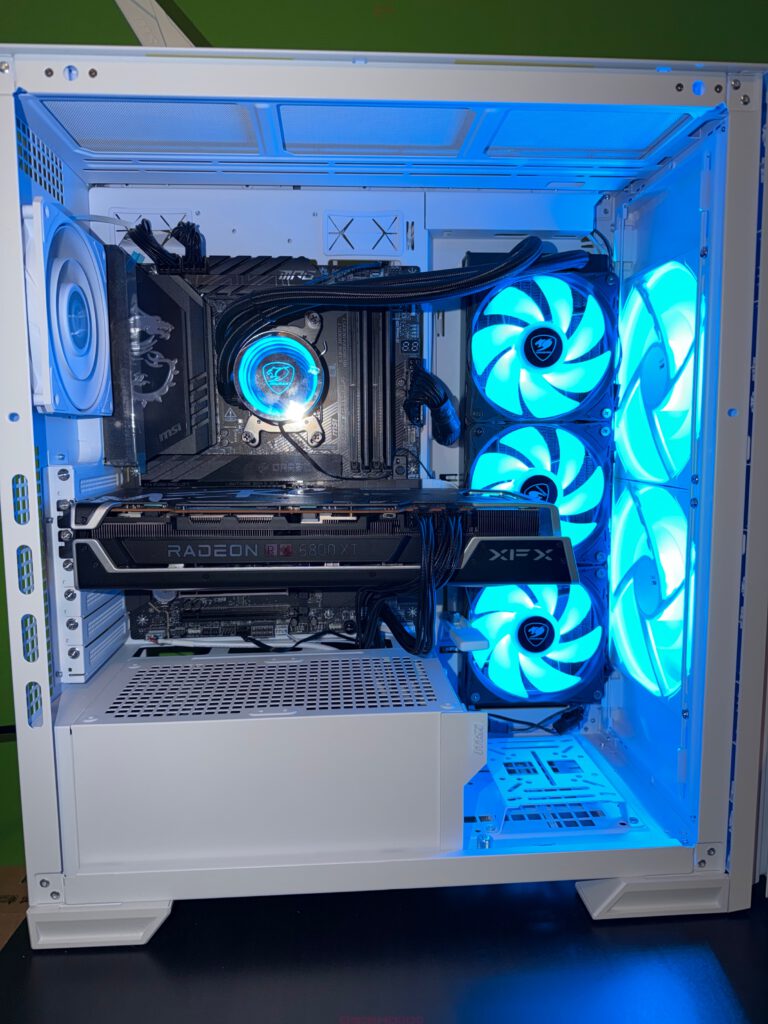
The Radeon RX 6800 XT is then installed into the top PCIe 5.0 x16 slot. Its size and weight are immediately present, but the reinforced metal slot holds it steady. The latch at the end of the slot remains reachable, even with the radiator mounted — something many boards fail at.
Power cables are attached, the card is screwed into place, and the GPU now dominates the lower half of the case while the X870E Carbon’s design still stands out against the white interior.
The AIO radiator is installed in the front or top of the case, depending on configuration. Fans are mounted, airflow is directionally planned, and pump and fan headers are connected to their dedicated spots on the motherboard. MSI placed these headers with intent, making routing straightforward.
Cabling and Final Adjustments
With the core hardware installed, the cabling phase begins. The 24-pin cable connects at the right edge, the two EPS cables at the top. The front-panel connectors are organized using the included adapter, turning a tedious task into a quick plug-in.
USB-C front ports attach to the Gen 2×2 internal header; USB 3.2 front connectors plug in slightly below. Audio runs to the lower-left corner, ideally separated from major power lines to avoid interference. All fan cables are routed behind the motherboard tray and connected to PWM headers.
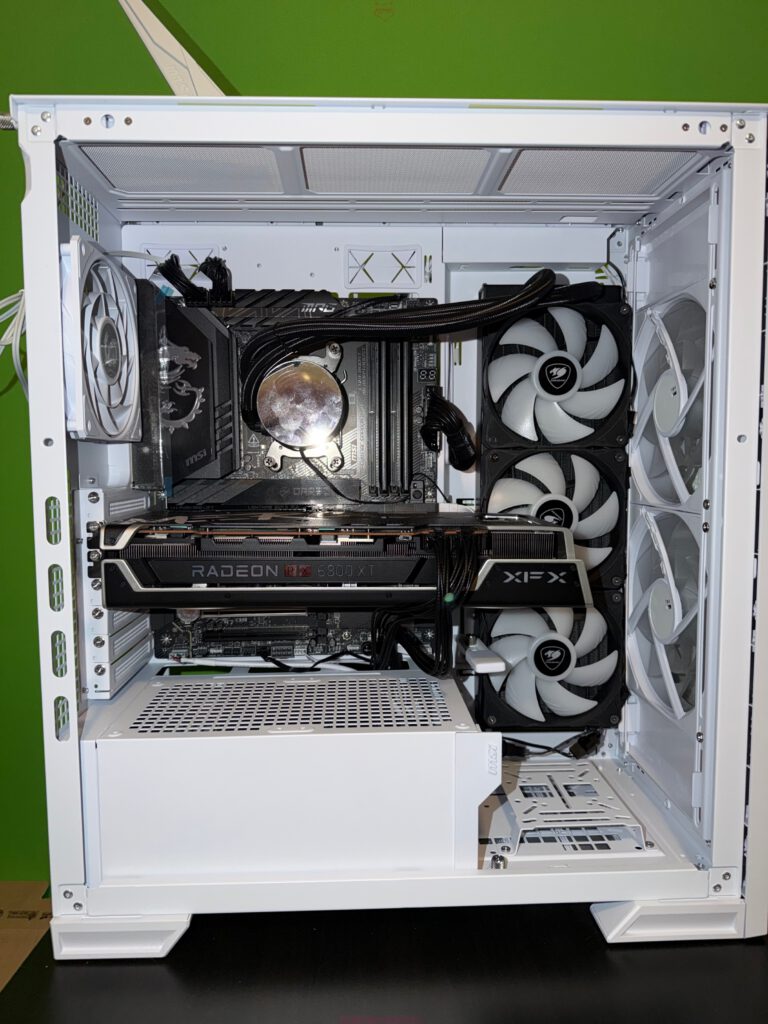
As everything is tied down and routed through the grommets, the interior transforms from a cluster of components into a clean, structured build. The X870E Carbon sits confidently at the center, visually and functionally.
Steve Jobs once said that design isn’t just what something looks like — it’s how it works. This board proves the point. Good motherboard design reveals itself not in the marketing material, but during installation, when every connector, header, and mounting point feels like it was placed exactly where it should be.
First Boot and Hardware Check
With all connections made and the side panel still off, the moment of truth arrives. The power button is pressed, the PSU clicks, fans spin up, the RGB of the AIO comes to life, and the front fans wash the interior in a soft blue glow.
The debug LEDs cycle through their startup routine. The seven-segment display shows the POST sequence. CPU, RAM, and GPU are recognized immediately. No hangs. No boot loops. No forced CMOS reset. The UEFI interface appears within seconds.
This marks the end of the hardware-focused unboxing and installation. The board is unpacked, mounted, powered, cooled, and fully integrated with CPU, RAM, storage, and GPU. It feels balanced, powerful, and ready to take on whatever comes next.
Transparency Notice (as requested, unchanged except for product name)
Transparency Notice in accordance with EU regulations:
The MSI MPG X870E Carbon WIFI featured in this review was provided to us by MSI as a non-binding loan for testing purposes. This is not paid advertising.
MSI had no influence on the content, evaluation, or editorial independence of this article. All opinions expressed are based solely on our own hands-on experience.
We sincerely thank MSI for providing the motherboard and for their trust in dataholic.de.