MSI Click BIOS X & Software Ecosystem – A Deep Dive
- 1) What Is “Click BIOS X”?
- 2) First Boot: EZ Mode Step by Step
- 3) Advanced Mode: The Toolbox
- 4) Overclocking – Between “Auto” and “Too Much”
- 5) Security: fTPM, Secure Boot & U-Key
- 6) Boot Menu: UEFI, Priorities & Beeps
- 7) Profiles, Reset & Updates
- 8) Fan Control & Monitoring
- 9) Windows Side: MSI Center & Drivers
- 10) Storage Tweaks
- 11) Troubleshooting
- 12) Hidden Gems
- 13) Efficiency Tuning
- 14) Security & Maintenance
- 15) Real-World Observations
- 16) Checklist: From “Fresh Boot” to “Smooth System”
- 17) Side Notes
- 18) Why It’s Worth It
- 19) Documentation & Community
- 20) Closing Note (without conclusion)
When you set up a modern AM5 system, you often spend more time in the BIOS than in Windows. And that’s a good thing: a well-configured UEFI is the foundation for stability, performance, and quiet fan curves. This article is only about software and BIOS – no final verdict, no conclusion, just practice.
As our guide, we’ll use the MSI MPG B650 EDGE TI WIFI (MS-7E62) motherboard paired with a Ryzen 9 9900X and 32 GB DDR5-5600 memory, exactly as seen in the screenshots.
Along the way, we’ll include a few remarks, quotes, and – in small doses – a touch of flowery description. As Nathan Myhrvold once quipped: “Software is a gas – it expands to fill its container.” BIOS menus are no different: there’s an option for everything. The real art is knowing which ones matter.
1) What Is “Click BIOS X”?
MSI brands its UEFI interface as Click BIOS X. It runs in two modes:
- EZ Mode – a streamlined overview for the most important switches.
- Advanced Mode (F7) – the full toolbox, with overclocking, security, and boot menus.
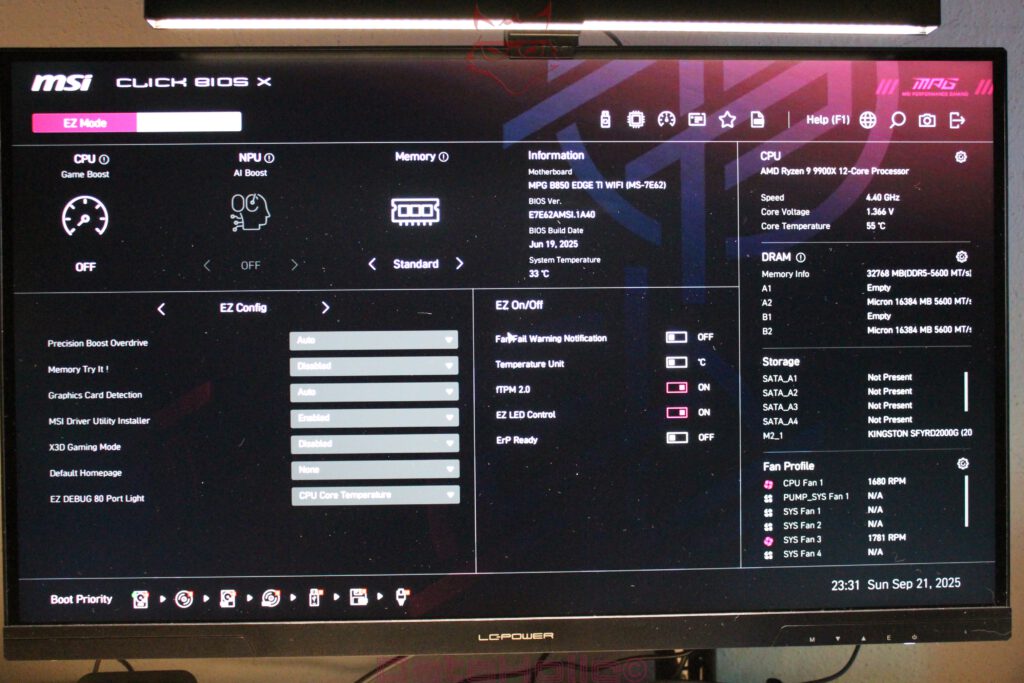
The interface is clean, responsive, and works with both mouse and keyboard. On the right side, an info panel shows critical details at all times: board name, BIOS version (here E7E62AMS.1A40, built June 19, 2025), CPU (Ryzen 9 9900X, idle at 4.40 GHz, around 1.34 V core voltage), DRAM (32 GB at 5600 MT/s), and system temperature (~33 °C in this setup).
A neat touch: the DRAM section lists slot population (A1/A2/B1/B2). In our case, the 16 GB sticks sit in A2 and B2 – exactly as recommended.
2) First Boot: EZ Mode Step by Step
EZ Mode is the natural starting point. It collects the toggles that 90% of users set once – and never touch again.
2.1 Game Boost, NPU Boost & Memory Profiles
- CPU Game Boost: MSI’s one-click overclocking preset. It pushes limits aggressively, increasing voltage and power draw. For daily use, better leave it Off and fine-tune later with PBO/Curve Optimizer (see Overclocking).
- NPU AI Boost: Shows up on Ryzen CPUs with NPUs. It toggles firmware-level AI tweaks. Gains are minimal; it’s optional.
- Memory: Choose Standard, A-XMP, or EXPO. On AM5, EXPO is the right choice for AMD-optimized kits. Our DDR5-5600 modules run perfectly on EXPO.
“He who does not measure, misses.” With RAM, the opposite is true: skip tuning, and you waste performance. Always stress test after enabling EXPO.
2.2 EZ Config Essentials
- Precision Boost Overdrive: Safe on Auto. Fine-tune in Advanced Mode.
- Memory Try It!: MSI’s preset library for DRAM tuning. Useful if EXPO fails.
- Graphics Card Detection: Usually Auto.
- MSI Driver Utility Installer: Enabled to preload drivers during first Windows boot.
- X3D Gaming Mode: Only for Ryzen X3D CPUs; leave Disabled here.
- EZ Debug & LED Control: Diagnostic lights and RGB management – helpful when troubleshooting.
2.3 EZ On/Off
- Fan Fail Warning: On, so you get notified if a fan stalls.
- Temperature Unit: Celsius (℃).
- fTPM 2.0: On, required for Windows 11.
- ErP Ready: Off, unless you want ultra-low standby consumption with wake events disabled.
2.4 Boot Priority
At the bottom of EZ Mode, drag and drop boot icons. Set the Windows Boot Manager (M.2_1: Kingston SFYRD2000G) or your installer USB stick at the top. Saves black screens and wasted minutes.
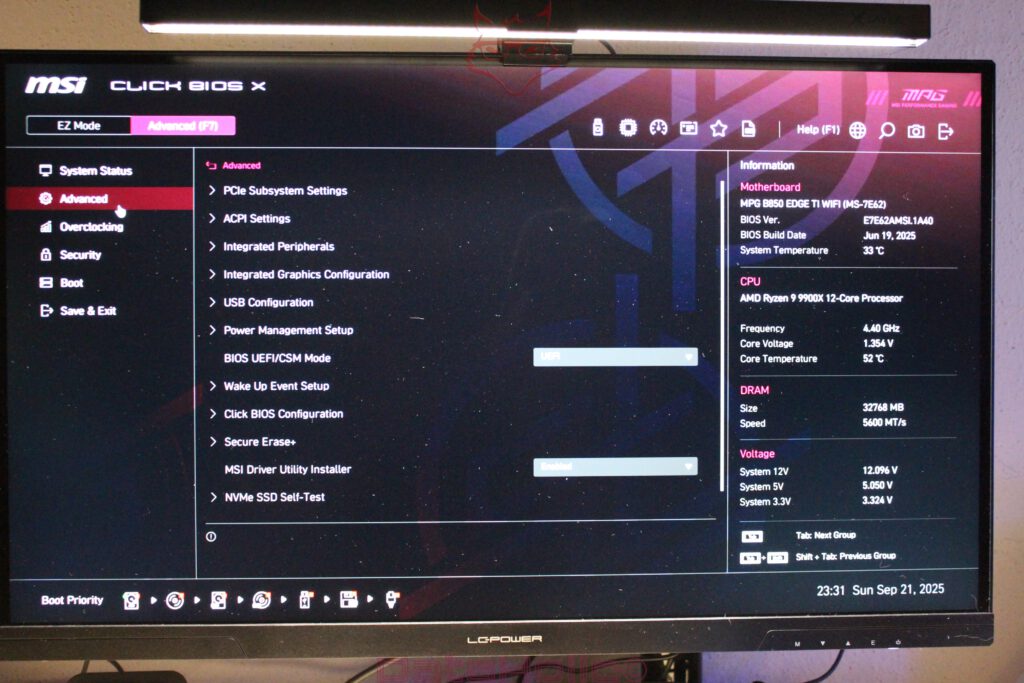
3) Advanced Mode: The Toolbox
Press F7 to open Advanced Mode. Navigation sits on the left, while the info panel remains on the right.
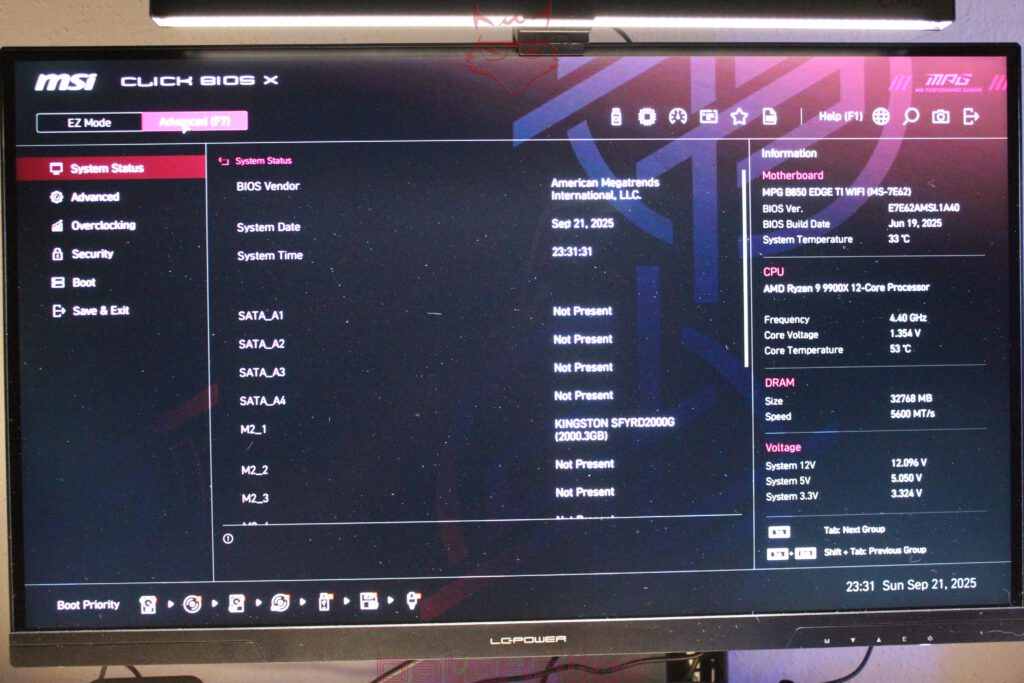
3.1 System Status
This is your hardware inventory: SATA ports, M.2 slots, BIOS vendor (American Megatrends), date, and time. It also confirms NVMe presence and slot location, e.g. M2_1: Kingston SFYRD2000G (2000.3 GB).
3.2 Advanced Settings
- PCIe Subsystem: Control slot speeds (Gen3/4/5), Resize-BAR, ASPM. Default Auto is fine.
- ACPI Settings: Power states (S3/S4/S5), wake events.
- Integrated Peripherals: LAN, WiFi, audio, SATA controllers – disable unused devices.
- Integrated Graphics: iGPU tweaks for APUs; irrelevant on Ryzen 9 9900X.
- USB Configuration: Legacy support, BIOS flashing, troubleshooting toggles.
- Power Management: Restore on AC power loss, CPU C-states.
- BIOS UEFI/CSM Mode: Stick with UEFI; use CSM only for legacy OS or hardware.
- Wake Events: WoL, RTC alarm.
- NVMe SSD Self-Test: Handy built-in diagnostic.
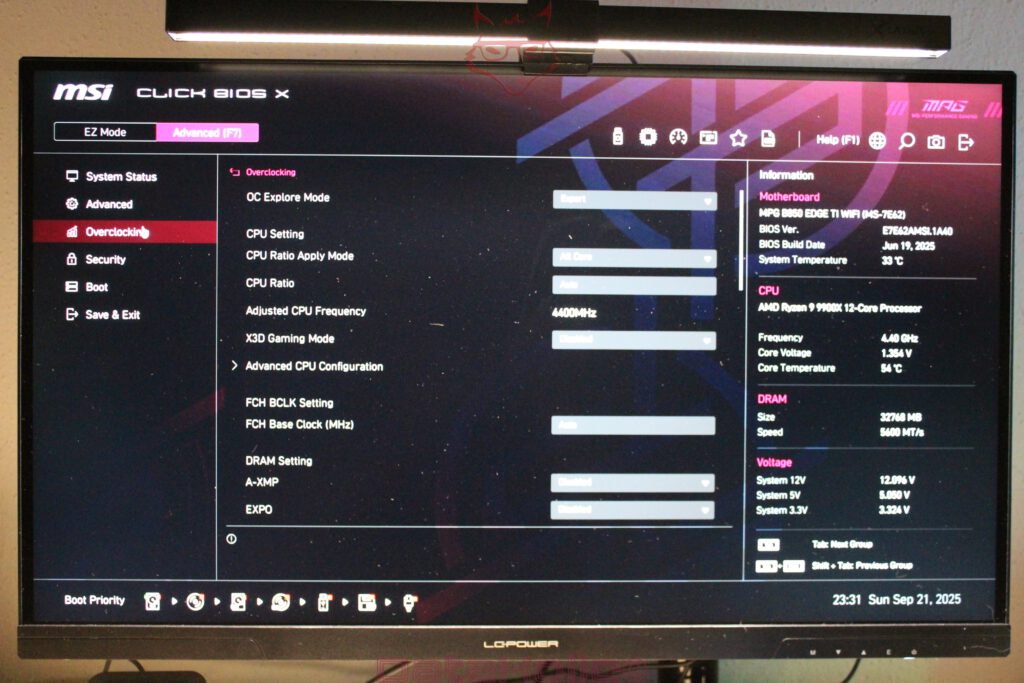
4) Overclocking – Between “Auto” and “Too Much”
The Overclocking tab houses all performance tweaks. With OC Explore Mode: Expert, every option is visible. The goal is stable, efficient performance – not bragging rights.
Donald Knuth once said: “Premature optimization is the root of all evil.” The same holds true: first aim for stability, then tweak.
4.1 CPU: PBO & Curve Optimizer
AMD’s boost is smart. The sweet spot is light PBO tuning plus Curve Optimizer:
- Precision Boost Overdrive:
- Enable and raise limits moderately. For air coolers, PPT ~142 W, TDC ~110 A, EDC ~170 A work well.
- Or let the motherboard decide with Motherboard limits.
- Curve Optimizer:
- Negative offsets, either per-core or globally. Try –10 to –20 to start.
- Stress test thoroughly (OCCT, Cinebench, gaming).
- Scalar: Leave on Auto. High values just allow higher voltages.
- Thermal Limit: Lowering to ~90 °C keeps noise down. Default 95 °C is fine but warm.
4.2 Base Clock & Ratio
- FCH Base Clock (BCLK): Keep at 100 MHz. Overclocking here destabilizes PCIe and DRAM.
- CPU Ratio: AMD’s auto-boosting is smarter than manual all-core locks. Only adjust if you want fixed frequency for special workloads.
4.3 Memory: EXPO, A-XMP, and “Memory Try It!”
- EXPO: Always the first choice on AM5.
- A-XMP: Generic fallback; unnecessary if EXPO exists.
- Memory Try It!: Useful for custom timings or if EXPO fails. Start conservative, tweak later.
4.4 Voltages
Clear labels for Core, SoC, DRAM voltages. Leave on Auto unless undervolting or troubleshooting. The golden rule: as low as possible, as high as necessary.
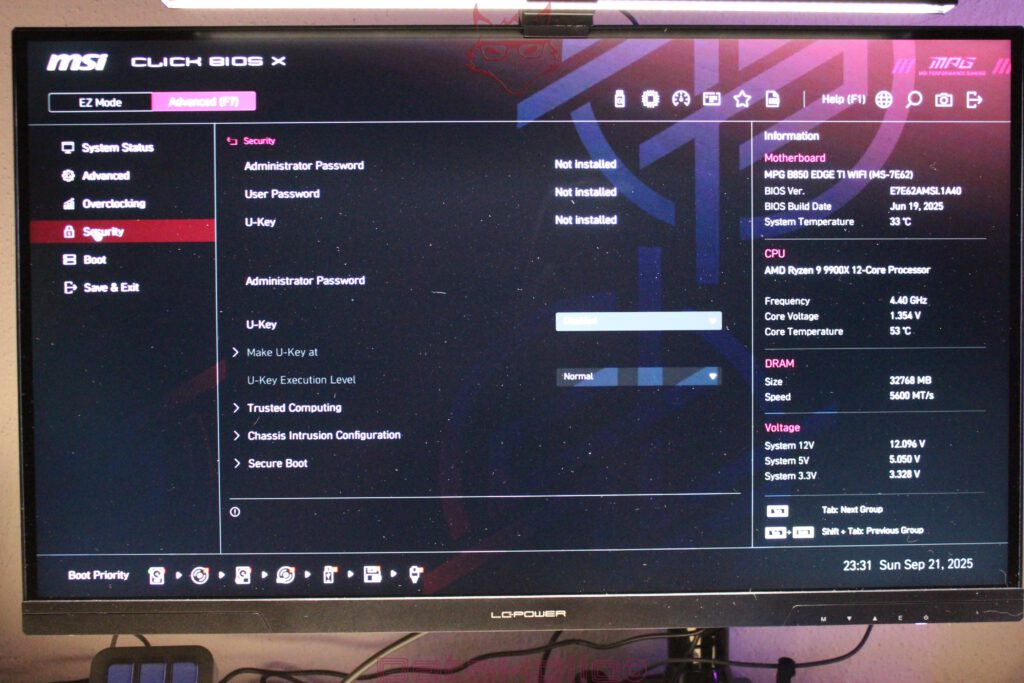
5) Security: fTPM, Secure Boot & U-Key
Key for Windows 11 compliance:
- fTPM 2.0: Enabled.
- Secure Boot: Load default keys, set to Enabled.
- Chassis Intrusion: Optional alarm if your case supports it.
- U-Key: Bind BIOS access to a USB stick – a physical lock.
Admin and User passwords can be set separately. Keep recovery methods ready in case of lockouts.
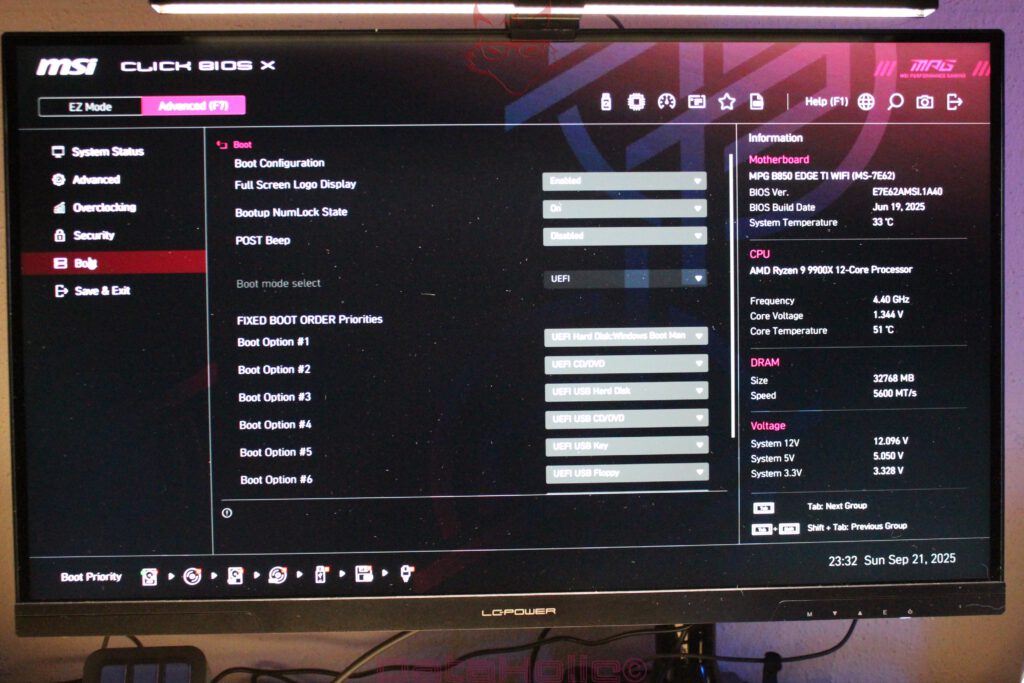
6) Boot Menu: UEFI, Priorities & Beeps
Under Boot:
- Full Screen Logo: Cosmetic.
- NumLock State: On by default.
- POST Beep: Optional but helpful – one short beep confirms success.
- Boot Mode: UEFI preferred.
- Boot Order: Prioritize Windows Boot Manager.
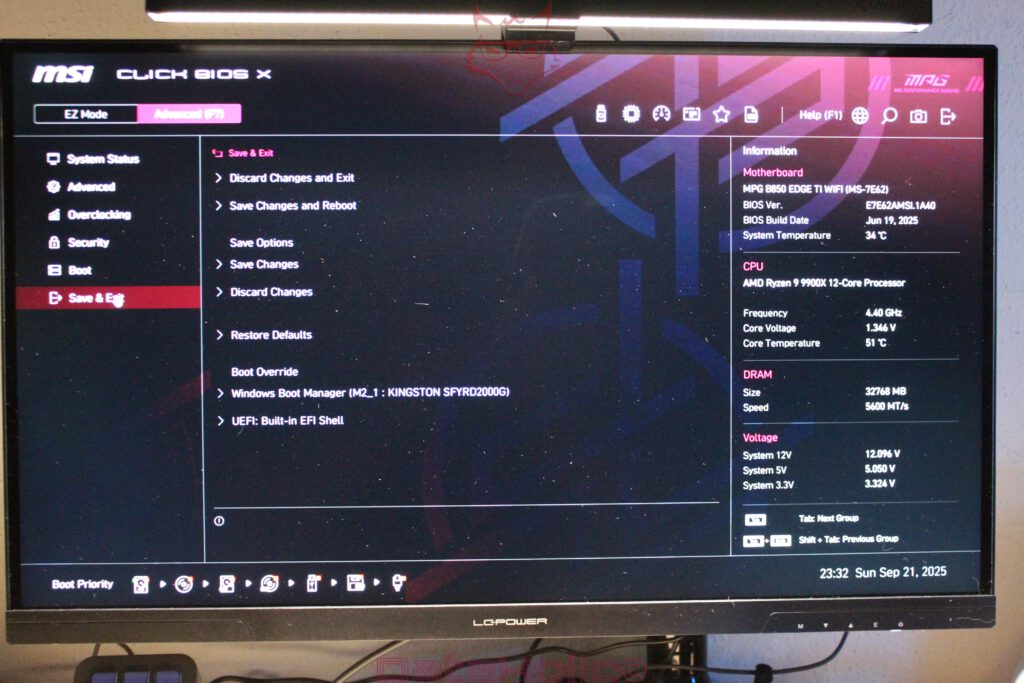
Save & Exit also offers Boot Override: one-time boot from a chosen device – ideal for installs or BIOS updates.
7) Profiles, Reset & Updates
7.1 Save Profiles
Save multiple setups: “Stock-Secure” (default + EXPO), “PBO-Curve”, “Troubleshoot” (safe defaults).
7.2 Restore Defaults
For failures: Restore Defaults. For boot loops: perform a CMOS reset. Debug LEDs on the board (CPU, DRAM, VGA, Boot) guide troubleshooting.
7.3 BIOS Update
- M-FLASH inside BIOS.
- BIOS Flashback (if available): update without CPU/RAM.
Always load defaults before and after flashing to avoid conflicts.
8) Fan Control & Monitoring
MSI’s Hardware Monitor is excellent:
- Detects PWM/DC per header.
- Curve editor with multiple points and hysteresis.
- Choose sources: CPU, system, VRM, even GPU (via software).
Typical setup:
- CPU fan: gentle ramp to 75% by ~90 °C.
- Case fans: based on VRM/system temp, rising slowly.
“The best cooling is the one you don’t notice.”
9) Windows Side: MSI Center & Drivers
BIOS is half the story. In Windows, MSI bundles MSI Center:
- Live Update: grabs drivers (but do BIOS updates manually).
- LAN Manager: prioritizes game traffic.
- Mystic Light: RGB control. Or switch it off in BIOS.
- User Scenario: power/fan profiles – less granular than BIOS.
- System Diagnosis: logs, S.M.A.R.T., RAM checks.
The MSI Driver Utility Installer, enabled in BIOS, ensures baseline drivers at first boot. Still, manual installation from MSI’s site is cleaner.
10) Storage Tweaks
- NVMe Self-Test: Quick health check.
- Disable unused SATA ports: reduces boot time.
- Fast Boot + Memory Context Restore: cuts warm boot times significantly.
Cold boots on AM5 remain slower due to DDR5 training – the price for speed.
11) Troubleshooting
EXPO won’t boot
- Use A2/B2 slots.
- Try looser timings with Memory Try It!.
- Stay conservative with SoC voltage.
- Update BIOS for AGESA improvements.
Black Screen after PBO/CO
- Clear CMOS.
- Reapply Curve Optimizer in smaller steps.
Secure Boot issues with dual boot
- Use Custom Mode, load Linux-signed keys.
Fans too loud at idle
- Use system temp as control source.
- Add hysteresis to avoid fan hunting.
- Check Windows tasks spiking temps.
12) Hidden Gems
- POST Beep: Old-school, but useful.
- EFI Shell: launch scripts without OS.
- Board Explorer: visual slot map.
- Favorites (F4): collect most-used options.
- Help (F1): built-in explanations.
13) Efficiency Tuning
For performance per watt:
- Curve Optimizer Undervolting: –10 to –20 per core often saves ~100 mV.
- Limit PPT/TDC/EDC: emulate Eco Mode (~120 W PPT).
- Fan curves: slow ramps, long hysteresis.
Think of it this way: a well-tuned BIOS is like a fine-tuned watch – precise, quiet, and always reliable.
14) Security & Maintenance
- Separate Admin/User passwords.
- Keep a backup USB stick with stable BIOS.
- Don’t rush into updates – read changelogs first.
- Document settings with screenshots for future reference.
15) Real-World Observations
From the screenshots:
- Core Voltage ~1.34–1.36 V, CPU Temp ~50–55 °C idle – normal in BIOS.
- Memory recognized as 32 GB DDR5-5600, slots A2/B2 populated.
- Storage: Kingston NVMe in M2_1, correctly listed as boot device.
- BIOS Build: June 19, 2025 – fairly recent.
- ErP Ready disabled, so USB wake and RGB remain functional when off.
16) Checklist: From “Fresh Boot” to “Smooth System”
- Update BIOS.
- Load defaults, set date/time.
- Enable EXPO.
- Turn on Secure Boot.
- Ensure fTPM is active.
- Adjust boot order.
- Create fan curves.
- Tune PBO/CO carefully.
- Disable unused devices.
- Save multiple profiles.
17) Side Notes
- Quote: “Make things as simple as possible, but not simpler.” – Einstein. Perfect advice for BIOS settings.
- Observation: Most AM5 instability comes from RAM. Looser timings often help more than higher voltage.
- NPU Boost: Interesting, but not yet critical. Drivers matter more.
18) Why It’s Worth It
A carefully set UEFI isn’t “overclocking luxury,” it’s system hygiene. It reduces power draw, ensures security compliance, and keeps noise low.
Or poetically: A tuned BIOS is a silent partner. It doesn’t demand attention – it frees it.
19) Documentation & Community
MSI provides manuals, release notes, and forums. Best practice:
- Screenshot every change.
- Read changelogs before updating.
- Avoid importing old profiles blindly.
- Run quick stability tests after changes.
20) Closing Note (without conclusion)
We’ve mapped out how Click BIOS X on the MPG B650 EDGE TI WIFI works: EZ Mode for quick setup, Advanced Mode for detailed tuning, and software in Windows to complement it.
If you get stuck, remember two rules:
- Change only one thing at a time.
- Document everything.
And keep in mind: a PC is an instrument. It should be tuned – not tortured.
Transparency Note (EU Regulation):
The MSI MPG B650 EDGE TI WIFI used in this review was provided to us by MSI as a temporary loan for testing purposes. This is not paid promotion.
MSI had no influence on the content, evaluation, or editorial independence of this article. All opinions are based solely on our own practical experience.
We sincerely thank MSI for providing the monitor and for their trust in dataholic.de.