MAG X870E Tomahawk WIFI (PZ): BIOS and Software as the Control Center
For the MAG X870E Tomahawk WIFI and its sibling, the MAG X870E Tomahawk MAX WIFI PZ, everyday usability is determined not only by PCB layout and hardware design but especially by firmware and software. Modern AM5 motherboards are essentially specialized computers within the computer: they regulate voltages, manage CPU and memory behavior, control fans, and interact with the NPU, graphics card, and SSDs.
MSI relies on two pillars: the redesigned Click BIOS X and the Windows application MSI Center, which covers AI features, monitoring, fan control, and updates. Both are functionally identical on both boards, whether it’s the classic or the Project Zero version—the differences are mostly practical, relating to cable routing rather than software.
To quote Arthur C. Clarke: “Any sufficiently advanced technology is indistinguishable from magic.” Ideally, though, this “magic” should feel unspectacular in day-to-day use. It should just work. That’s exactly what we take a closer look at here.
Click BIOS X – Layout and Structure
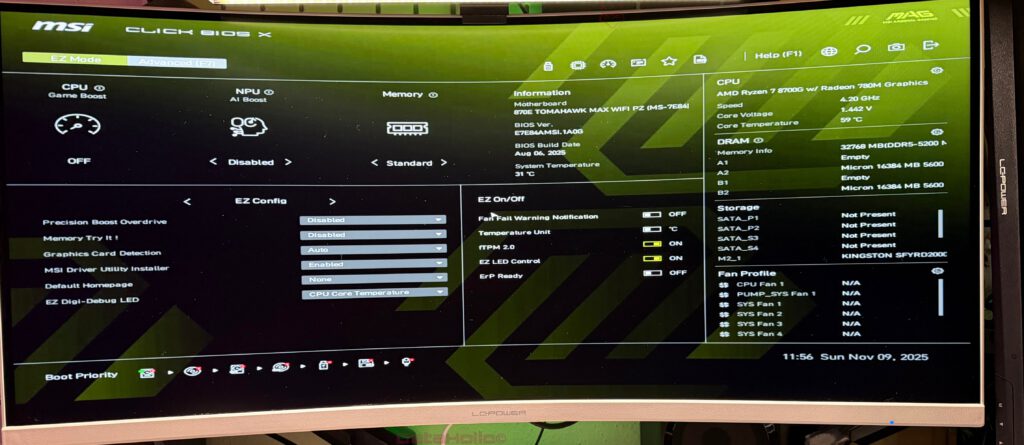
MSI’s Click BIOS X is the main control center from the moment you press Delete during boot. The interface follows the MAG design language: a dark background, green accents, and a clear visual layout. The BIOS version on the MAG X870E Tomahawk MAX WIFI PZ demonstrates this vividly, as shown in the screenshots from our test system running a Ryzen 7 8700G with DDR5-5200.
By default, the BIOS launches in EZ Mode. Across the top is a status bar showing key information such as temperature, BIOS version, date and time, as well as shortcuts for M-Flash (BIOS update), favorites, screenshot functionality, search, and PBO toggle. MSI has cleaned this area up significantly—the idea is straightforward: frequently used options should be no more than two clicks away.
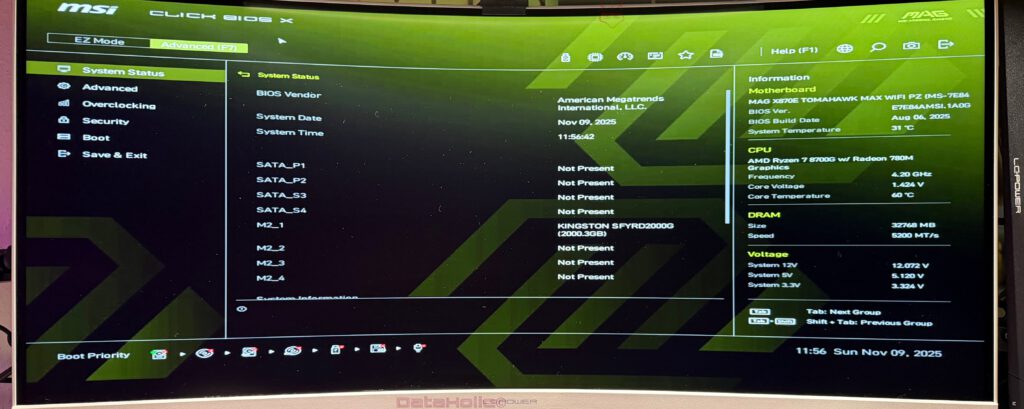
Pressing F7 switches to Advanced Mode. On the left appears the classic navigation column with items like System Status, Advanced, Overclocking, Security, Boot, and Save & Exit. On the right, the info panel persistently shows live values for the motherboard, CPU, RAM, voltages, and temperatures—one of the more useful UI choices, saving time across all menus.
EZ Mode: Quick Setup Without a Manual
EZ Mode is designed for the initial boot: the system powers on, Windows isn’t installed yet, and you want to configure the essentials quickly.
CPU Game Boost and NPU AI Boost
Front and center are two large toggles: CPU Game Boost and NPU AI Boost.
Game Boost enables a preconfigured performance profile for the CPU that adjusts voltage and power limits within AMD’s allowed specifications—without diving into offsets or curve optimization. This is especially interesting for high-core-count chips or X3D models when you want “a bit more speed” with minimal effort.
NPU AI Boost ties into the integrated NPU on current Ryzen processors. It raises NPU power limits slightly and activates optimized presets that can be accessed via MSI Center or compatible applications—useful for video upscaling, AI filters, or local language models. It’s not essential, but it’s a clear signal that accelerators are no longer exclusive to GPUs.
The takeaway: these presets don’t replace full manual tuning, but they lower the entry barrier enough that even beginners can comfortably experiment.
Memory Profiles, PBO, and Quick Tools
The lower part of EZ Mode includes important performance options:
- Precision Boost Overdrive, toggled directly without navigating to hidden AMD menus.
- Memory Try It!, a collection of validated memory presets that go beyond EXPO/XMP. Instead of adjusting timings and voltage manually, you can pick something like a Hynix-based preset and let the board do the work.
You’ll also find tools like Graphics Card Detection, Default Homepage, and EZ Digi-Debug LED, which defines how the debug LEDs behave. These are small touches that greatly help during troubleshooting or new system builds.
MSI clearly treats the BIOS not only as a tuning interface but as a diagnostic hub. Anyone who has stood in a dark room at midnight with a system refusing to POST knows how valuable a well-designed LED system can be.
fTPM 2.0, LED Control, Energy Options
On the right side of EZ Mode is EZ On/Off, giving quick access to:
- fTPM 2.0
- EZ LED Control
- ErP Ready
fTPM 2.0 is required for Windows 11 installations, though it’s nice to have it quickly accessible for users who dual-boot or troubleshoot. ErP Ready reduces standby power consumption by disabling certain USB power lines and wake functions—insignificant per day, significant over years.
These are “set once and forget” features, but having them visible encourages awareness around security and efficiency.
Boot Order and Info Panel
The graphical Boot Priority bar at the bottom allows drag-and-drop reorganizing of boot devices—far more intuitive than scrolling through long UEFI lists with confusing names.
To the right remains the persistent info panel, showing temperatures, BIOS data, CPU details, RAM configuration, and fan status. Especially when tuning RAM or testing BIOS builds, this reduces guesswork considerably.
Advanced Mode: Deep Controls for Enthusiasts
Pressing F7 opens Advanced Mode, the place for users who want full control over the system’s internals.
System Status: Hardware Inventory
System Status offers a structured view of what the system detects: populated M.2 slots, SATA ports, RAM channels, BIOS vendor, and build date. In our screenshots, for example, only the Kingston SSD in M2_1 is recognized while other slots correctly show “Not Present.”
This overview is extremely helpful for complex builds with multiple drives or hot-swap enclosures. It is often the first place to check if a loose cable or lane conflict is causing trouble.
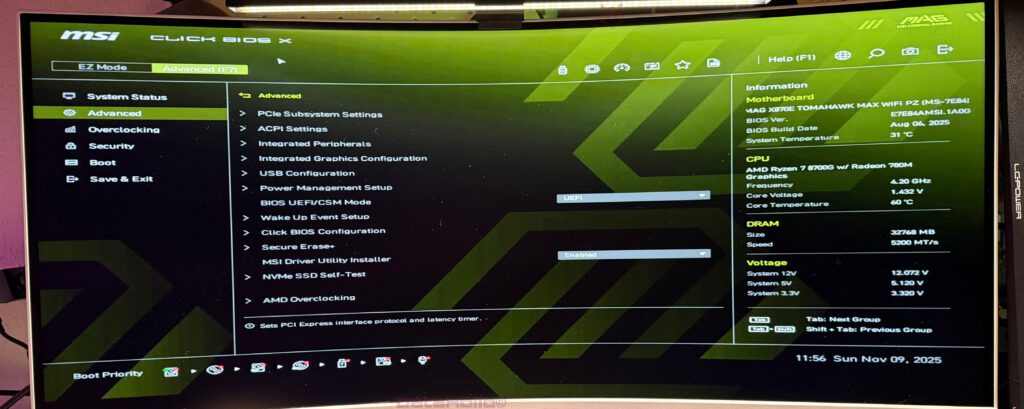
Advanced: Onboard Devices and Interfaces
The Advanced menu covers platform-wide settings: PCIe subsystem, ACPI behavior, onboard peripherals (LAN, audio, USB), NVMe configuration, power management, and more.
Here you enable or disable unused SATA ports, force PCIe Gen modes, configure the iGPU output, define system behavior after power loss, or adjust virtualization-related ACPI/IOMMU features.
Additionally, MSI includes configuration entries for its EZ-DIY features (EZ PCIe Release, M.2 Shield Frozr handling), offering deeper insight and control.
Overclocking: From Presets to Microscopic Tweaks
The Overclocking section contains all tuning options: CPU multipliers, voltages, SoC voltage, EXPO profiles, Memory Try It! presets, and advanced memory timings.
MSI arranges these logically—CPU frequency and voltage, memory configuration, controller voltage, plus chipset-specific enhancements such as Latency Killer or High-Efficiency Mode.
Beyond this, AMD-specific menus (AMD Overclocking, AMD CBS) open access to deep technical features like CCD topology, cTDP, AVX offsets, and more. Casual users don’t need these; enthusiasts will appreciate them.
Security: U-Key, fTPM, Secure Boot
Here you configure administrator and user passwords, USB-based U-Key access control, fTPM behavior, Trusted Computing settings, and Secure Boot.
Depending on your setup, this can range from minimal security for testing to hardened workstation configurations that only accept signed bootloaders.
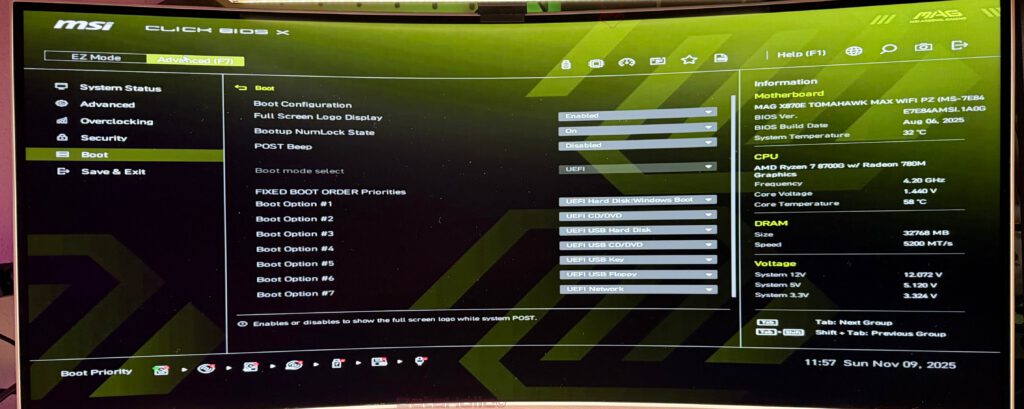
Boot and Save & Exit
Boot controls all boot-related behavior: POST behavior, full-screen logo, NumLock state, boot order logic, and fallback options.
Save & Exit includes profile management, restoring defaults, and one-time boot overrides—useful when you need to boot from a USB drive without reordering the entire boot list.
Fan, Temperature, and Voltage Monitoring
Click BIOS X includes an extensive hardware monitor with full fan curve control. Each fan header can be mapped to different temperature sensors (CPU, motherboard, GPU, sometimes VRM or M.2 depending on the board), with detailed curve shaping and hysteresis options.
This allows setups where case fans follow GPU temperature while the CPU cooler reacts independently to CPU load—ideal for systems where the GPU dumps the majority of heat into the chassis. Monitoring M.2 drive temperatures is also increasingly important on multi-slot AM5 boards.
A good fan curve is the difference between “constantly audible” and “quiet with occasional load spikes,” and MSI gives you the tools to achieve that.

MSI Driver Utility Installer and BIOS Integration
A distinct MSI feature is the MSI Driver Utility Installer, accessible directly from the BIOS. When enabled, it automates driver installation after a fresh Windows setup: chipset, LAN, audio, and more.
It can also serve as a transition point into MSI Center. MSI’s documentation explains how to enable it, run it once, and disable it afterward if preferred.
For users who frequently reinstall Windows or assemble multiple systems, this saves considerable time. For users who want full manual control, it can be turned off just as easily.
MSI Center: Windows Control Hub
Once Windows is installed, MSI Center takes over. It unifies monitoring, tuning, RGB control, fan management, and updates. Both motherboards use the exact same software stack.
The home screen displays system metrics—temperatures, fan speeds, clocks, utilization—and offers User Scenarios such as Silent, Balanced, or Extreme Performance. These profiles adjust CPU behavior, power budgets, fan curves, and sometimes NPU settings.
AI Engine and NPU Integration
The AI Engine dynamically adapts fan profiles, power settings, and system responsiveness based on workload. When combined with CPUs that include an NPU, MSI Center can prioritize accelerated AI workloads—useful for AI noise reduction, upscaling, or processing pipelines.
This isn’t meant to replace manual tuning entirely, but it removes much of the tedious fine-tuning required to balance noise and performance.
Fan Controls in Windows
All fan headers can be configured directly inside MSI Center. This allows live adjustment, immediate acoustic feedback, and the ability to save presets. Changes can be written back into UEFI so profiles persist even without Windows.
Mystic Light, Game Assistant & More
Mystic Light handles all RGB control—motherboard LEDs, connected ARGB headers, and compatible components. For clean Project Zero builds, consistent lighting is often part of the overall aesthetic.
Game Assistant overlays system information in games and allows quick adjustments to system behavior without exiting your current session. Live Update covers driver updates and occasionally BIOS update prompts (though BIOS updates should ideally still be done manually through M-Flash).
Difference Between PZ and Non-PZ: Project Zero in Real Use
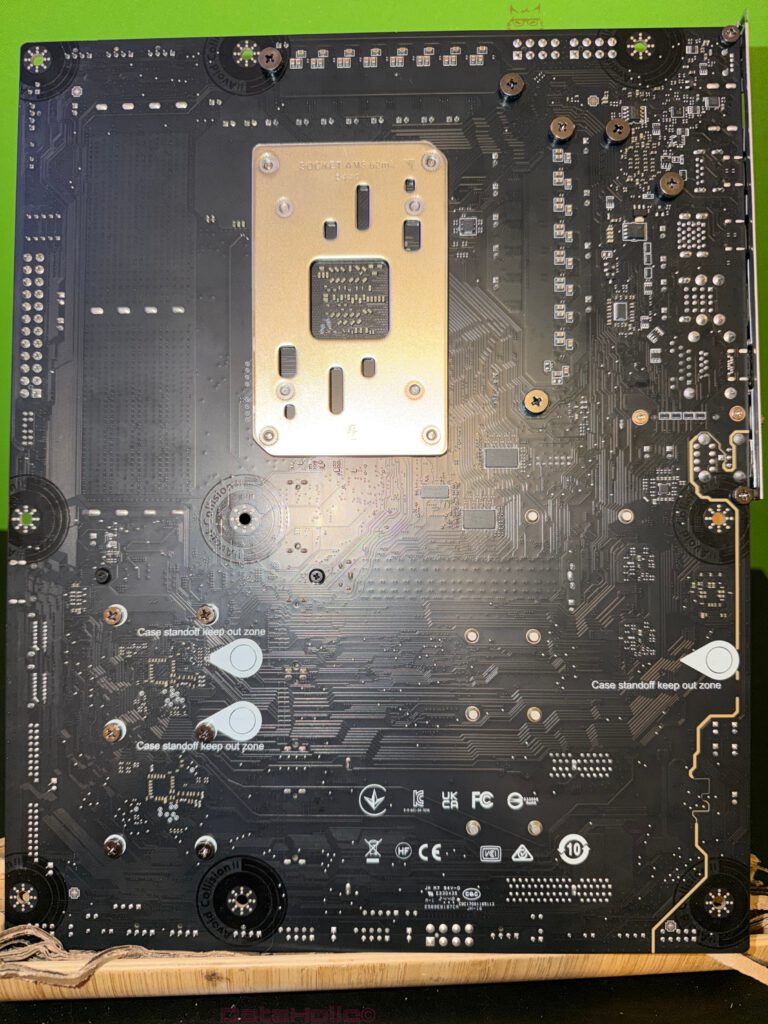
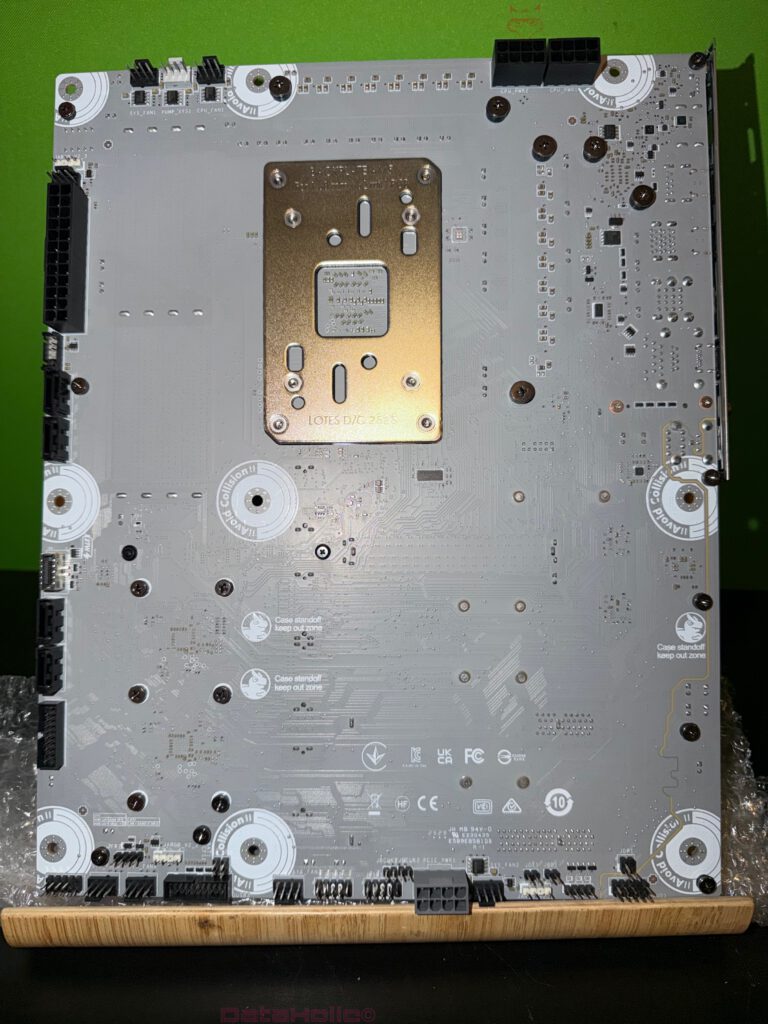
The most visible difference between the MAG X870E Tomahawk WIFI and MAG X870E Tomahawk MAX WIFI PZ is the Project Zero layout. On the PZ model, nearly all connectors—ATX power, EPS, front USB, SATA, fan headers, and I/O headers—are moved to the back of the PCB. The goal: extremely clean front-facing cable management and simplified routing in compatible cases.
From a software perspective, nothing changes. Both versions run the same Click BIOS X, the same AMD features, and the same MSI Center interface.
However, the effects are noticeable indirectly:
- With cables routed behind the motherboard tray, airflow improves—especially around M.2 slots and the GPU.
- Cleaner cable separation can make it easier to identify fan headers and ARGB lines in MSI Center.
- Fan profiles can often be less aggressive due to cleaner airflow.
In other words: Project Zero doesn’t change the software, but it improves the environment in which the software’s tuning features operate.
Real-World Impressions: Everyday Use
In everyday use, Click BIOS X and MSI Center work together seamlessly:
- On first boot, you set EXPO, enable PBO if desired, configure fTPM, adjust boot priority, and you’re ready in minutes.
- Once in Windows, MSI Center handles system profiles, fan curves, RGB, and monitoring.
- Advanced tuning remains just a keystroke away in BIOS, without overwhelming users who simply want a stable system.
Or to paraphrase a quote often attributed to Steve Jobs: “Simplicity is the ultimate sophistication.” MSI succeeds by showing complexity only when it’s actually needed.
Transparency Notice
Transparency notice according to EU regulations:
The MSI MAG X870E Tomahawk WIFI and MSI MAG X870E Tomahawk MAX WIFI PZ motherboards featured in this review were provided to us by MSI as non-binding loan units for testing purposes. This does not constitute paid promotion.
MSI had no influence on the content, evaluation, or editorial independence of this review. All opinions are based solely on our own hands-on experience.
We sincerely thank MSI for providing the motherboards and for their trust in dataholic.de.
If you want, I can also format the text specifically for WordPress (with H2/H3 tags, spacing, or SEO-optimized structure).