Software & OSD of the MSI MPG 272URX QD-OLED: A Complete Guide
- Navigation Logic: The Fastest Way Through the OSD
- G.I. – Gaming Intelligence: Assistants and Automation
- Gaming Modes: Presets and Adaptive Helpers
- Professional Modes: Color Management for Work and Creativity
- Image: Fine Control over Visual Parameters
- Input Source: Sources & Auto Scan
- PIP/PBP: Two Worlds on One Panel
- Navi Key: The Difference Between Frustration and Flow
- Settings: Language, OSD, LEDs, CEC & On-Screen Info
- MSI OLED Care: Protection Against Burn-In – Used the Right Way
- Windows & macOS: Seamless Integration
- Consoles & CEC: PS5/Xbox Integration
- Workflow Examples: Configure Like a Pro
- Troubleshooting: When Things Misbehave
- Documentation & Firmware: Staying Organized
- Small but Important Convenience Toggles
- Best-Of Shortcuts: Three Everyday Winners
- Safety, Responsibility, and Fair Play
- Checklist: From Zero to “Works” in 5 Minutes
- Mini Glossary
- Closing Word on Software Philosophy
“The details are not the details; they make the design.” – Charles Eames
This article focuses exclusively on the software side of the MSI MPG 272URX QD-OLED: the On-Screen Display (OSD), the Gaming Intelligence features (G.I.), OLED protection routines, signal and KVM management, presets for gaming and professional work, image parameters, and the smart integration with Windows/macOS.
The goal is not just to describe the OSD, but to explain why certain menus exist, when each option makes sense, and how to achieve great results quickly in real-world use.
No hardware discussion, no unboxing, no conclusion – just software, step by step.
For orientation: at the top of the OSD, status info is displayed such as 3840×2160 @ 240 Hz, Game Mode: Premium Color, HDR: OFF/ON, Adaptive-Sync: ON/OFF, and the active Type-C port. On the right edge, the contextual sidebar contains Enter, Move, and Exit.
At the bottom right, many units show their firmware version (e.g. FW.018). These small hints are gold when documenting or replicating settings.
Navigation Logic: The Fastest Way Through the OSD
The OSD of the 272URX is organized into main categories listed on the left:
- G.I. (Gaming Intelligence)
- Gaming
- Professional
- Image
- Input Source
- PIP/PBP
- Navi Key
- Settings
- MSI OLED Care
The 5-way joystick (Navi button) opens the menu, confirms selections, and allows diagonal scrolling.
If you switch settings often, you should map Navi Key shortcuts to your most-used items (for example, right → Game Mode, up → Brightness).
“Less, but better.” – Dieter Rams
In that sense, it’s worth setting the shortcuts so you don’t have to dig through seven menus every time Windows switches to SDR or you need to toggle from “Office” to “FPS”.
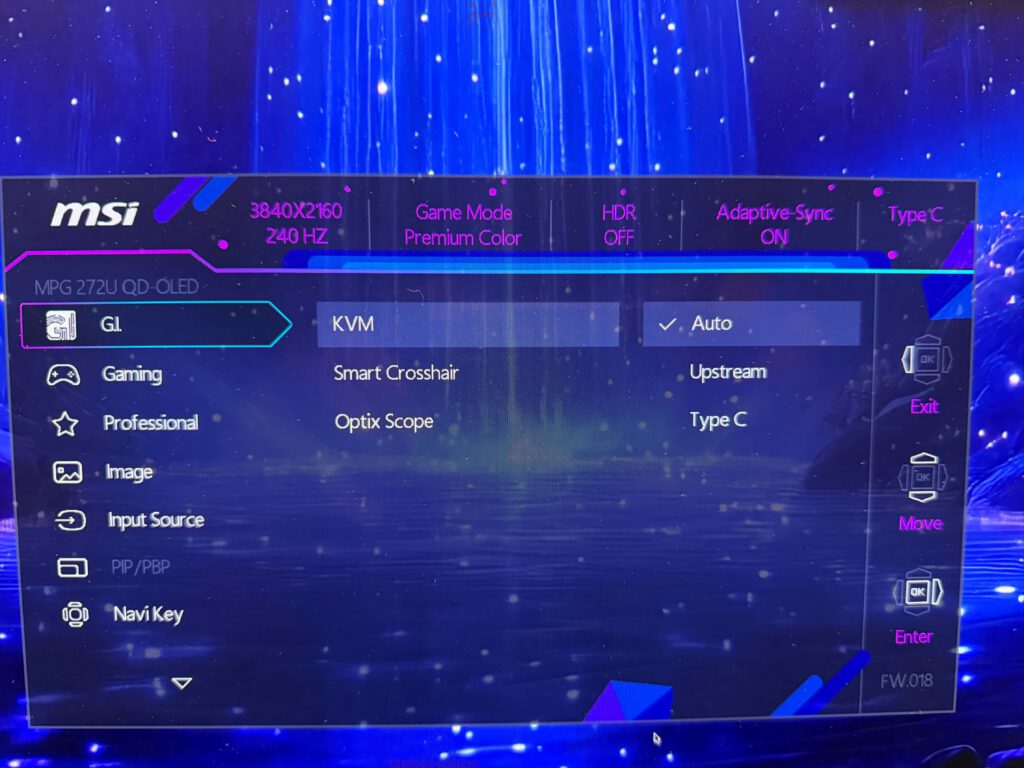
G.I. – Gaming Intelligence: Assistants and Automation
The G.I. (Gaming Intelligence) category houses the smart comfort functions, software logic, and the KVM switch.
KVM: One Set of Peripherals, Two (or More) Systems
What it is: The integrated KVM switch lets you toggle keyboard and mouse between two sources – perfect for a notebook + desktop combo or separate work and gaming PCs.
In the OSD you’ll find:
- KVM: Auto (or manual)
- Upstream: Selects the upstream port (typically Type-C)
- Type C: Manages the signal and USB routing
Practical setup (quick steps):
- Connect your notebook via Type-C (USB-C with DP Alt Mode).
- Connect the desktop via DisplayPort/HDMI and (if available) the USB-B upstream cable to the desktop – or plug mouse/keyboard directly into the monitor’s USB-A ports.
- In the OSD under G.I. → KVM → Auto, enable Auto mode.
- Switch the Input Source to your active video source – the USB peripherals will follow automatically.
Tip: If you switch sources frequently, map Input Source to a Navi Key direction. KVM switching will follow automatically.
“Convenience is not an accident; it is designed.” – from the UX world
Smart Crosshair & Optix Scope
- Smart Crosshair: Displays a centered reticle that intelligently adapts to brightness changes, ensuring it never disappears or blinds you. Useful in titles without a crosshair (or with heavy motion blur).
- Optix Scope: A software-based zoom at the screen center (e.g., 1.25× to 2×). This is an OSD zoom, not an in-game one – fine for single-player, but typically banned in competitive play.
Fine-tuning: Map Smart Crosshair to a Left/Right shortcut in Navi Key to toggle it quickly. Fix Optix Scope to a consistent zoom level for muscle memory.
Gaming Modes: Presets and Adaptive Helpers
Under Gaming, you’ll find the picture presets and comfort options:
- Game Mode: Premium Color, User, FPS, Racing, RTS, RPG
- Night Vision: Brightens dark zones (Gamma/Black Equalizer).
- AI Vision: Automatically adjusts contrast and brightness depending on scene content.
- Refresh Rate: Displays your current Hz rate as an on-screen overlay.
- Adaptive-Sync: ON/OFF (G-Sync Compatible/FreeSync depending on input).
- DSC: Display Stream Compression (required for 4K@240 Hz over DP).
Premium Color vs. Genre Presets
Premium Color is the most vibrant preset: saturation and tone dynamics are cranked up, ideal for vivid games or to show off the QD-OLED’s brilliance.
The genre presets emphasize different aspects:
- FPS: Higher brightness in dark areas, reduced saturation, sharper edges.
- Racing: Highlights peak whites and emphasizes motion clarity.
- RTS/RPG: Slightly warmer tones, boosted midrange luminance.
Best Practice:
Assign Game Mode to your Right shortcut. Combine it with Night Vision on Up, so you can toggle instantly between cinematic color and competitive clarity.
“You can’t improve what you don’t measure.” – Peter Drucker
If you document your impressions, note preset, HDR status, Night Vision level, and refresh rate overlay – this ensures screenshots and clips remain reproducible.
Adaptive-Sync and DSC
- Adaptive-Sync minimizes tearing. Activate it both in the OSD and in your GPU driver (NVIDIA/AMD).
- DSC is required for 4K @ 240 Hz over DisplayPort. If the image flickers or disconnects at 240 Hz, check your DP cable, DSC setting, and GPU driver.
Professional Modes: Color Management for Work and Creativity
The Professional section houses factory-calibrated modes for productivity:
- Pro Mode: Eco, User, Anti-Blue, Movie, Office, sRGB, Adobe RGB
- Low Blue Light: Additional blue light reduction.
- Image Enhancement: Sharpness filter for text/UI clarity.
sRGB & Adobe RGB: When to Use Which
- sRGB is the web standard. For photo editing, UI design, or web preview, it’s the reference mode – it clamps the wide gamut to sRGB, preventing oversaturation.
- Adobe RGB targets print/photo workflows (expanded cyan-green gamut). Use it only if your entire pipeline (software/export) supports it.
- User is your go-to if you calibrate with external hardware (colorimeter/software).
Fine-tuning:
Under Image, adjust white point and sharpness. QD-OLEDs can look “crispy” with aggressive sharpness – less is often more.
“Color is a power which directly influences the soul.” – Wassily Kandinsky
Because QD-OLEDs produce such vivid color, disciplined mode selection is key when color accuracy matters more than spectacle.
Low Blue Light & OSD Transparency
- Low Blue Light cuts blue emission. Great for evenings, but disable it for color-critical work.
- OSD Transparency (found under Settings) lets you view changes without blocking the image – helpful during live color checks.
Image: Fine Control over Visual Parameters
Under Image, you’ll find the standard picture controls and HDR path options:
- Brightness
- Contrast
- Sharpness
- Color Temperature (presets and manual RGB gain controls)
- Screen Size (scaling/aspect)
- DisplayHDR (HDR path selection)
Brightness and ABL Behavior
As with all OLEDs, the Automatic Brightness Limiter (ABL) kicks in on large bright areas. The Brightness slider defines your target level; in SDR mode, aim for 15–30 depending on your room lighting to preserve highlight headroom. In bright offices, go higher but keep Night Vision low to avoid grayish blacks.
Sharpness
Keep Sharpness modest. UI elements benefit from a small boost, but text at 4K scaling (150–200%) does not. Too much sharpness creates halo artifacts.
Color Temperature
- Warm/Neutral/Cool are basic starting points.
- For precise white (D65), select User and adjust RGB gain manually. Note your values – they help restore calibration later.
DisplayHDR
The DisplayHDR entry switches HDR tone mapping. For Windows 11:
- Settings → System → Display → HDR → ON
- Ensure the OSD’s DisplayHDR is not forcing SDR.
- Enable HDR in each game/app as needed.
Note: Some apps render in SDR even with Windows HDR active. In such cases, use SDR presets (sRGB/Office) and enable HDR only for HDR-native content.
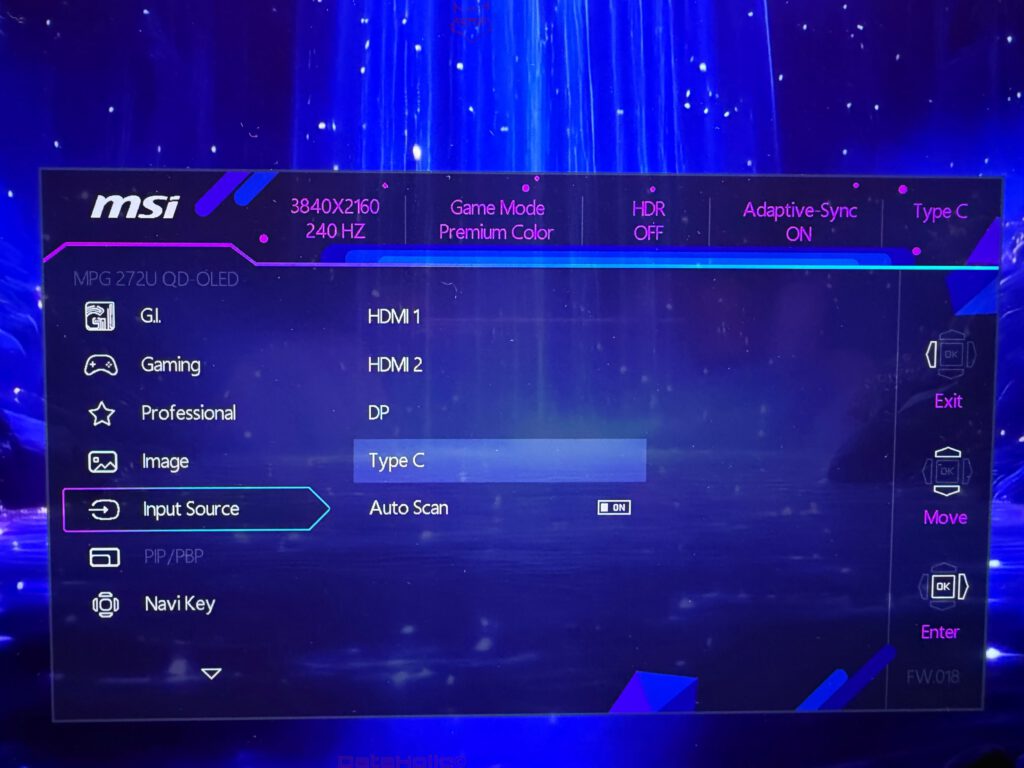
Input Source: Sources & Auto Scan
Under Input Source, choose HDMI 1, HDMI 2, DP, or Type-C.
Auto Scan is handy if you want the monitor to detect active sources automatically after standby.
However, in multi-device setups, manual selection is more reliable.
Pro Tip (KVM workflow):
Link Input Source to a Navi Key (e.g., Down → Input Source). This way, both display and peripherals switch together.
PIP/PBP: Two Worlds on One Panel
Picture-in-Picture (PIP) and Picture-by-Picture (PBP) let you display two inputs simultaneously.
- PIP: Secondary signal in a movable window.
- PBP: Side-by-side layout – perfect for comparisons (e.g., Windows left, macOS right).
Use cases:
- Streaming setups: Gameplay (DP) left, dashboard (HDMI) right in PBP.
- Notebook over Type-C in PIP for quick email checks while desktop stays full-screen.
- Color grading: Console input vs. reference image.
Note that PBP may restrict color modes per side – sRGB on both is the safest choice.
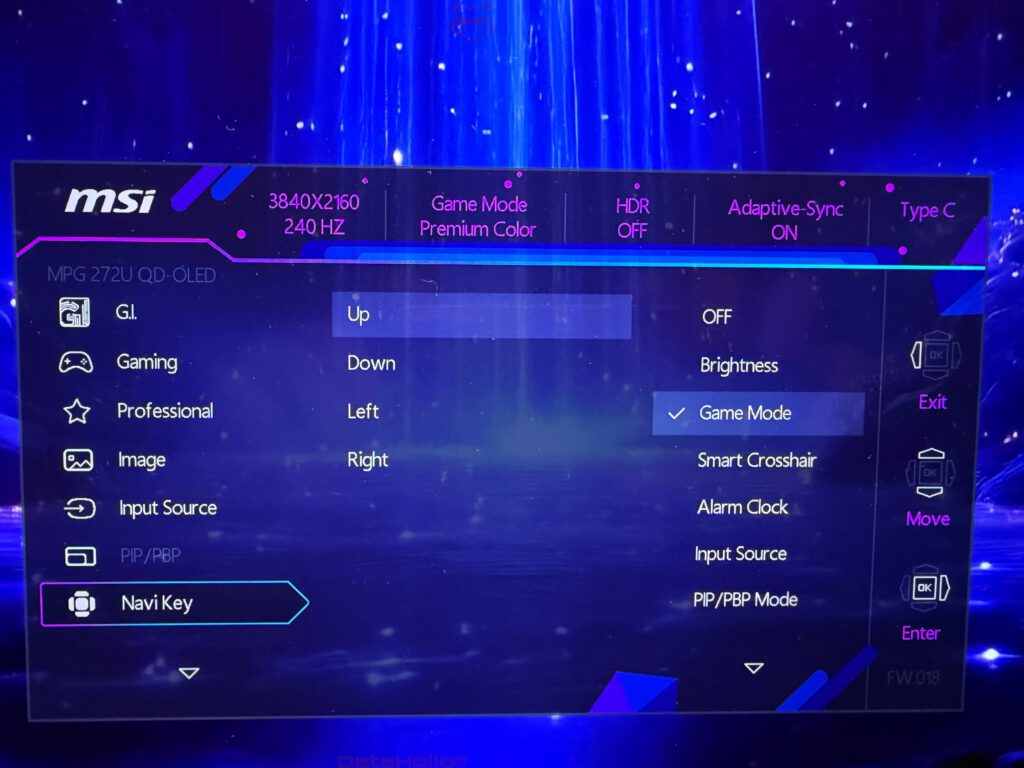
Navi Key: The Difference Between Frustration and Flow
The Navi Key (joystick mapping) is your hidden turbo button. In Navi Key settings, you can assign Up/Down/Left/Right individually:
- Gaming-first suggestion:
- Up → Brightness
- Right → Game Mode
- Left → Smart Crosshair
- Down → Input Source
- Creator-first suggestion:
- Up → Brightness
- Right → Pro Mode
- Left → Color Temperature
- Down → Input Source/PIP
“In the end, what matters is how fast you’re back in the flow.” – Common dev wisdom
For OLED care (logo detection too sensitive? taskbar shift annoying?), a shortcut saves time – no need to dive three levels deep.
Settings: Language, OSD, LEDs, CEC & On-Screen Info
Under Settings, you’ll find structural controls:
- Language (multi-language, e.g., English, Deutsch, etc.)
- Transparency (OSD opacity)
- OSD Timeout (duration)
- RGB LED (monitor illumination control)
- Power Button (behavior)
- Info. On Screen (persistent status display)
- HDMI CEC (HDMI control commands, e.g., console wake)
Pro Hint: Keep Info. On Screen subtly enabled (small overlay showing Hz + sync). One glance confirms: Adaptive-Sync ON? HDR active? 240 Hz?
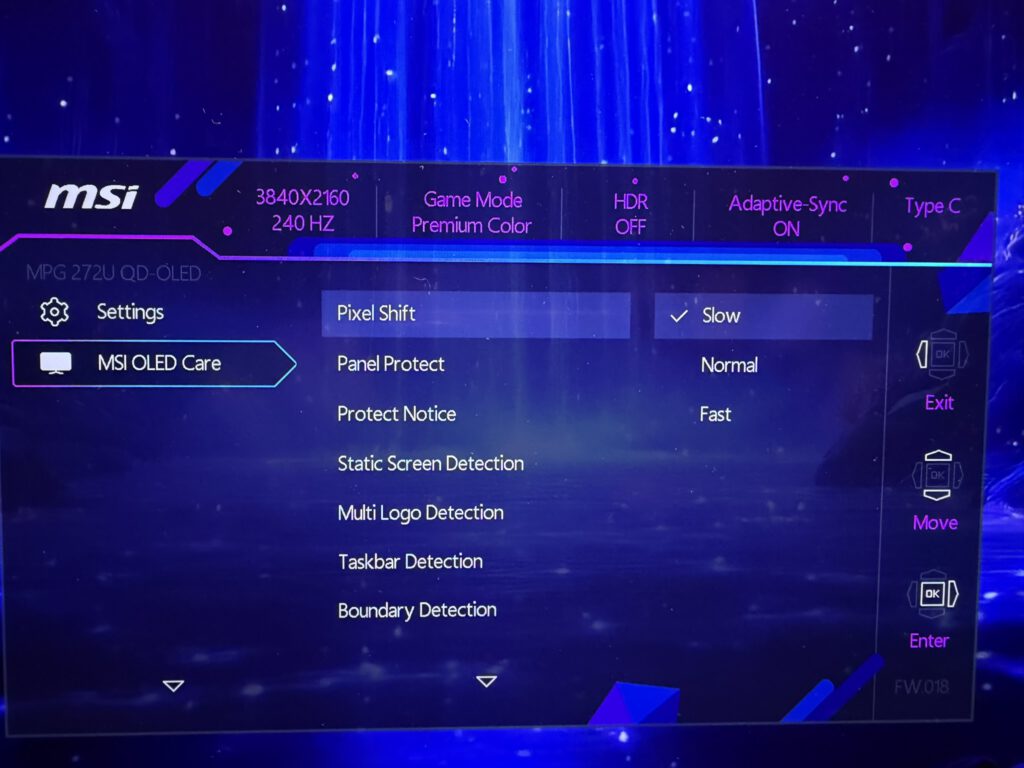
MSI OLED Care: Protection Against Burn-In – Used the Right Way
QD-OLED panels offer superb colors and infinite blacks but need care. MSI bundles all protection tools under MSI OLED Care:
- Pixel Shift (Slow/Normal/Fast): Slightly shifts the image to reduce static wear.
- Panel Protect: Pixel refresh / panel cleaning – runs periodically (auto or manual).
- Protect Notice: Alerts when maintenance is due.
- Static Screen Detection: Detects static content, dims accordingly.
- Multi Logo Detection: Identifies multiple bright logos and dims them.
- Taskbar Detection: Monitors Windows taskbar, dims or shifts it slightly.
- Boundary Detection: Detects static UI borders (window frames, HUD bars).
Recommended Practical Profiles
Gaming session:
- Pixel Shift: Slow or Normal
- Static Screen Detection: On
- Multi Logo Detection: On
- Taskbar Detection: On (if desktop remains visible)
- Panel Protect: Allow automatic runs after sessions.
Creator session (static UI):
- Pixel Shift: Slow
- Static Screen Detection: On, conservative dimming
- Taskbar Detection: Off (for precise layouts, re-enable after)
- Panel Protect: Run manually after workday
Presentation/Streaming (static overlays):
- Pixel Shift: Normal/Fast
- Multi Logo Detection: On
- Boundary Detection: On
- Use breaks to trigger Panel Protect
“Prevention is always cheaper than repair.” – timeless truth
These routines are subtle by design. Disabling them entirely offers minimal comfort gain but risks premature panel wear.
Windows & macOS: Seamless Integration
Windows 11 – HDR, Scaling, 240 Hz
- Display → Advanced Display: set 3840×2160 @ 240 Hz.
- Enable HDR (only for HDR content).
- Color Profile:
- For sRGB workflows, use the correct ICC profile or OSD’s sRGB mode.
- For Adobe RGB workflows, match the mode and app settings (Lightroom/Photoshop).
- GPU Driver: Activate Adaptive-Sync/G-Sync if desired.
Common Issues & Fixes:
- No 240 Hz: Check DP cable, enable DSC, update driver.
- Dim HDR: Calibrate in-game HDR; adjust Windows HDR-SDR balance.
- Washed-out colors: Use sRGB mode; verify ICC profile.
macOS – Type-C & Color Spaces
Connect via Type-C (DP Alt Mode) directly to a MacBook. macOS handles color management well, but:
- Scaling: For 27” 4K, use 200% or a HiDPI step.
- HDR: Only enable for true HDR content.
- Color Management: For accurate web colors, set OSD to sRGB – macOS respects this.
Consoles & CEC: PS5/Xbox Integration
- Use HDMI inputs and enable 4K output and VRR (if supported).
- In OSD, turn Adaptive-Sync ON and HDMI CEC ON for console wake control.
- Complete each console’s HDR calibration wizard – essential for correct tone mapping.
Workflow Examples: Configure Like a Pro
1) “Everyday SDR” (Writing, Web, Email)
- Professional → sRGB
- Image → Brightness 20–30, Sharpness 0–10
- MSI OLED Care: Pixel Shift Slow, Taskbar Detection On
- Settings → Info. On Screen minimal (Hz + Sync)
Why: sRGB ensures neutral colors; lower brightness preserves eyes & panel; taskbar detection prevents static wear.
2) “Pure HDR Gaming”
- Gaming → Game Mode → Premium Color
- Windows → HDR ON, enable in-game HDR
- Adaptive-Sync ON, DSC ON (for 4K@240 Hz)
- Night Vision → Low (only when needed)
Why: Premium Color + HDR showcases QD-OLED’s strengths; limited Night Vision preserves blacks.
3) “Photo/Design Work”
- Professional → Adobe RGB (or sRGB, depending on target)
- Image → Color Temperature → User → D65 fine-tuned
- Brightness ~120 cd/m² (measured)
- MSI OLED Care active; disable Taskbar Detection during layout, re-enable later.
Why: Ensures consistent color chain and non-intrusive protection.
4) “Dual System with KVM”
- Connections: Desktop via DP + USB-Upstream, Notebook via Type-C
- G.I. → KVM → Auto, Input Source via Navi Key (Down)
- Occasionally enable PIP (notebook small bottom-right)
Why: One-button switching, peripherals follow; PIP supports multitasking.
Troubleshooting: When Things Misbehave
No signal via Type-C:
- Does the laptop support DP Alt Mode?
- Correct Upstream source under G.I.?
- Replace cable – not all USB-C cables carry video.
HDR too dark:
- Adjust Windows HDR/SDR balance slider.
- Calibrate Peak Brightness/Paper White in-game.
- Ensure OSD DisplayHDR isn’t forcing SDR.
Input lag noticeable:
- Lower Image Enhancement/Sharpness.
- Test disabling Adaptive-Sync (rare frametime issues).
Crushed blacks:
- Raise Night Vision slightly.
- Set Gamma (if available) to 2.2.
- Check in-game Tone Mapping.
Documentation & Firmware: Staying Organized
- Note your firmware version (e.g., FW.018 in OSD
- Export/screenshot your profiles regularly.
- Keep a small change log (drivers, Windows updates) with dates.
“If it’s not written down, it didn’t happen.” – project-management proverb
This lets you trace symptoms back to updates – and you’ll know exactly which combination made your favorite games feel perfect.
Small but Important Convenience Toggles
- OSD Time Out: Shorter for power users, longer for beginners.
- OSD Transparency: A middle value so the picture remains visible underneath.
- RGB LED: When judging content, turn decorative LEDs off – they can influence color perception in a dark room.
- Power Button: Prefer “Standby” over “Off” if you use CEC wake functions.
Best-Of Shortcuts: Three Everyday Winners
- Right → Game Mode (toggle between Premium Color and User/sRGB)
- Down → Input Source (also acts as KVM switch)
- Up → Brightness (one flick when daylight changes)
These three cover 90% of daily needs without getting lost in the OSD.
Safety, Responsibility, and Fair Play
- Optix Scope and Smart Crosshair are powerful tools. In competitive games, such overlays can be considered unfair. Use them responsibly.
- HDR consumes brightness budget. Maintain a day profile (bright room) and an evening profile (lower brightness).
- Never disable OLED Care lightly – these routines are your long-term insurance policy.
“With great power comes great responsibility.” – Stan Lee
Checklist: From Zero to “Works” in 5 Minutes
- Cables: DP (PC) + USB upstream, Type-C (notebook).
- Input Source selection and KVM Auto enabled.
- Windows: 4K at 240 Hz, Adaptive-Sync ON, current GPU driver.
- Navi Key: map Brightness, Game Mode, Input Source, Smart Crosshair.
- OLED Care: Pixel Shift Slow, Panel Protect Auto, Taskbar Detection On.
- Profiles: Professional → sRGB (work), Gaming → Premium Color (fun).
- HDR: Enable only when needed and calibrate in-game.
Mini Glossary
- Adaptive-Sync/G-Sync Compatible/FreeSync: Variable refresh rate to avoid tearing.
- DSC: Compression on the DP link to enable 4K@240 Hz.
- sRGB/Adobe RGB: Color spaces for web (sRGB) and photo/print (Adobe RGB).
- EOTF: Electro-Optical Transfer Function, the curve used for HDR tone mapping.
- ABL: Automatic Brightness Limiter, reduces full-screen brightness for OLED longevity.
- Pixel Shift/Panel Protect: OLED care via microscopic shifts and refresh cycles.
Closing Word on Software Philosophy
The OSD of the MSI MPG 272URX QD-OLED combines clear structure (G.I., Gaming, Professional …) with practical benefits: KVM, PIP/PBP, quick presets, and deep OLED care. If you spend half an hour setting up shortcuts and creating two clean profiles (sRGB/Office + Premium Color/HDR), you’ll rarely have to open the OSD again – and that’s exactly the point.
“Simplicity is the ultimate sophistication.” – Leonardo da Vinci
Software is good when it disappears and the screen “just does what it should.” With the settings described here, that’s exactly what happens.
Notice in accordance with EU transparency requirements:
The MSI MPG 272URX QD-OLED featured in this review was provided to us by MSI as a non-binding loan unit for testing purposes. This is not paid advertising.
MSI had no influence on the content, evaluation, or editorial independence of this article. All opinions are based solely on our own hands-on experience.
We would like to thank MSI for providing the monitor and for the trust placed in dataholic.de.