Unboxing & Assembly: MSI MAG X870E Tomahawk MAX WIFI PZ in the MSI MAG PANO 110R PZ
- Packaging and First Impressions – MSI MAG X870E Tomahawk MAX WIFI PZ
- Unboxing – Contents of the Motherboard Package
- First Board Reading – Layout, Feel, and Build Quality
- Rear I/O – Port Distribution and Functional Overview
- Design and Surface Observations
- Practical Details Apparent During Unboxing
- Contextualizing the PZ Concept in the Market
- Section Summary (Without Performance Judgment)
- Unboxing – MSI MAG PANO 110R PZ (White)
- Case Accessories – Fasteners and Cable Aids
- Link to the complete Unboxing
- Preparation Phase – Assembly Planning
- Step-by-Step Assembly
- Assembly Experience – Observations in Practice
- Design Evaluation – Aesthetics and Material Consistency
- Cable Management – Method and Outcome
- Notable Details During Assembly
- Practical Takeaways
- Unboxing & Assembly Findings – Without Performance Evaluation
- Final Assembly Check – Visual and Mechanical Review
- Acknowledgment & Transparency
Packaging and First Impressions – MSI MAG X870E Tomahawk MAX WIFI PZ
Overview and Positioning
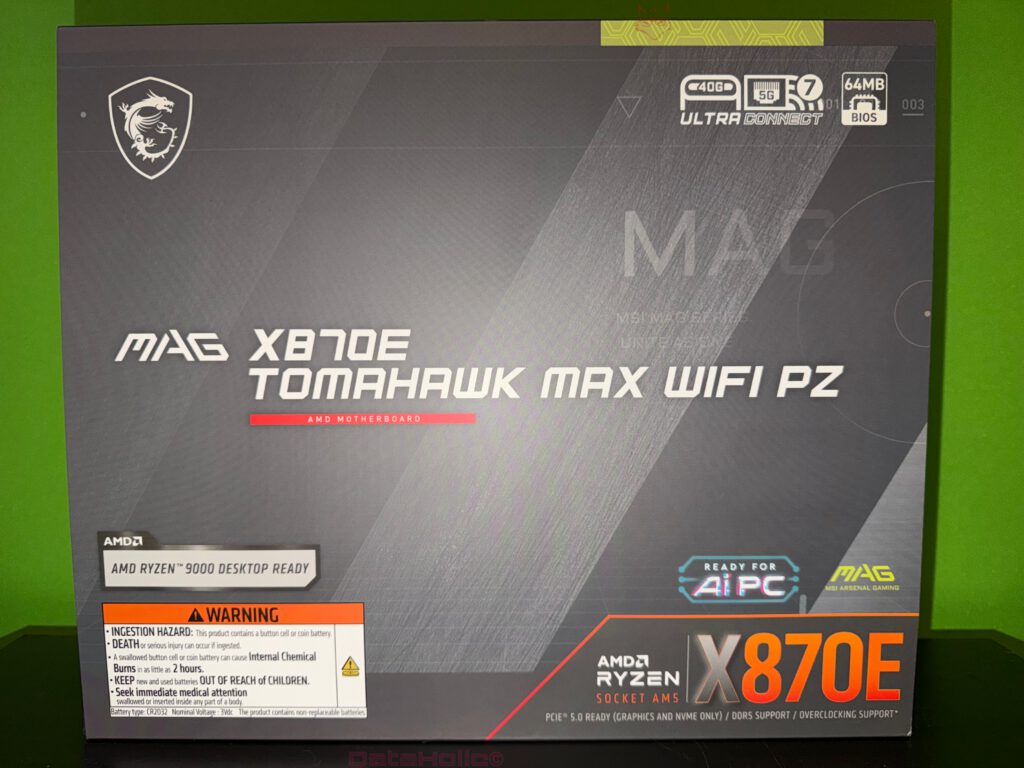
The MSI MAG X870E Tomahawk MAX WIFI PZ belongs to MSI’s Arsenal Gaming (MAG) series and, as the “PZ” version, introduces the Back-Connect concept: numerous headers — including ATX 24-pin, EPS, front-panel, and internal USB — are relocated to the rear side of the PCB. The packaging itself already communicates this design philosophy clearly. The color palette follows MSI’s familiar understatement: structured gray tones, a matte surface, precise lines, and legible typography. Nothing appears flashy or over-designed. The aesthetic reflects a tool-like product, one that speaks through functionality rather than decoration.
Front: Iconography and Core Messages
The front of the box is dominated by the product name and its platform designation. Along the upper edge, MSI showcases a set of key feature badges, highlighting the most relevant specifications for its class:
- USB 40 Gbps (USB4 / Thunderbolt-compatible depending on device)
- Wi-Fi 7 / Bluetooth 5.4 (current-generation wireless standard with higher bandwidth and lower latency)
- 64 MB BIOS (expanded flash memory for firmware)
- Lightning Gen5 (MSI’s branding for PCIe 5.0 readiness)
- AMD Ryzen 9000 Desktop Ready (support for AMD’s latest AM5 processors)
- PZ (Back-Connect designation)
Importantly, these icons don’t just sell performance; they emphasize structural intent. “PZ” isn’t a stylistic flourish — it’s a directive for those who care about clean builds and optimized cable management.
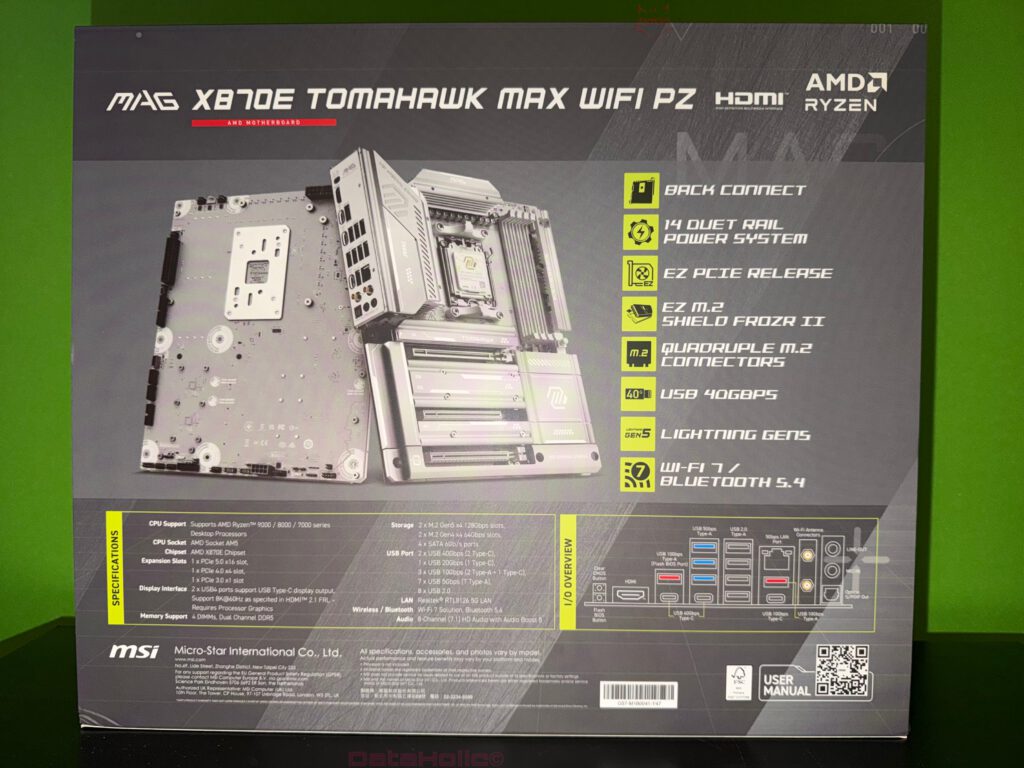
Back of the Box: Technical Blueprint, Not Marketing Poster
The rear of the packaging functions as an information map. On the right, a vertical list of features outlines the board’s key technical pillars:
- Back Connect – relocated connectors on the rear side
- 14 Duet Rail Power System – dual-rail VRM topology
- EZ PCIe Release – simplified GPU latch mechanism
- EZ M.2 Shield Frozr II – tool-free M.2 installation with heat spreaders
- Quadruple M.2 – four NVMe drive slots
- USB 40 Gbps – high-speed USB-C ports
- Lightning Gen5 – PCIe 5.0 support for GPUs and NVMe
- Wi-Fi 7 / Bluetooth 5.4 – current-generation wireless connectivity
To the left sits a perspective rendering of the motherboard, showing both front and back views. Below it, MSI includes an I/O layout diagram, color-coded for USB types, audio jacks, LAN, HDMI, and the dedicated Clear-CMOS and Flash BIOS buttons. This kind of detailed labeling helps builders mentally map the port distribution even before unboxing.
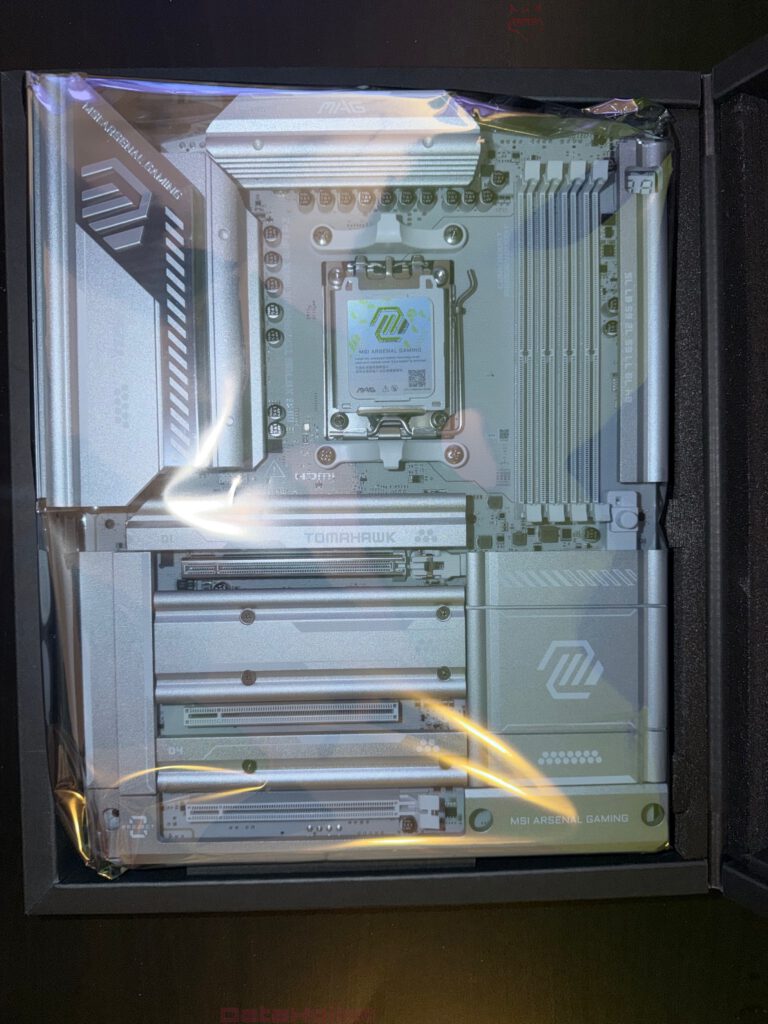
Protection, Tactility, and Environmental Impression
The board is secured within a surrounding cardboard frame and a precision-cut foam insert. The motherboard itself is sealed in an anti-static bag and rests on a sturdy cardboard tray; accessories are stored beneath. The foam is closed-cell and dense, providing reliable shock absorption and maintaining shape even after multiple openings. MSI’s approach here balances durability and sustainability — minimal glossy coatings, predominantly paper-based materials, and only a few small plastic bags for labeled accessories.
Transport safety: The rigidity of the foam and the tight lid seal ensure that no contact points can cause scuffs or deformation during shipping. Under typical handling, shipping damage is highly unlikely.
Unboxing – Contents of the Motherboard Package
First View: The Board Presentation
Once the lid is lifted, the motherboard immediately commands attention:
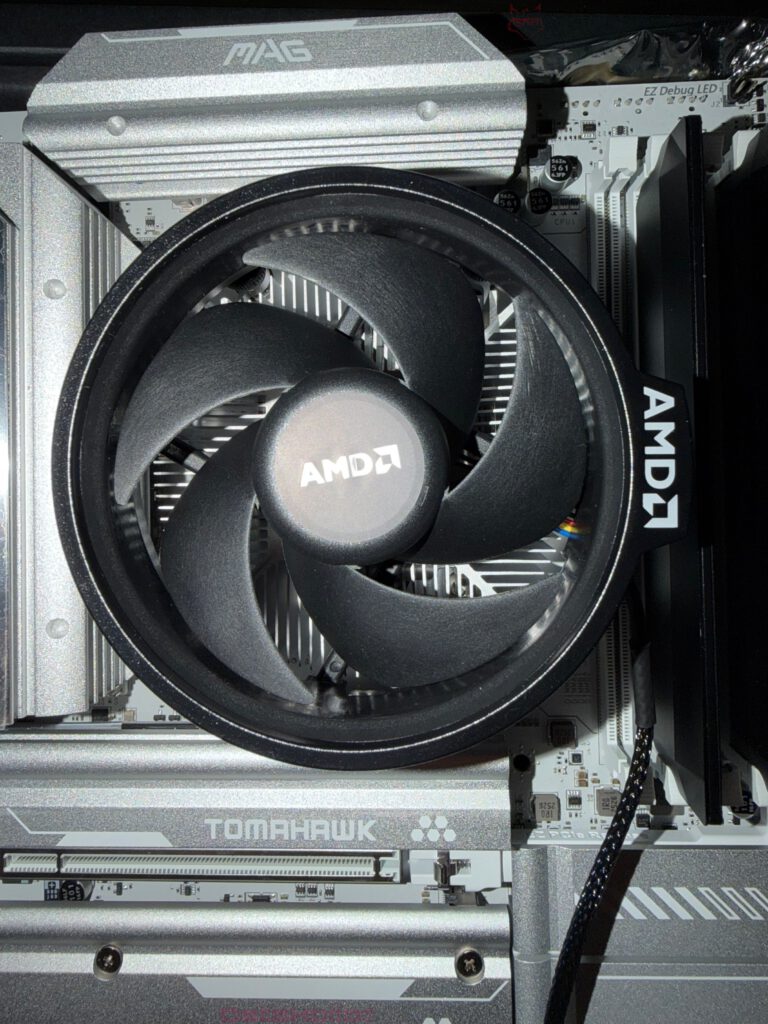
silver-gray heatsinks, broad M.2 covers, and a solid integrated I/O shroud bearing the MAG logo. The overall impression is monochromatic and industrial — deliberately free of RGB flair, emphasizing precision machining over decorative lighting.
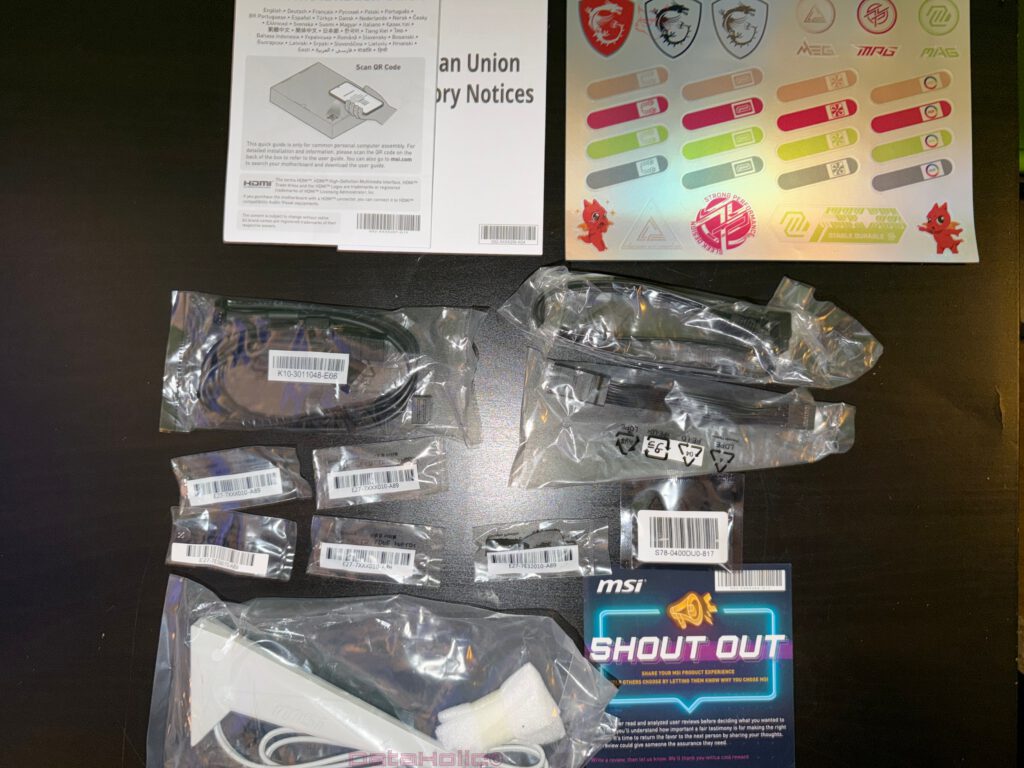
Accessory Overview
Beneath the motherboard tray, the accessories are systematically arranged and individually packed. The full list includes:
- 2× SATA cables (black, with straight and angled connectors)
- M.2 screws and standoffs (multiple labeled sets)
- Wi-Fi antenna kit (white, screw-mounted, flexible base)
- Front-panel header adapter (depending on region)
- Quick installation guide and EU regulatory notice
- MAG series sticker sheet
- “MSI Shout Out” feedback card
Each component is neatly labeled. This might seem like a small touch, but it streamlines the build process and minimizes mistakes, especially when installing multiple M.2 drives. The white antennas stand out for their soft matte finish and integrate perfectly into white or silver PC builds.
Documentation and QR Integration
MSI’s printed quick guide directs users to QR-linked online manuals. This hybrid approach is practical: firmware revisions and slot priorities evolve between production batches, and online documentation prevents outdated information from causing confusion. It’s a small but thoughtful modernization of the traditional printed manual.
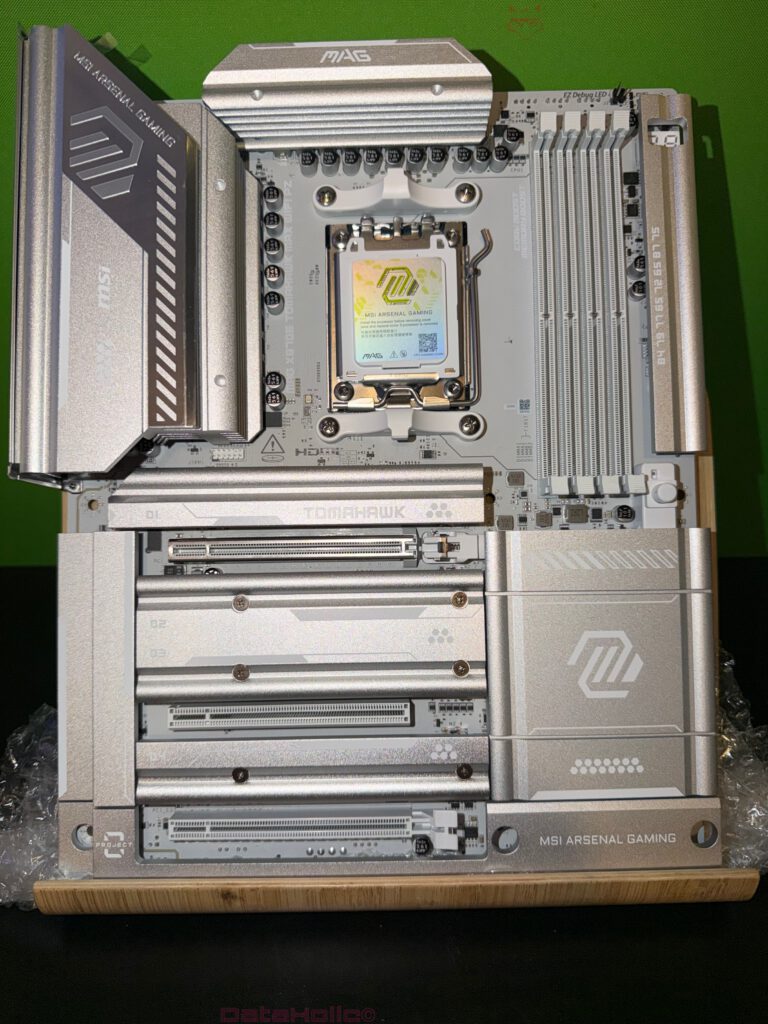
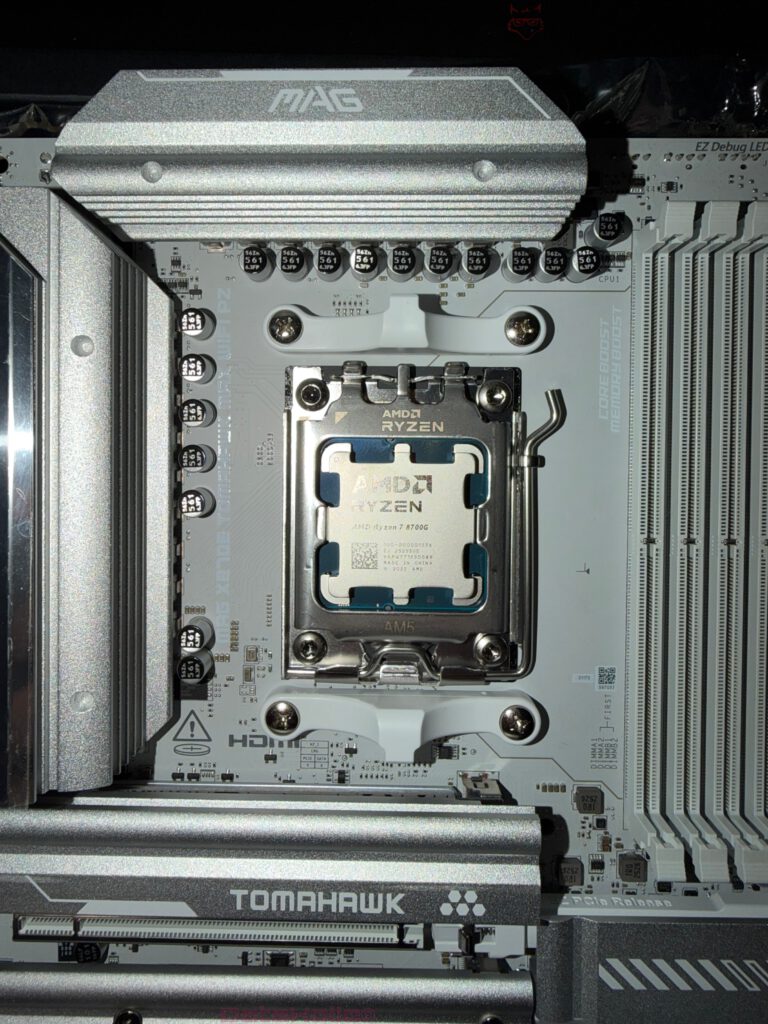
First Board Reading – Layout, Feel, and Build Quality
VRM Section and Heatsinks
The X870E Tomahawk MAX WIFI PZ immediately feels sturdy and refined. The VRM area is topped by large brushed-aluminum heatsinks connected by a reinforcement bridge that improves rigidity and surface area. Contact alignment is precise — no visible gaps or machining residue. The finish has a fine texture that subtly diffuses light rather than reflecting it.
Socket and Memory Area
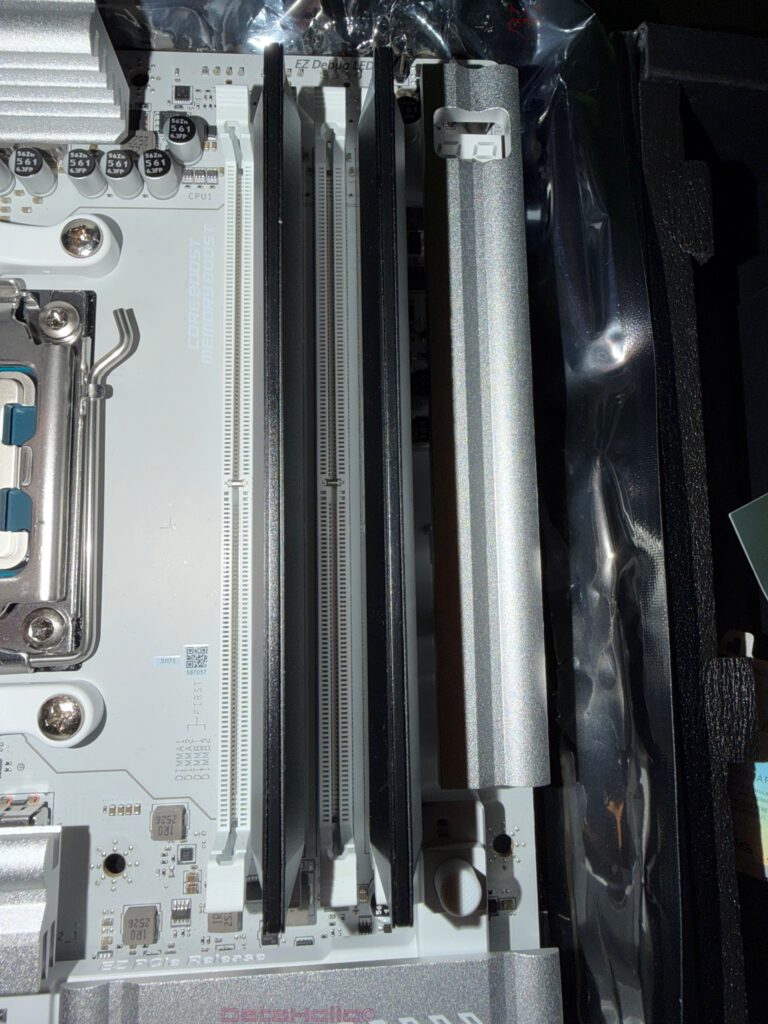
Between the AM5 socket and DDR5 slots, there’s generous clearance for most air and liquid coolers. The four DDR5 DIMM slots, finished in light gray, are clearly labeled for installation order (A2/B2 before A1/B1). These markings are sharp and legible, even under moderate lighting. The slot layout adheres closely to AMD’s reference spec for optimal signal routing.
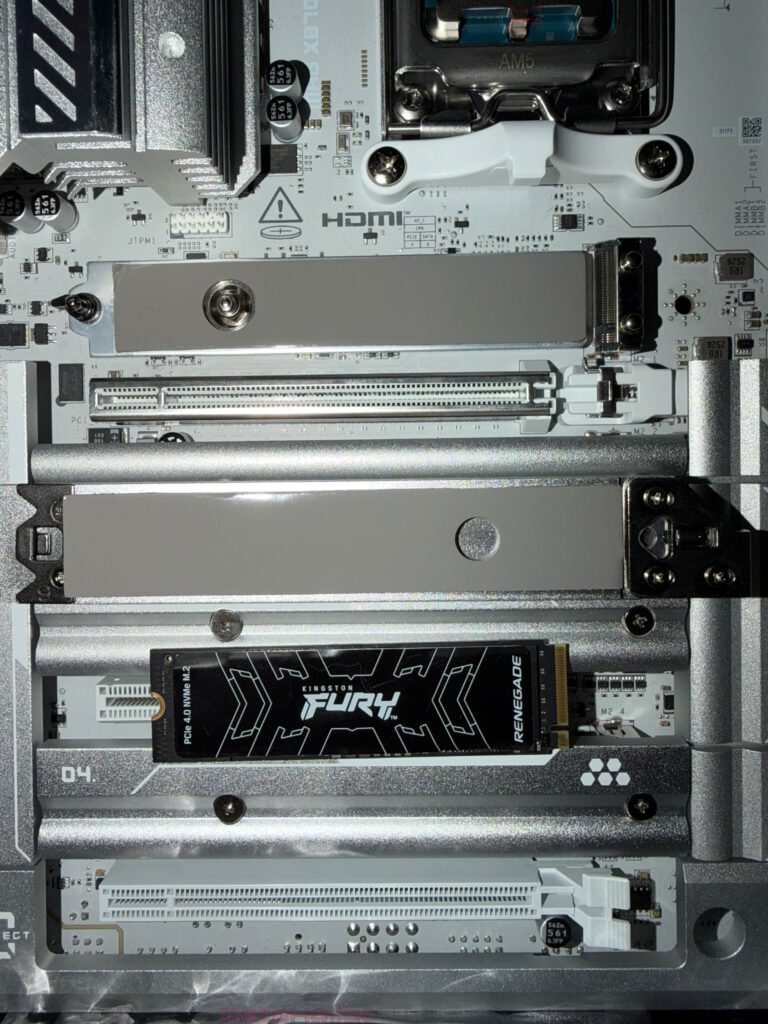
Storage: Fourfold M.2 Integration
Below the socket are four M.2 slots, each hidden under a tool-free EZ M.2 Shield Frozr II cover. Depending on slot, MSI uses either thumb screws or push-pins. The covers sit flush with the board and come pre-applied with thermal pads. The entire setup conveys a professional-level refinement — installation is quick, risk of lost screws minimal, and thermals well managed.
Expansion Slots and Structural Rigidity
The PCIe x16 slots are reinforced with steel shrouds. The primary slot includes the EZ PCIe Release mechanism: a small lever that allows easy GPU removal in tight cases. Slot spacing is ATX standard, with no flex or bending around the reinforcement zones. The board feels solid and unyielding even under moderate pressure.
Integrated I/O Shroud
The I/O shield is factory-mounted, seamlessly integrated with the heatsink armor. Port openings are precisely machined, and laser-etched labels remain readable from any angle. This integrated design accelerates installation, reduces fitting errors, and avoids the loose, misaligned plates still found in older generations.
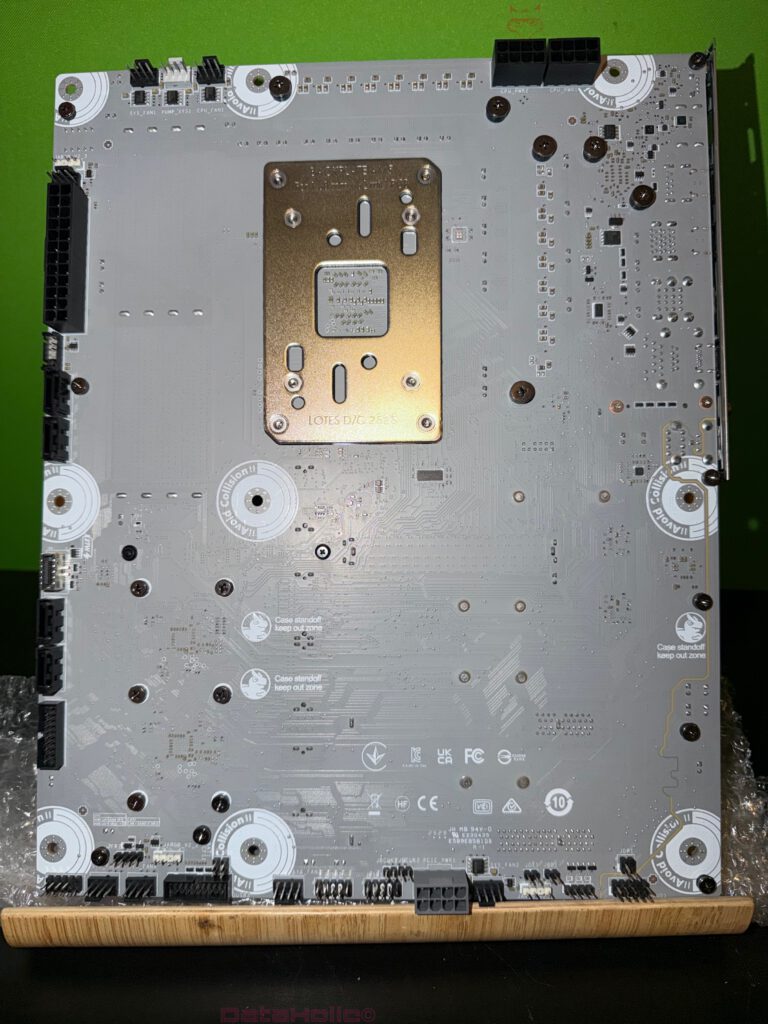
Rear Side: The Back-Connect Layout
The board’s reverse side is where the “PZ” designation earns its name. Along the edges, MSI relocates the ATX 24-pin, EPS 8-pin, front-panel, USB headers, and other key connectors. Clear “Keep-Out Zone” markings indicate where case standoffs must not be placed. The outcome is a cable-free front chamber in completed builds, with all routing handled discreetly behind the motherboard tray — assuming the case offers sufficient depth and cable channels.
Rear I/O – Port Distribution and Functional Overview
From Top to Bottom
The I/O array is comprehensive and intuitively structured:
- Clear CMOS and Flash BIOS buttons — recessed yet easily accessible
- HDMI port — for integrated GPU output or troubleshooting
- Two USB-C (40 Gbps) ports — high bandwidth for external drives and docks
- One USB-C (10 Gbps) — extra high-speed connectivity
- Multiple USB-A ports — USB 2.0, 5 Gbps, and 10 Gbps, color-coded
- Dual LAN — 2.5G and 5G Ethernet for flexible networking
- Wi-Fi 7 antenna connectors — gold-plated, clearly labeled
- Audio cluster — analog jacks plus S/PDIF optical out
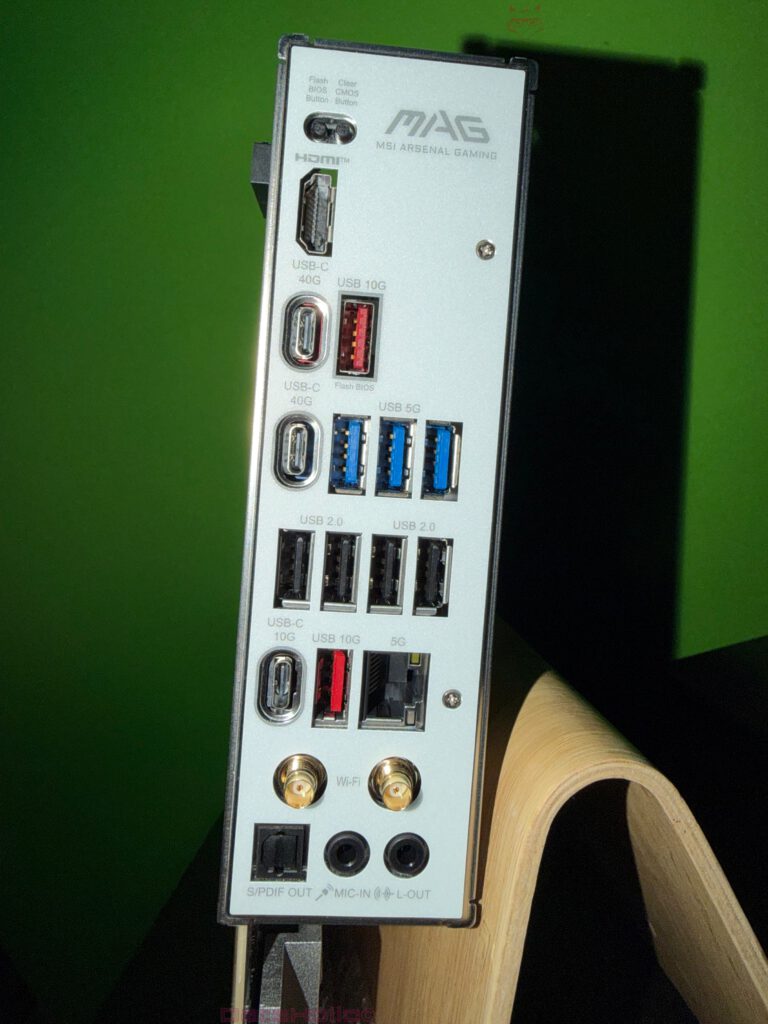
Ergonomics and Readability
The layout provides ample finger clearance between ports. Labels are high-contrast and crisp, remaining legible even under low ambient light. The CMOS and BIOS flash buttons are positioned to prevent accidental presses while remaining easy to reach during setup. For first-time configuration, this is genuinely practical: firmware updates and resets can be handled without opening the case.
Practical Advantages During Integration
- The Flash BIOS button allows firmware updates without CPU or RAM installed (via the dedicated USB port).
- Dual LAN enables network segmentation or redundancy without additional hardware.
- Multiple high-speed USB-C ports support modern external SSDs, docks, and VR/AR peripherals simultaneously.
Design and Surface Observations
Color and Typography
The design language is monochromatic minimalism — silver-gray heatsinks, light-gray DIMM slots, and subtle TOMAHAWK branding. The look fits naturally into white, silver, or industrial-themed builds. Typography is sharp and angular, aligning with the utilitarian identity of MSI’s MAG series: function before ornamentation.
Tactile Quality and Surface Finish
The metal surfaces are smoothly brushed, edges are cleanly chamfered, and there are no rough points around mounting holes. The PCB’s finish is even and consistent, with sharp silkscreen printing for headers and slot identifiers. M.2 covers fit snugly and flush, demonstrating precise alignment and tight manufacturing tolerances. Overall, the board exudes high build precision.
Practical Details Apparent During Unboxing
- Tool-free M.2 installation saves time — particularly valuable for multi-drive setups.
- Preinstalled I/O shield eliminates alignment issues and speeds up installation.
- Back-Connect layout significantly improves front-chamber cable management, ideal for panoramic glass cases.
- Labeled screw packs reduce risk of confusion during component installation.
- Dual LAN and Wi-Fi 7 ensure immediate networking flexibility right out of the box.
Contextualizing the PZ Concept in the Market
Back-Connect layouts are gaining traction as an alternative to traditional front-header designs. The benefits are clear: cleaner aesthetics, improved airflow, and often shorter cable paths. The key prerequisite is a case designed with rear cable space and dedicated routing channels. MSI positions the Tomahawk MAX WIFI PZ squarely for builders who prioritize visual clarity and functional design — systems that look as disciplined as they perform.
Section Summary (Without Performance Judgment)
Based solely on packaging, included accessories, and first-hand impressions, the MSI MAG X870E Tomahawk MAX WIFI PZ leaves a distinct impression of purposeful engineering:
- Function over flash,
- Back-Connect as a defining principle,
- Solid materials and precise labeling,
- Thoughtful, well-organized accessory packaging.
The overall first impression is of a professionally designed motherboard that, from the moment it’s unboxed, communicates its intent: structured assembly, minimal visible cabling, and a refined, tool-like aesthetic that complements modern, clean builds.
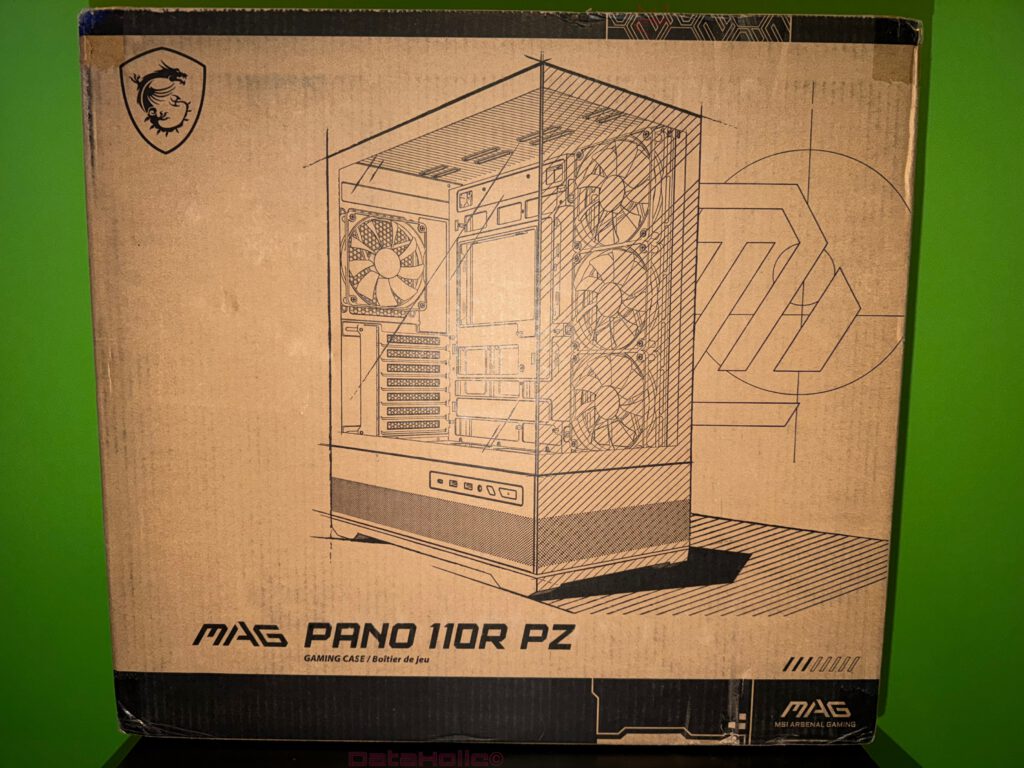
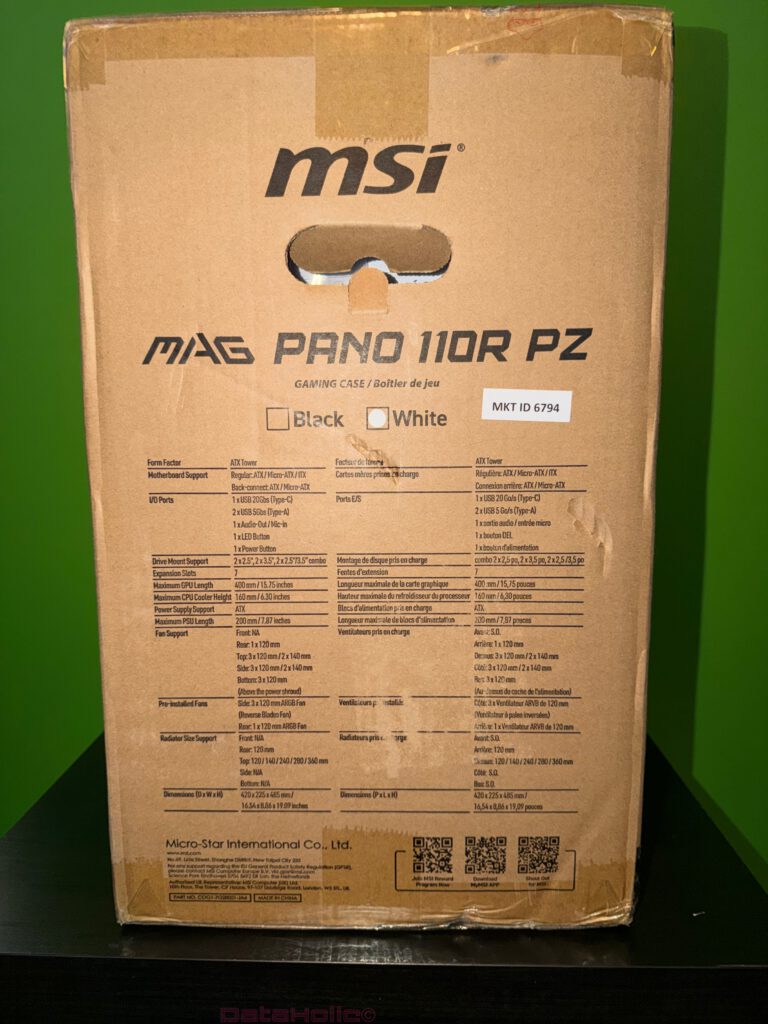
Unboxing – MSI MAG PANO 110R PZ (White)
The MSI MAG PANO 110R PZ case ships in a natural brown cardboard box with a technical line drawing on the front. The side panel lists specifications (form factor, fan support, I/O ports, dimensions). Internally, the chassis is protected by thick foam corner blocks and a soft fabric cover. A bright yellow sticker on the glass panel warns users to handle with care.
Exterior Impression
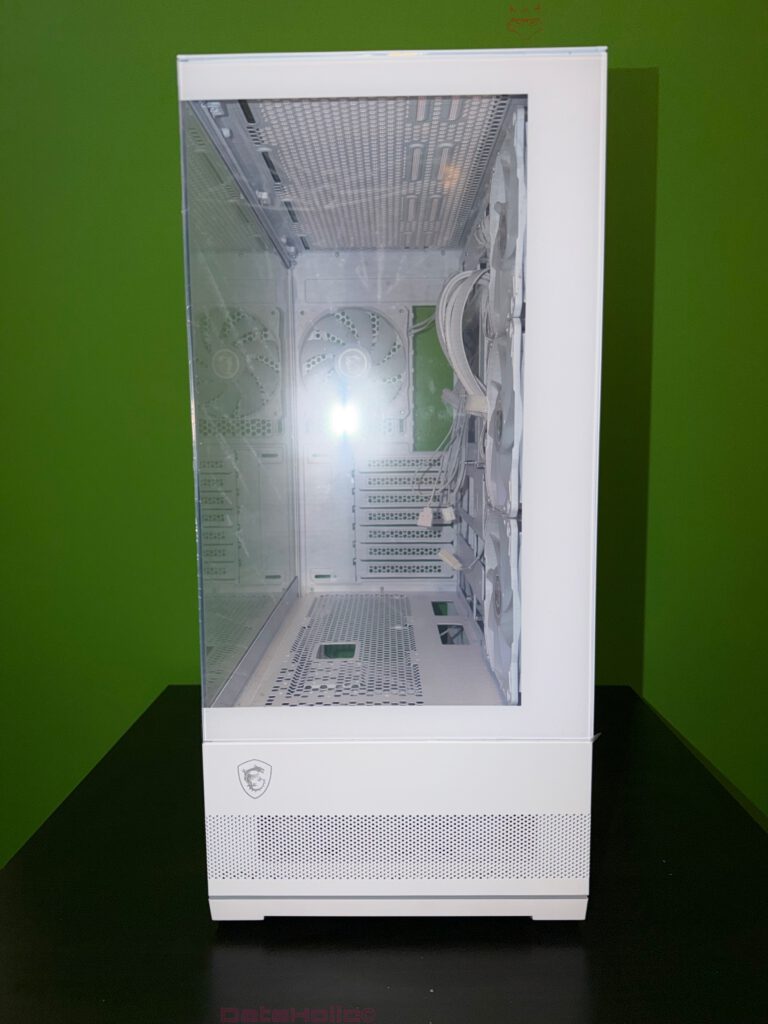
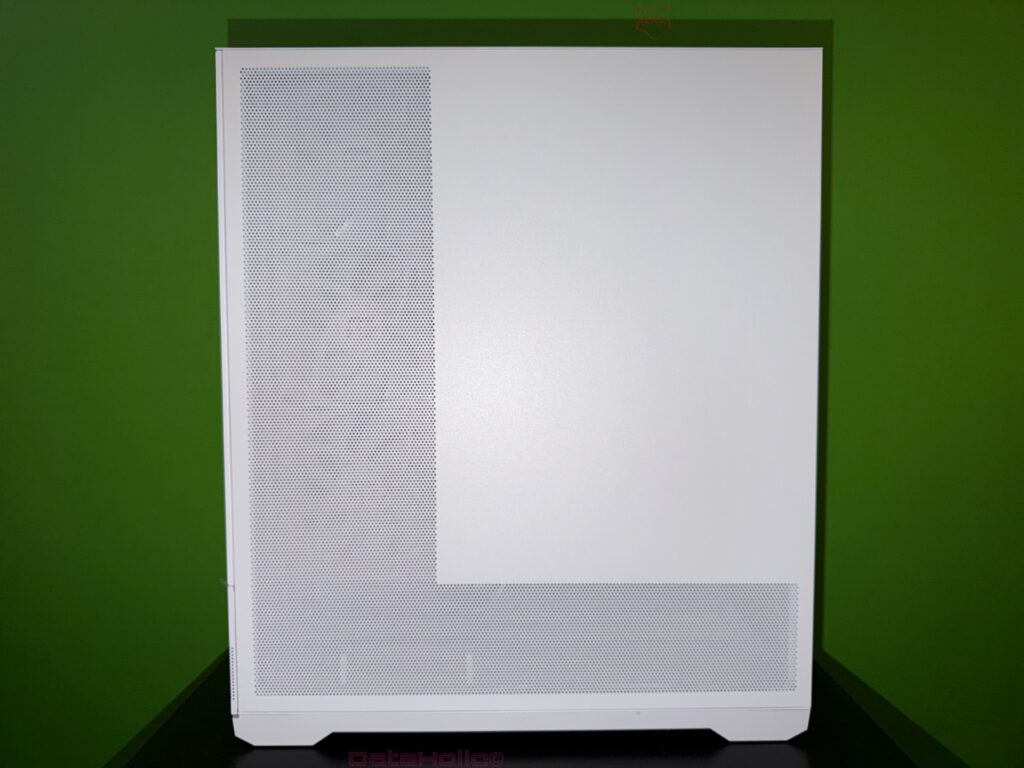
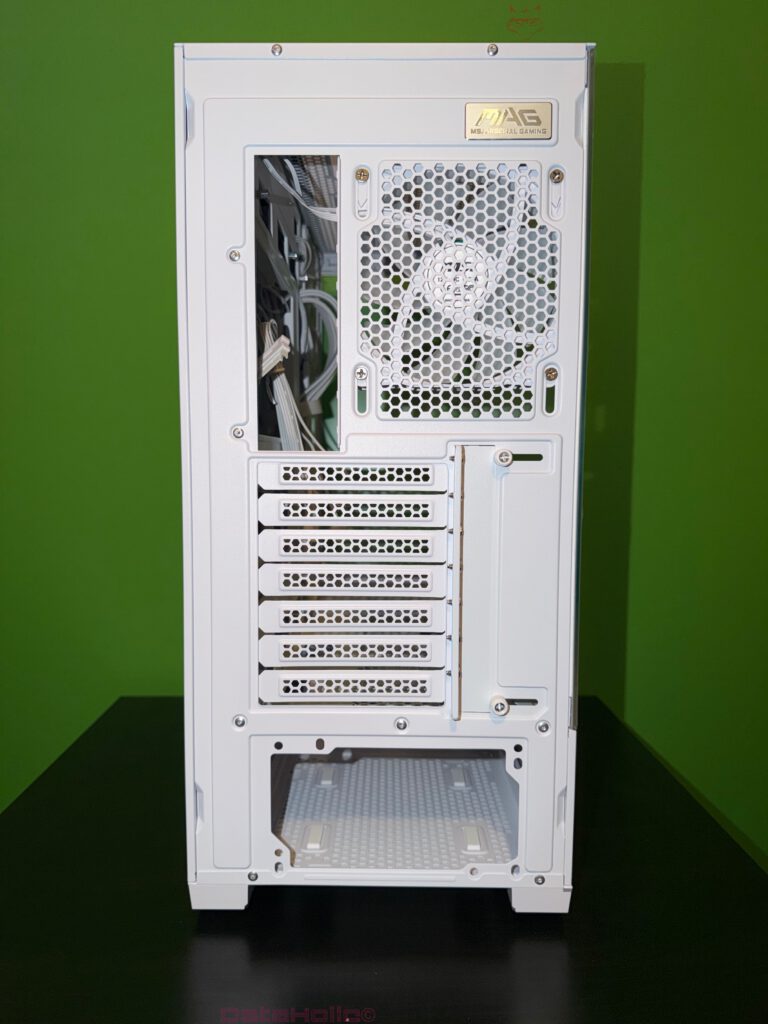
The White Edition immediately catches attention with its clean geometry. Dominating the design is the panoramic glass layout — a large side window extending towards the front, complemented by fine mesh sections for intake airflow. The right side panel is fully perforated metal, allowing air circulation to the rear compartment.
At the bottom of the front panel sits the I/O array:
- 1x USB-C,
- 2x USB-A,
- Audio combo jack,
- LED button,
- Power button.
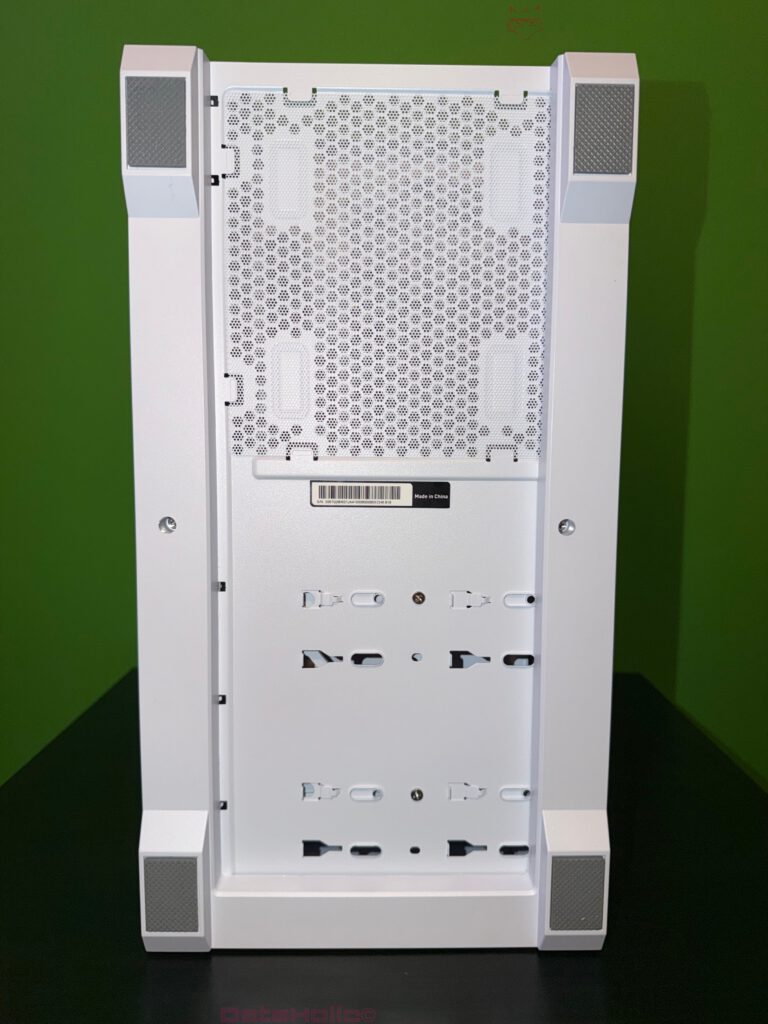
The rear panel features seven expansion slots, a 120 mm exhaust fan, and a bottom-mounted PSU bay. The underside carries a full-length, removable dust filter and four sturdy rubberized feet. The front panel is fully meshed, with a consistent microperforation pattern designed to balance airflow and aesthetics.
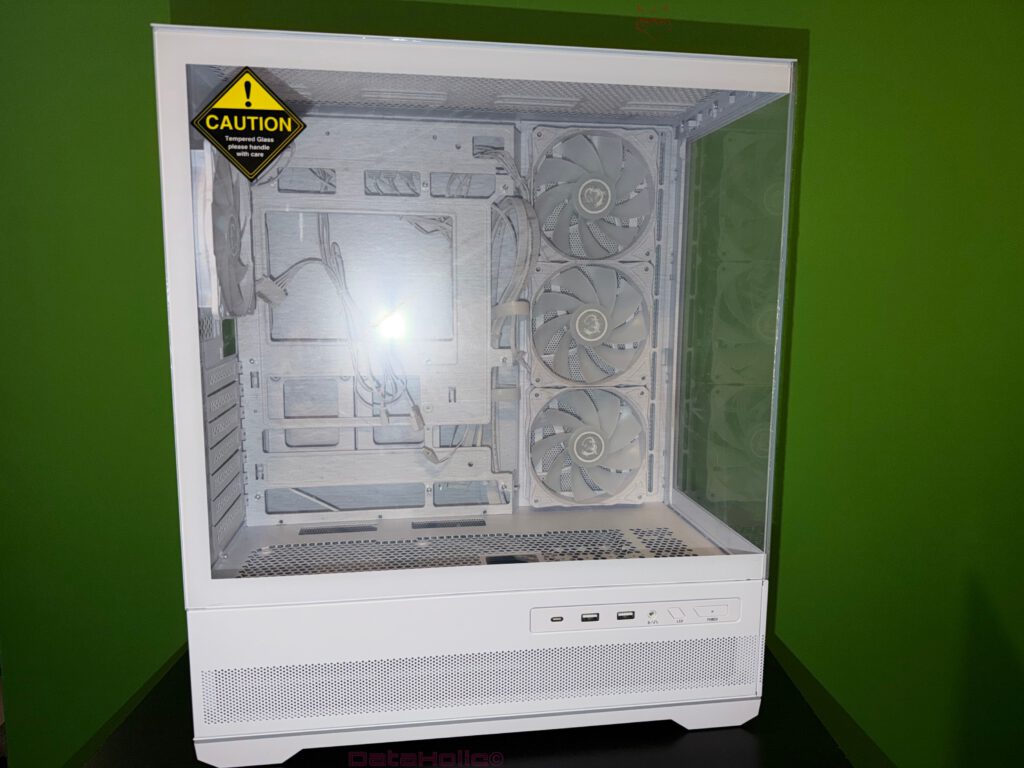

Interior Impression
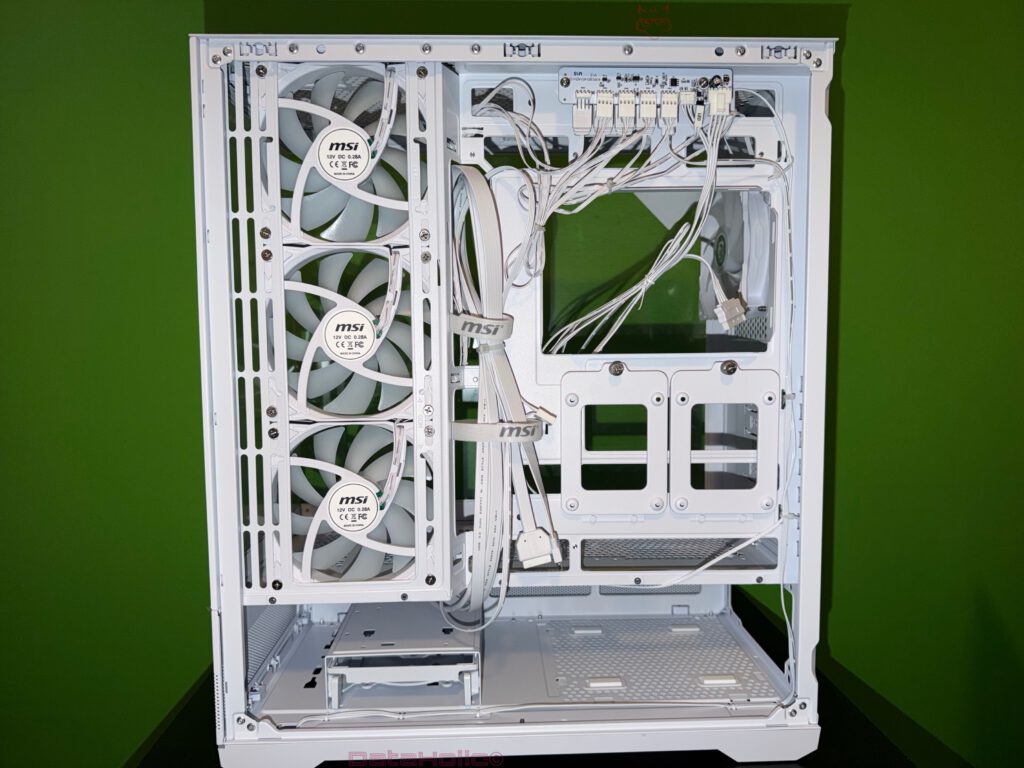
Inside, the PANO 110R PZ comes pre-equipped with three 120 mm intake fans at the front and one 120 mm exhaust fan at the back. A fan/ARGB hub is preinstalled on the rear side, near the top. Cable channels are wide, with multiple Velcro straps branded by MSI. The PSU compartment below is modular, with open access to drive mounts.
The white paint finish is consistent across steel, plastic, and mesh surfaces — a detail that often distinguishes high-quality white builds from cheaper implementations. The overall impression is one of manufacturing precision and coherence.
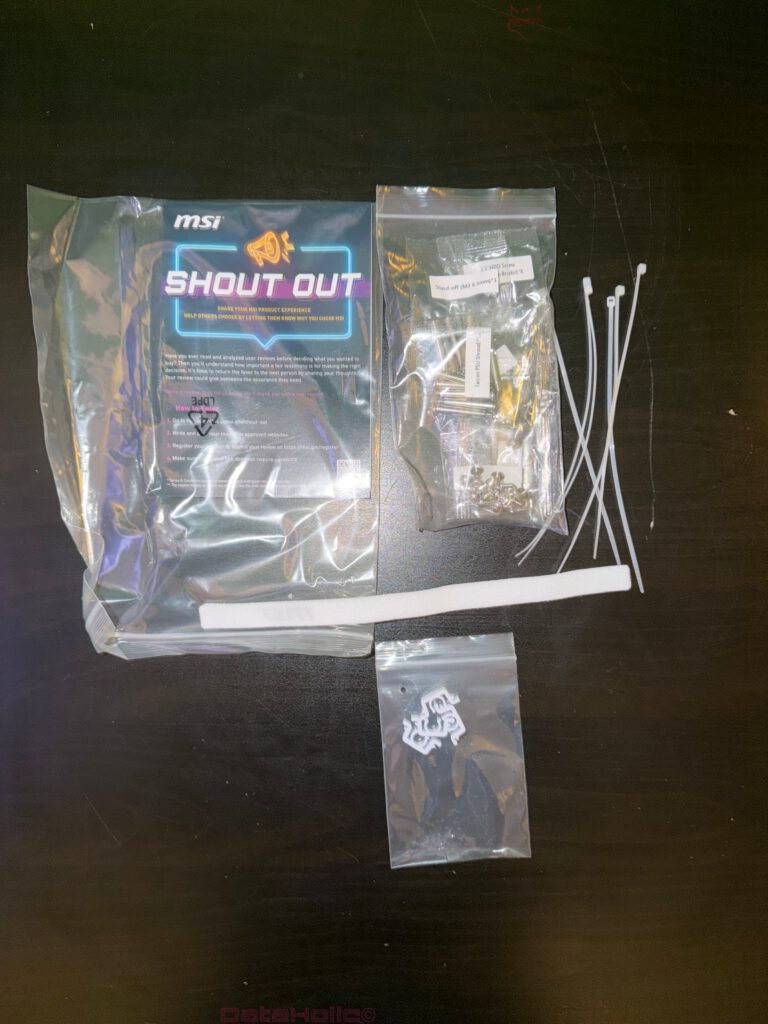
Case Accessories – Fasteners and Cable Aids
Included accessories within the case are as follows:
- Labeled screw packs (motherboard, PSU, drive mounts),
- Spare standoffs,
- Nylon zip ties,
- Reusable Velcro strap,
- MSI stickers,
- “MSI Shout Out” card.
The packaging of each small part is clear and organized. The provided Velcro strap proves particularly useful for grouping main power lines during cable management.
Link to the complete Unboxing
Preparation Phase – Assembly Planning
Combining a Back-Connect motherboard with a case designed for cable routing space requires a short planning phase:
- Check standoffs – Verify alignment with the ATX mounting pattern and the board’s Keep-Out markings.
- Define cable paths – Preplan routes for 24-pin ATX, EPS, front I/O, and fan hub cabling.
- Fan layout – Default airflow (3× intake, 1× exhaust) provides balanced pressure for initial setup.
- Dust filter management – Ensure the bottom filter is properly seated before installing the PSU.
A “dry fit” of the motherboard — without screws — helps visualize connector reach and clearance before final mounting.

Step-by-Step Assembly
1) Power Supply and Pre-Routing
The PSU bay fits standard ATX units. It’s best to pre-route ATX 24-pin and EPS cables before final PSU fastening. With a Back-Connect board, cable clutter in the visible chamber is virtually eliminated. The PSU compartment of the PANO 110R PZ offers generous cable depth, allowing clean routing without tension.
2) Install Motherboard Standoffs and Board
Factory standoff alignment corresponds to standard ATX spacing. The board can be gently lowered into position; the pre-mounted I/O shield aligns precisely. Using the center screw first and then securing diagonally ensures even pressure distribution.
3) Rear Connections – Front I/O, USB, Audio
Front I/O leads (power switch, LED, optional reset) are neatly bundled by MSI. The Tomahawk’s Back-Connect headers along the rear edge allow all of these to be connected invisibly. USB-C, USB 3.0, and HD audio headers are all located on the reverse side, resulting in a cable-free main chamber.
4) Connect ATX 24-pin and EPS Cables
The 24-pin connector is located mid-board on the back, while the 8-pin EPS connector sits at the top edge. The PANO 110R PZ provides dedicated routing channels and tie points; cable runs can be fixed using the included Velcro and zip ties. Once organized, the rear chamber remains visually neat and easy to access.
5) Drives and M.2 SSDs
M.2 drives mount under the EZ M.2 Shield Frozr II covers — tool-less and fast. 2.5” or 3.5” drives can be installed in the PSU area if needed. Ventilation slots below maintain unrestricted airflow.
6) Fan Hub Integration and Cable Management
The preinstalled fan/ARGB hub simplifies wiring. All front and rear fans connect here, powered via SATA, with one PWM line to the motherboard. This drastically reduces cable clutter. Ensuring cables are tension-free allows the steel side panel to close smoothly — the PANO’s cable depth supports this comfortably.

7) Final Closure – Panels and Inspection
Before sealing the system, check slot covers and I/O alignment. The left tempered glass panel remains protected with its factory film until the very end. The right perforated steel panel snaps into place with firm precision.
Assembly Experience – Observations in Practice
Back-Connect in Real Use
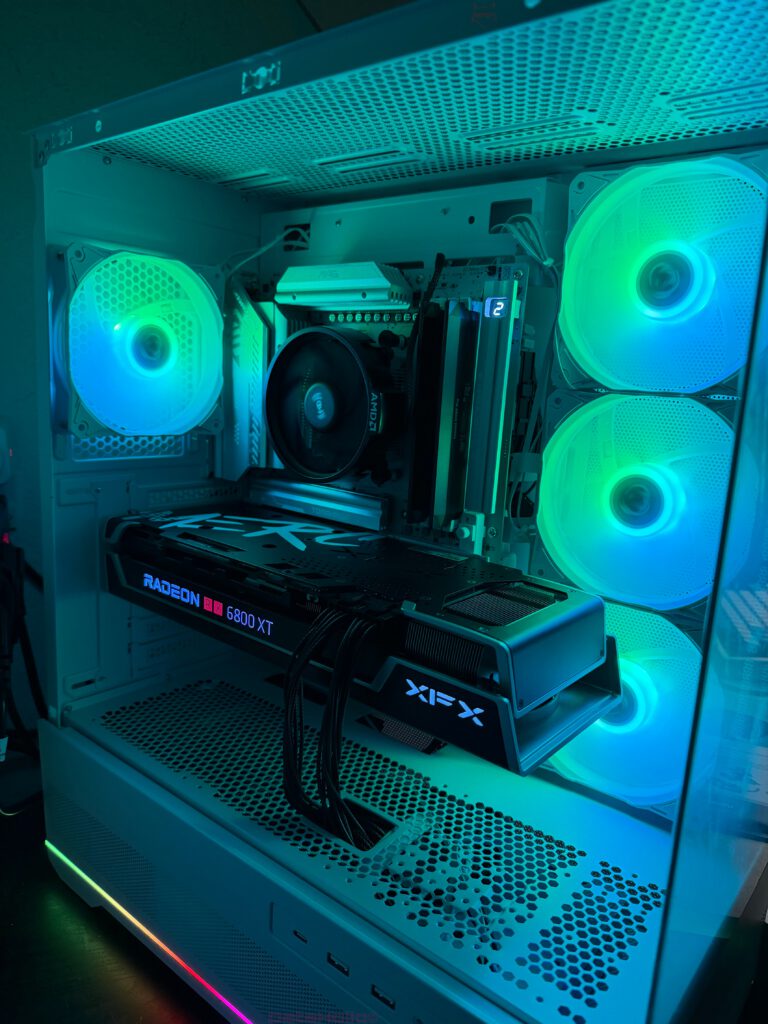
The Back-Connect approach of the Tomahawk MAX WIFI PZ provides a tangible ergonomic advantage. The main chamber remains entirely clear, with no visible power or front-panel cables. Within the PANO 110R PZ, this design philosophy becomes visually evident — the motherboard, cooler, and GPU are showcased without interference. For transparent builds, the improvement is striking.
Compatibility and Spatial Planning
The case easily accommodates long GPUs and tall CPU coolers. The front fan bracket is removable for radiator installation, and the roof allows 280/360 mm units. Within an all-white configuration, the color harmony between case, fans, and the board’s silver finish is visually seamless.
Mechanical Noise and Stability
Focusing purely on mechanical build: panels align firmly, the tempered glass sits tight, and the bottom filter slides securely. Factory fans are mounted without vibration. For perfectionists, adding silicone dampers remains an easy option.
Accessibility and Maintenance
Rear cable routing space is ample. The fan hub is positioned conveniently for reach. The board’s tool-less M.2 system and well-marked connectors make servicing straightforward. Upgrades or replacements can be executed without major disassembly.
Design Evaluation – Aesthetics and Material Consistency
Motherboard
The Tomahawk’s design language is engineered minimalism. Large brushed surfaces replace RGB accents. Typography (“TOMAHAWK”, “MAG”) is technical but understated. The I/O shroud provides visual balance, creating a unified look across components. Surface finishing is uniform, with clean engraving and consistent coloration.
Case
The PANO 110R PZ’s defining feature is its panoramic visibility. The expansive glass perfectly complements the Back-Connect principle — there are fewer cables to hide. The opposing steel mesh side ensures airflow balance. The front I/O at the bottom edge is ergonomically placed and symmetrical for left/right desk setups.
Overall, form follows function with refined precision.
Cable Management – Method and Outcome
Clean cable routing is dramatically simplified with this pairing. The most efficient approach proved to be:
- Separate groups – Route front-panel micro leads apart from the 24-pin and EPS bundle to avoid cross-pressure.
- Early bundling – Connect all front fans to the hub before final PSU cable routing.
- Dual fixation – Secure main lines first with Velcro, then reinforce with zip ties.
- Gentle curvature – Keep excess cable in long arcs rather than tight loops to preserve insulation integrity.
The result: a front chamber visually free of wires, while the rear remains tidy and accessible.

Notable Details During Assembly
- EZ PCIe Release simplifies GPU removal in tight clearances.
- Readable rear labels: all Back-Connect ports are clearly printed, even under moderate light.
- Wi-Fi antenna clearance: ensure open line-of-sight if the PC sits near a wall or corner.
- Bottom dust filter: easily removable from the rear for cleaning.
- Front I/O feel: firm, short travel buttons; USB ports fit snugly.
Practical Takeaways
- Sequence matters – connect rear headers before fixing the PSU to maximize access.
- Leave glass last – keep protective films on until the final dust check.
- Use labeled bags sequentially – prevents mix-ups of M.2 or drive screws.
- Document hub layout – a quick photo aids future upgrades.
Unboxing & Assembly Findings – Without Performance Evaluation
The observed process confirms that pairing an MSI Back-Connect motherboard with a well-ventilated panoramic chassis yields a practical and aesthetic advantage. The packaging of both products is secure, accessories are complete, and labeling is meticulous. Mechanically, the assembly proceeds smoothly; the visible cable count in the main chamber is effectively zero. The clean visual presentation often seen in marketing photos is reproducible in practice.
Equally notable is the color consistency of the white build: tempered glass, painted metal, and mesh components match tonally. MSI’s intended balance — a system that is functional, service-friendly, and visually coherent — is achieved.
Performance, acoustics, and thermals remain topics for a separate analytical review.
Final Assembly Check – Visual and Mechanical Review
Once the glass and steel panels are installed, a closing inspection confirms:
- Front chamber – cables clear of fan blades, all screws flush, M.2 covers tight.
- Rear chamber – cables fixed, hub connected, no bulges under the side panel.
- Underside – dust filter secured, case sits level.
The mechanical assembly is complete, ready for BIOS initialization, OS installation, or liquid cooling expansion.
Acknowledgment & Transparency
Transparency Notice (EU regulation compliance):
The products featured in this review — the MSI MAG X870E Tomahawk MAX WIFI PZ motherboard and the MSI MAG PANO 110R PZ case — were provided to us by MSI as non-binding loan samples for testing purposes. This is not paid promotion.
MSI had no influence on the content, evaluation, or editorial independence of this article.
All opinions expressed are based solely on our own hands-on experience.
We would like to sincerely thank MSI for supplying the hardware and for their trust in dataholic.de.