MoErgo Go60 – Basics 1: Removing Keycaps and Preparing the Keyboard for Your Own Needs
- Why Preparation Matters More on the Go60 Than on Conventional Keyboards
- What Should Be Ready Before Starting
- The Important Note About Keycaps: English Is Standard, Local Is Practical
- Understanding the Structure of the Go60 Before Removing Keycaps
- Removing Keycaps Safely: Step by Step
- Be Careful With Thumb Keys and Special Shapes
- What Becomes Visible Beneath the Keycaps
- Preparing and Sorting the New Keycaps
- Reinstalling Keycaps: Straightforward and Precise
- Ergonomic Preparation Includes Positioning the Halves
- Why Hardware Preparation Comes Before Software Configuration
- Common Mistakes and How to Avoid Them
- Final Thoughts on Preparing the Go60
- Part 2: Prepare the Go60 for the new firmware and how to enter the G60 into bootloader mode
The MoErgo Go60 is not the kind of keyboard that gets unpacked, plugged in, and casually dropped onto a desk without a second thought. This model follows a very different philosophy: less strain, more ergonomics, shorter finger travel, and a typing experience that feels noticeably more comfortable over long sessions. For that exact reason, the Go60 looks unusual at first glance. Two separate halves, circular touch surfaces, curved key clusters, and a layout that resembles a precision tool more than a typical office keyboard. In short: the Go60 clearly has no interest in being ordinary—and that is exactly the point.
Before the first key is remapped, before layers are configured, and before the software editor comes into play, everything begins with the hardware. More specifically, with the keycaps. The Go60 ships with English keycaps by default. Anyone working in another language environment should therefore order the correct keycaps for their country at the time of purchase. This is not an optional cosmetic upgrade but a practical decision. After all, the most advanced ergonomic keyboard becomes confusing very quickly when a “Z” appears where a “Y” is expected or punctuation marks start behaving like mischievous strangers.
This guide therefore focuses on the physical groundwork. It explains how to remove the keycaps safely, what to consider while preparing the keyboard for customization, and how to organize the process so that the Go60 is ready for later adjustments. The following guide will focus on the software configuration, ensuring that the layout defined in the MoErgo editor actually matches the physical keyboard sitting on the desk. In other words: first handle the physical reality, then configure the digital logic.
Why Preparation Matters More on the Go60 Than on Conventional Keyboards
With a traditional keyboard, many things follow long-established habits. Keys are positioned where decades of typing experience expect them to be. The printed legends typically match the operating system language, and modifications are often limited to aesthetic changes. The Go60 plays by very different rules. Its layout is intentionally ergonomic, the key clusters are designed to minimize finger movement, and the split design allows the two halves to be placed independently. That flexibility creates enormous benefits, but it also means the starting process is slightly different.
This keyboard is designed not only to function, but to adapt to posture, typing style, and personal preferences. Anyone typing in German, English, or multiple languages should establish clarity from the start. That includes checking the English keycaps, replacing them if necessary, and preparing the Go60 so that later software configuration does not turn into a guessing game involving misplaced symbols.
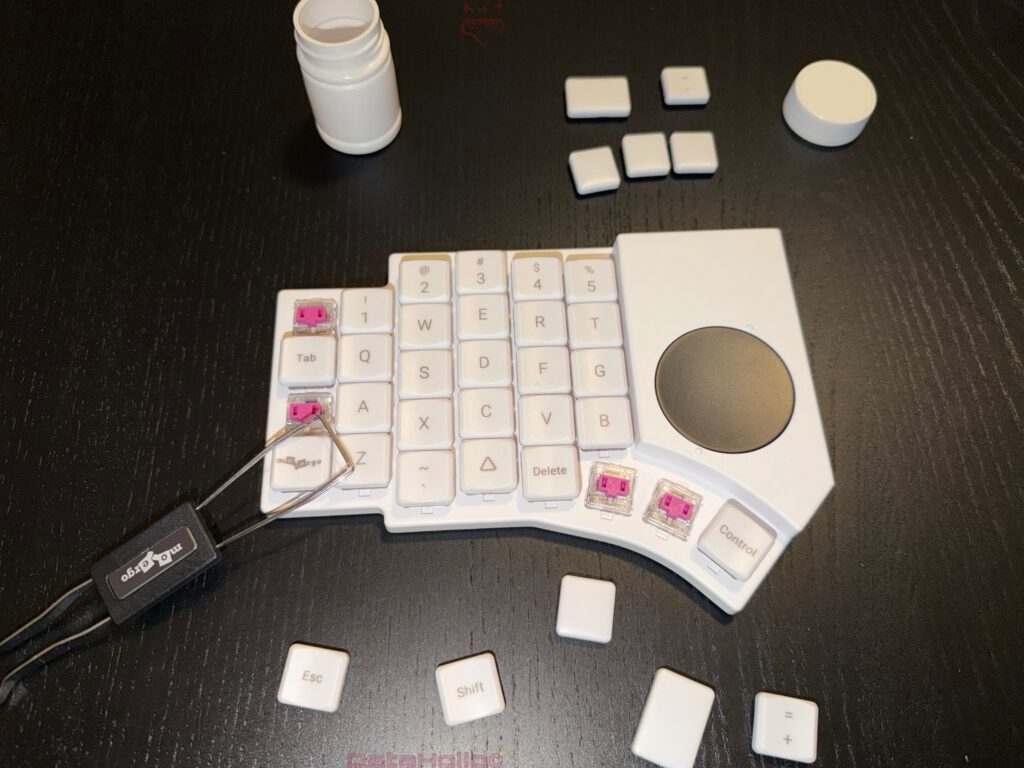
The photos already show this process in action. The keyboard appears in two separate halves, several keycaps have been removed, and pink switches are visible underneath. A keycap puller is used to remove the caps cleanly, while optional wooden palm rests demonstrate how the ergonomic setup can be expanded. Everything looks modular, organized, and intentionally built for customization. The Go60 does not merely tolerate personalization. It actively invites it.
What Should Be Ready Before Starting
Before removing the first keycap, it is worth taking a quick look at the workspace. This is not unnecessary caution—small plastic components have a remarkable ability to disappear into the most inaccessible corners of a desk within seconds.
A clean and well-lit workspace helps tremendously. Dark desks may look stylish but tend to hide small components visually. A tray, bowl, or organized surface prevents removed keycaps from rolling away or mixing randomly. The keycap puller—visible in the photos as a classic wire puller—should also be ready. This tool is ideal because it grips the keycap evenly and protects the surface.
Anyone planning to install country-specific keycaps should place them nearby and sort them in advance. This simple step saves time and reduces the risk of installing keys in the wrong positions. With a split layout that deviates from the standard keyboard structure, preparation quickly becomes the best friend of efficiency.
The Important Note About Keycaps: English Is Standard, Local Is Practical
One detail deserves special emphasis. The Go60 ships with English keycaps. This is not an oversight or inconvenience—it is simply the default configuration. For many users this is perfectly sufficient, especially if touch typing is already second nature or English is the primary language used on the system.
However, anyone relying on a different layout should order the appropriate keycaps at the time of purchase. This is important because the physical legends on the keys should match the software configuration later. Technically, configuring a German layout with English keycaps is possible. Practically, it feels about as elegant as wearing socks with sandals at a formal event. It works, but confusion arrives quickly.
The differences become particularly noticeable with punctuation marks, special characters, and language-specific letters. Umlauts, brackets, and symbols often appear in different places depending on the layout. Having correct keycaps avoids unnecessary mental translation and makes the transition to the Go60 far smoother.
Understanding the Structure of the Go60 Before Removing Keycaps
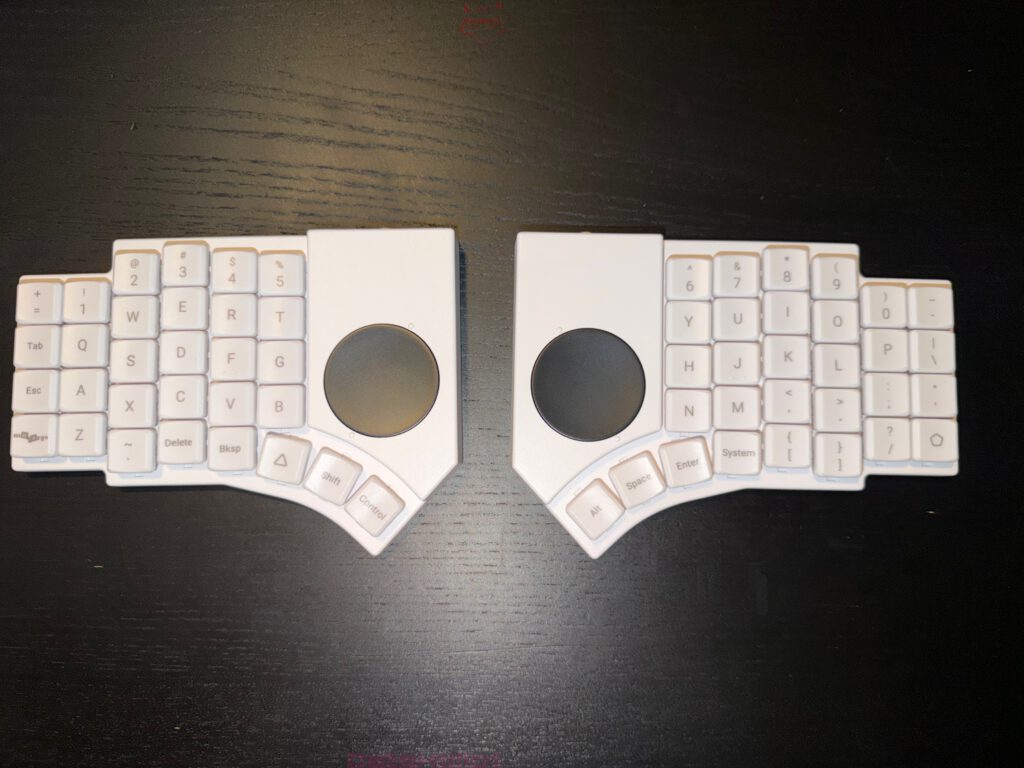
The Go60 consists of two independent halves. Each half contains its own cluster of keys and a circular touch surface. These round elements immediately stand out visually and play an important role in the overall design. They can later be assigned functions within the layout editor, though this first guide focuses exclusively on the standard keys.
The left half contains keys around the Q, W, and E region, as well as thumb keys positioned along the inner lower edge. The right half mirrors this structure. This symmetrical arrangement forms the ergonomic foundation of the keyboard. For anyone accustomed to traditional keyboards, the layout initially appears unfamiliar, which makes documentation useful.
Taking a photo of the keyboard before removing the keycaps is highly recommended if no reference images exist. In this case, several photos already illustrate both the complete keyboard and a partially disassembled half. These images provide a clear record of the original configuration, which can be extremely helpful during reassembly.
Even the most confident memory occasionally develops a sense of humor when confronted with a pile of identical keycaps.
Removing Keycaps Safely: Step by Step
The actual process of removing the keycaps is refreshingly straightforward. No advanced technical knowledge is required, and brute force is definitely not part of the procedure. Precision and patience are far more effective.
Place the keycap puller over the desired keycap so that the wires grip opposite sides. Then pull straight upward with steady pressure. Avoid twisting, levering sideways, or applying sudden jerking force. Mechanical switches appreciate gentle handling.
The close-up photo of the left half shows the intended result. Two keycaps have already been removed, revealing the pink switches beneath. The switches remain securely mounted while the keycap lifts away. If a cap feels slightly tight, a subtle upward wiggle usually solves the issue. The key principle remains simple: controlled movement instead of excessive strength.
Working methodically also helps enormously. Removing keys row by row or section by section prevents confusion later. Randomly removing keycaps across the keyboard might seem faster at first but quickly creates a small collection of identical plastic pieces that become surprisingly difficult to identify.
Be Careful With Thumb Keys and Special Shapes
Ergonomic keyboards like the Go60 include thumb clusters and uniquely shaped keycaps. These areas deserve extra attention. The keys near the thumb zones are not merely additional buttons—they are essential elements of the ergonomic design. Functions such as Space, Enter, Shift, Control, or layer switching often live in these locations because thumbs can reach them more comfortably.
While removing these keys, it is wise to remember their orientation and position. Some caps may be slightly angled or positioned differently than standard keys. Installing them incorrectly later does not necessarily break functionality, but it can lead to an awkward typing feel or visually misaligned keys.
Occasionally a keycap technically fits but ends up looking slightly crooked, like a painting hung unevenly on a wall. A quick check before installation avoids that situation entirely.
What Becomes Visible Beneath the Keycaps
Once the keycaps are removed, the switches become visible. The photos show pink switches that highlight the modular nature of the Go60. This stage offers a convenient opportunity to inspect the keyboard more closely.
Dust or small particles can be removed gently using a soft brush or careful compressed air. Liquids should never be used during this process, and aggressive cleaning products have no place here. The goal is simply to remove loose debris while leaving the hardware untouched.
Seeing the keyboard without keycaps also provides a clearer understanding of its ergonomic structure. The curvature of the key clusters and the placement of the thumb zones reveal how carefully the layout was designed. The Go60 almost resembles a compact mechanical project while in this state—only far more refined.
Preparing and Sorting the New Keycaps
After removing the original keycaps, the new ones can be prepared. The best approach is to lay them out completely and sort them logically. Separating the keys into left and right sections, followed by categories such as letters, numbers, and modifiers, creates immediate clarity.
Skipping this step may save a minute initially but often leads to confusion later. With a layout that differs from traditional keyboards, clear organization dramatically reduces mistakes.
Before installation begins, comparing the keycaps with the planned layout is helpful. While this guide does not yet address software configuration, the overall direction should already be clear. Whether building a German QWERTZ layout or experimenting with alternative typing arrangements, understanding the intended layout helps ensure the correct caps are placed in the correct locations.
Reinstalling Keycaps: Straightforward and Precise
Reinstalling the keycaps is even easier than removing them. Each cap is aligned over the switch and pressed straight down until it sits securely. A subtle click or firm seating indicates that the cap is correctly attached.
Alignment is important here as well. If a cap appears slightly tilted, it should be removed and reseated rather than forced into position. Speed offers no advantage during this stage.
After installing several keys, it is useful to press them lightly to confirm the feel. The key should move smoothly without rubbing against neighboring caps. Detecting misalignment early saves the effort of correcting an entire section later.
Ergonomic Preparation Includes Positioning the Halves
Preparing the Go60 involves more than replacing keycaps. The positioning of the two halves plays a major role in comfort. Split keyboards exist precisely because they allow a more natural arm and wrist posture.
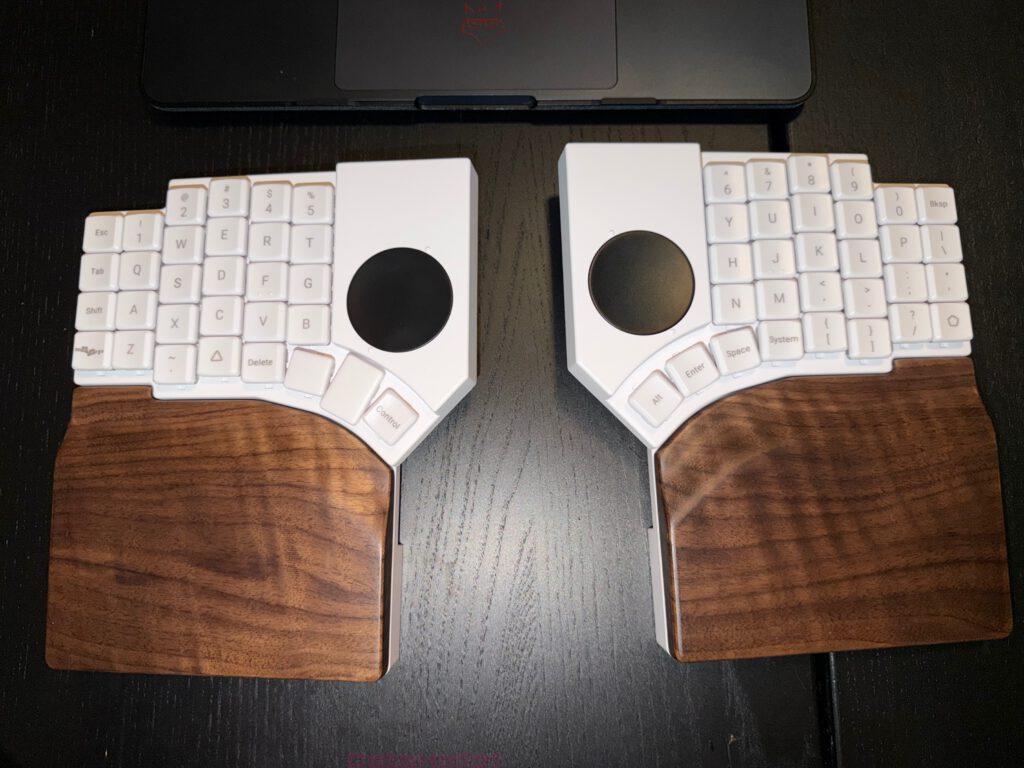
The photos showing the wooden palm rests demonstrate how this setup can transform the typing experience. The hands gain a stable support surface, wrists relax, and the entire arrangement appears more balanced. When palm rests are used, testing the spacing between the keyboard halves becomes especially important.
Too little distance reduces the ergonomic benefit, while excessive separation can feel unnatural. A slight outward angle often provides the most comfortable position, allowing the arms to rest naturally rather than forcing them inward.
Why Hardware Preparation Comes Before Software Configuration
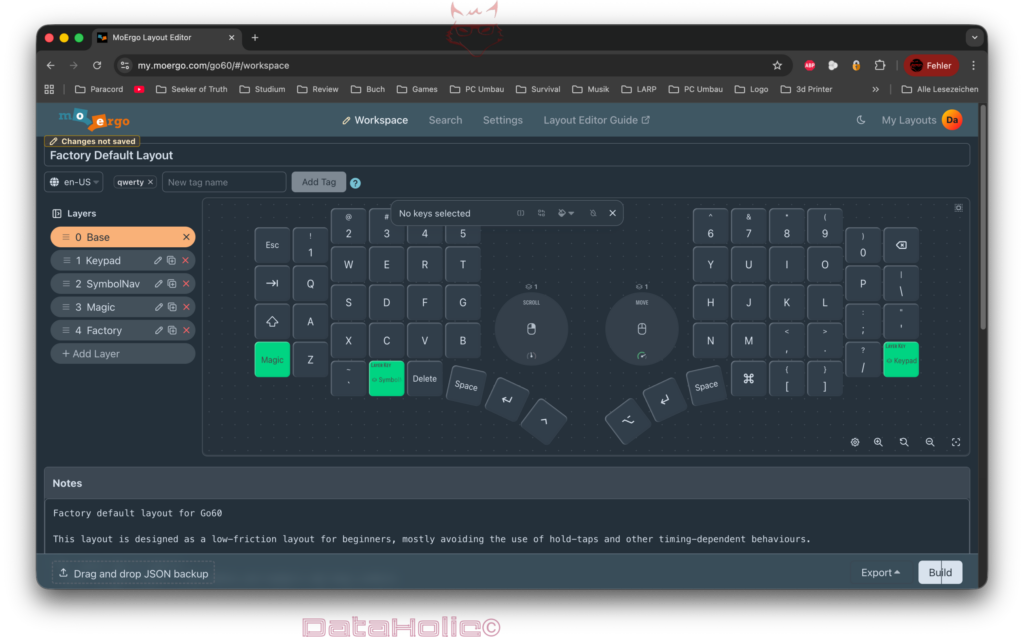
The MoErgo layout editor offers powerful customization options. Multiple layers, visual mapping of both halves, and configurable touch surfaces make it possible to transform the keyboard into a highly personalized tool.
However, diving into software adjustments before preparing the hardware often creates confusion. The physical keyboard on the desk should always match the layout being configured. Once the correct keycaps are installed and the keyboard is positioned comfortably, the logical layout becomes much easier to design.
Skipping this sequence leads to mismatched legends and unnecessary mental translation. Therefore the sensible order remains simple: prepare the hardware first, then configure the software.
Common Mistakes and How to Avoid Them
One of the most frequent mistakes is applying too much force when removing keycaps. The caps are designed to fit securely but not permanently. Gentle upward pressure is sufficient.
Another common issue is removing keycaps without organizing them. A pile of identical white plastic pieces might initially resemble progress but quickly turns into a puzzle.
Finally, ignoring the importance of country-specific keycaps can cause unnecessary inconvenience. While English keycaps technically work for any layout, matching legends significantly improve usability.
Final Thoughts on Preparing the Go60
The MoErgo Go60 is a unique keyboard, and that uniqueness begins with its preparation. Removing the keycaps is a simple task when performed carefully, and it provides an excellent opportunity to become familiar with the keyboard’s ergonomic design.
Ordering the correct keycaps for the desired language layout is strongly recommended, since the keyboard ships with English keycaps by default. With the proper keycaps installed, the keyboard halves positioned comfortably, and optional palm rests adjusted, the Go60 is ready for the next step.
That next step involves configuring the keyboard in the MoErgo layout editor, where the physical design transforms into a fully customized input device. Once both hardware and software work together, the Go60 stops feeling unusual and starts feeling exactly like the keyboard it was meant to be: one designed around the user rather than the other way around.
Part 2: Prepare the Go60 for the new firmware and how to enter the G60 into bootloader mode
Notice in accordance with EU transparency regulations:
The MoErgo Go60 presented in this review was provided to us by MoErgo as a non-binding loan for testing purposes. This does not constitute paid advertising.
MoErgo had no influence on the content, evaluation, or editorial independence of this article. All opinions expressed are based solely on our own practical experiences.
We sincerely thank MoErgo for providing the Go60 and for their trust in dataholic.de.