Setting up and configuring the MoErgo Go60 online: Software Basics 2
- 1. Where the software actually lives
- 2. Choosing a template and preparing the workspace
- 3. Adjusting keys: letters, special characters, macros and more
- 4. Changing the language afterward: important for German layouts
- 5. Building firmware: turning a layout into a .uf2 file
- 6. Important before flashing: both halves require the same firmware
- 7. Putting the Go60 into bootloader mode
- 8. Installing the firmware: simply drag the file into the root directory
- 9. Typical pitfalls and helpful hints
- 10. Can data be stored on the Go60?
- 11. Conclusion: surprisingly convenient for such a customizable keyboard
Anyone who hears the phrase “just quickly change it” in relation to a keyboard and immediately starts nervously reaching for a screwdriver can take a deep breath with the MoErgo Go60. For the software side of this split ergonomic keyboard, neither a massive local program nor a compiler marathon with three cups of coffee and questionable mood is required. With the Go60, MoErgo relies on the MoErgo Layout Editor, a web-based online solution that can be accessed via my.moergo.com. Layouts can be selected there, adjusted, saved, and then built directly as a firmware file. The documentation explicitly describes the editor as an online web app for modern browsers on desktop and mobile devices.
That is exactly what this article is about: not fundamental debates about key shapes, finger travel, or the eternal question of why classic keyboards were apparently developed in a time when comfort was only a rumor. Instead, this article provides a clean, understandable guide for the software side of the MoErgo Go60. This includes logging into the online editor, selecting a template, adjusting the layout including language and special character assignments, building the firmware, and finally installing it on both halves of the keyboard. And this is exactly where an important point lies: according to MoErgo, the generated firmware must be loaded onto both sides of the Go60.
1. Where the software actually lives
The first special feature of the Go60 begins even before the first click: the required software is not available as a classic local application on the hard drive but online at https://my.moergo.com/go60/. According to the manufacturer, the Layout Editor is an optional service that runs directly in the browser and can be used without installing additional software. An individual account is required for use, so the first step is to log in or create a new account. Without a login, the layout party quickly turns into nothing more than window shopping.
After logging in, an overview with various templates opens. Among other things, preconfigured layouts are available there, such as factory defaults for different usage scenarios or operating systems. The practical advantage: nobody has to start from scratch if only a working starting point is needed at first. An existing template can be copied into the workspace and then customized. This exact approach is also shown in the MoErgo interface: first select a template, then transfer it into your own working environment, then edit it. This saves time and prevents accidentally ending up with an empty keyboard during the very first attempt, one that only contains two commas, a backslash, and existential silence. The build function is available directly in the editor for saved or edited layouts.
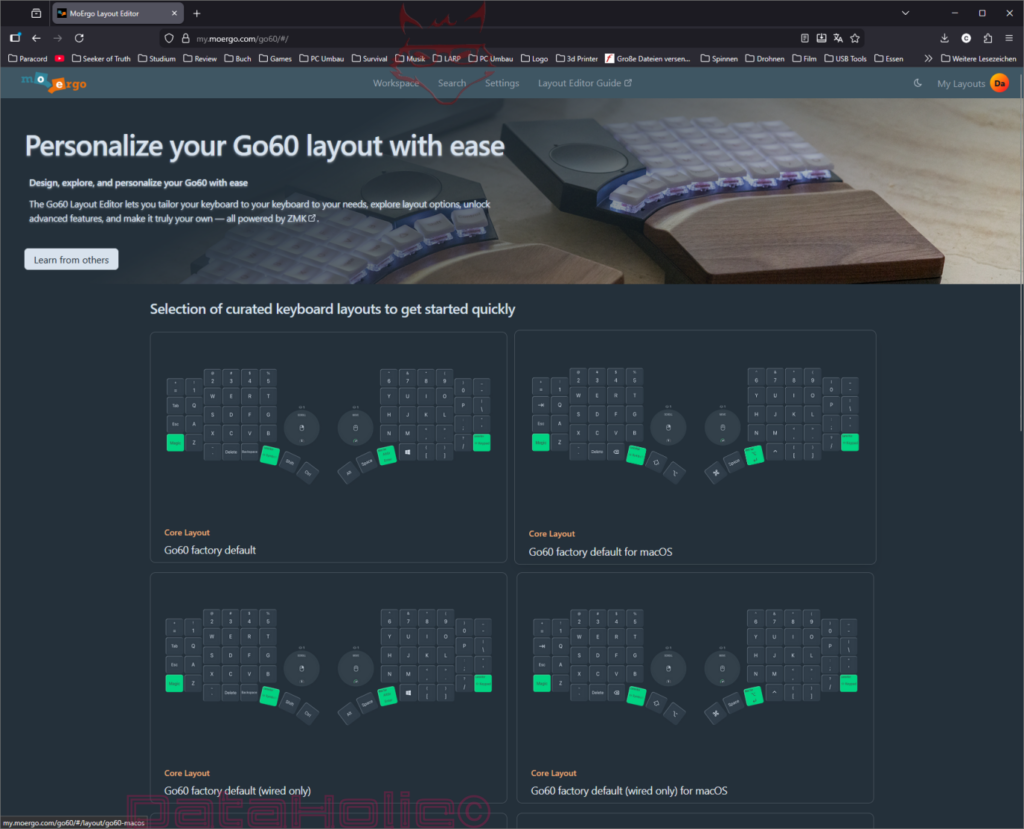
2. Choosing a template and preparing the workspace
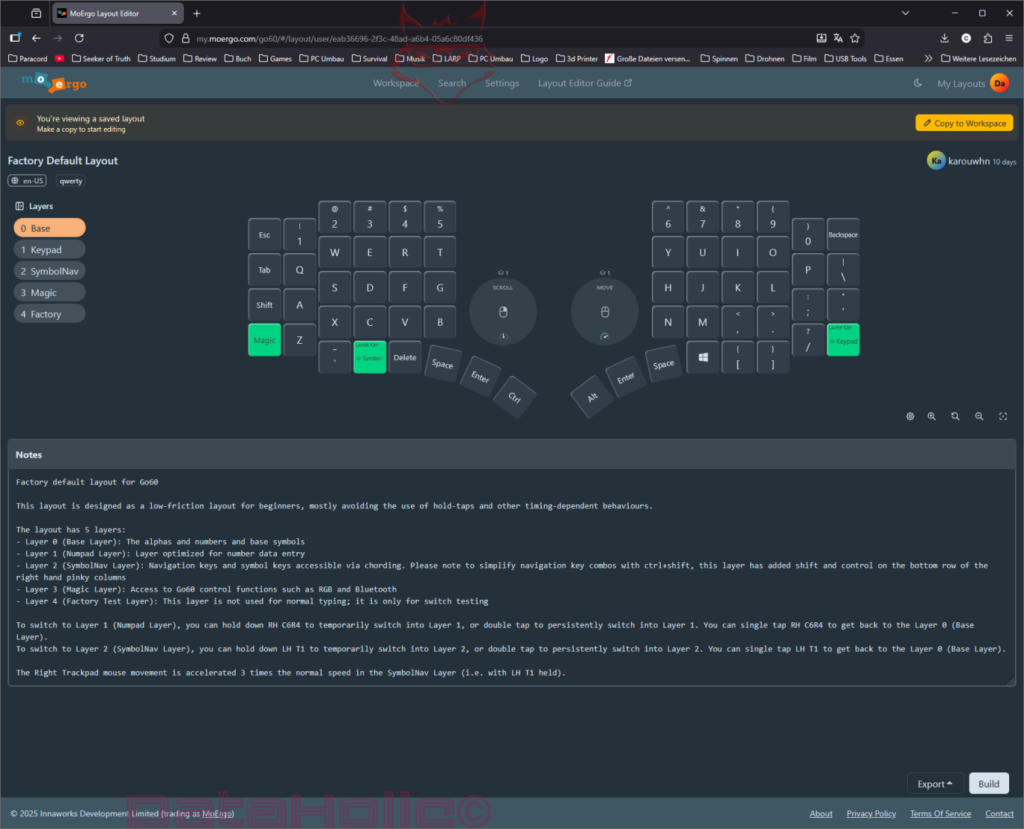
As soon as a template has been opened, the representation of the Go60 appears with its layers, the key fields, and the additional areas for notes, macros, hold-taps, combos, and further functions. According to the documentation, the layout page is divided into several sections, including title, tags, locale, layer selection, and advanced function areas. Anyone who does not only want to move letters but also build more complex assignments receives significantly more than just a graphical chessboard with keycaps here.
For a solid start, it is recommended to first look at three things:
Title: The layout should receive a clear name so that later a distinction can be made between test versions, everyday layouts, gaming setups, and “why is Enter suddenly doing Alt things”.
Tags: According to MoErgo, these help with organization, for example by operating system, language, or use case.
Locale: This point is especially important for German-speaking users because it influences how key labels and keycodes are displayed in the editor.
The locale setting in particular is often underestimated. The editor explains very clearly that a keyboard does not simply send characters such as “ä”, “ö”, or “ü” to the computer, but keycodes. The actual output depends on the configured language or the locale of the operating system. Therefore, the locale selected in the layout editor should match the devices being used. For German keyboard use, the editor supports de-DE among others according to MoErgo. If the layout is changed later, this country selection can also be adjusted afterward. This is especially helpful if a standard template was used initially and only later it becomes noticeable that instead of “ö”, a very confident semicolon suddenly appears.
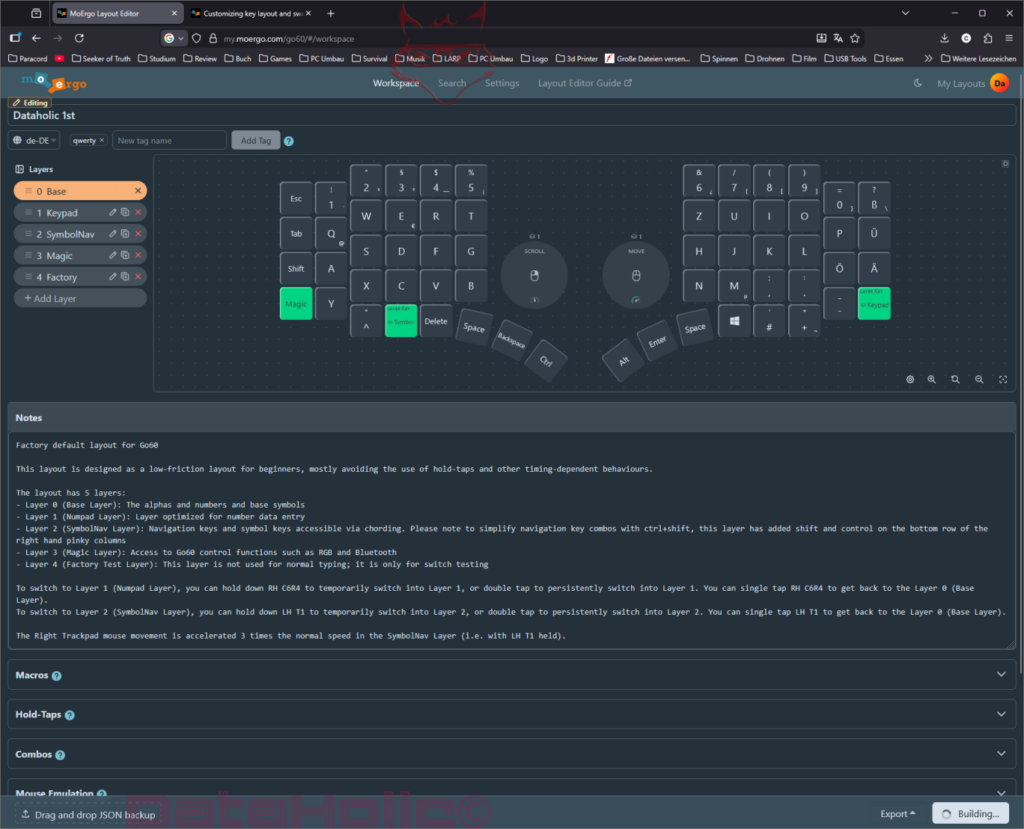
3. Adjusting keys: letters, special characters, macros and more
Now begins the part where the Go60 shows why it is not simply another keyboard with two halves. In the Layout Editor, practically every key can be reassigned. In the documentation, MoErgo mentions normal key presses, layer functions, Bluetooth switching, bootloader calls, mouse movements, scrolling functions, and much more. In addition, the editor supports its own macros with which multiple actions can be combined into a single key function.
In practice, this means:
- Letters and numbers can be rearranged.
- Special characters can be redistributed according to the desired national language or personal preference.
- Individual keys can be assigned macros.
- Layer switches can be defined.
- Special functions such as bootloader, mouse control, or Bluetooth profile switching are also possible.
Anyone working in German will sooner or later end up with ä, ö, ü, ß and the typical special characters. This is exactly where the locale adjustment shows its strength. According to MoErgo, when selecting a non-English locale, the keycodes offered in the editor also change accordingly. This makes configuration significantly easier because the expected output visually matches the actual target system better. In other words: the software helps assign keys more deliberately instead of clicking blindly. That is pleasant because typing mistakes are entertaining enough in everyday life and do not also need to be cultivated already at the firmware stage.
The interface also allows direct editing of individual keys. A keycode can be selected or recorded via the keycode recorder. MoErgo describes that for this purpose the input field of the desired key is activated and then the desired key or key combination can be pressed on the physical keyboard. For many adjustments this is faster than manually searching through all available options. Limitation: some special keys or system combinations may not be recorded properly due to browser or operating system restrictions.
Anyone who wants to go one step further can also work with layers. ZMK, on which the Go60 is based, supports multiple levels. MoErgo explains this in the layout editor with classic momentary or persistent layer switching. In practical terms this means: a key can be a letter in the base layout and trigger navigation, a numeric keypad, special characters, or media controls on a second layer instead. This massively increases functionality without requiring the keyboard to become physically larger. The Go60 therefore remains compact while the software quietly performs heavy lifting in the background.
4. Changing the language afterward: important for German layouts
One crucial point for German layouts: the language or country assignment is not permanently set in stone once the first template has been selected. According to the layout editor documentation, the locale can be changed in the editor so that the keyboard representation and the offered characters match the respective national layout. This is exactly why a layout can also be switched afterward to de-DE if umlauts or country-specific characters are required.
This makes sense because many users initially start with an English or factory layout and only realize during fine-tuning that everyday life in German requires slightly more than just A to Z. A key for “@” in the right place is nice. A key for “Ä” exactly where it is reliably needed is better. And if the keyboard no longer behaves as if it grew up in an American tax office while writing German texts, everything is finally fine.
5. Building firmware: turning a layout into a .uf2 file
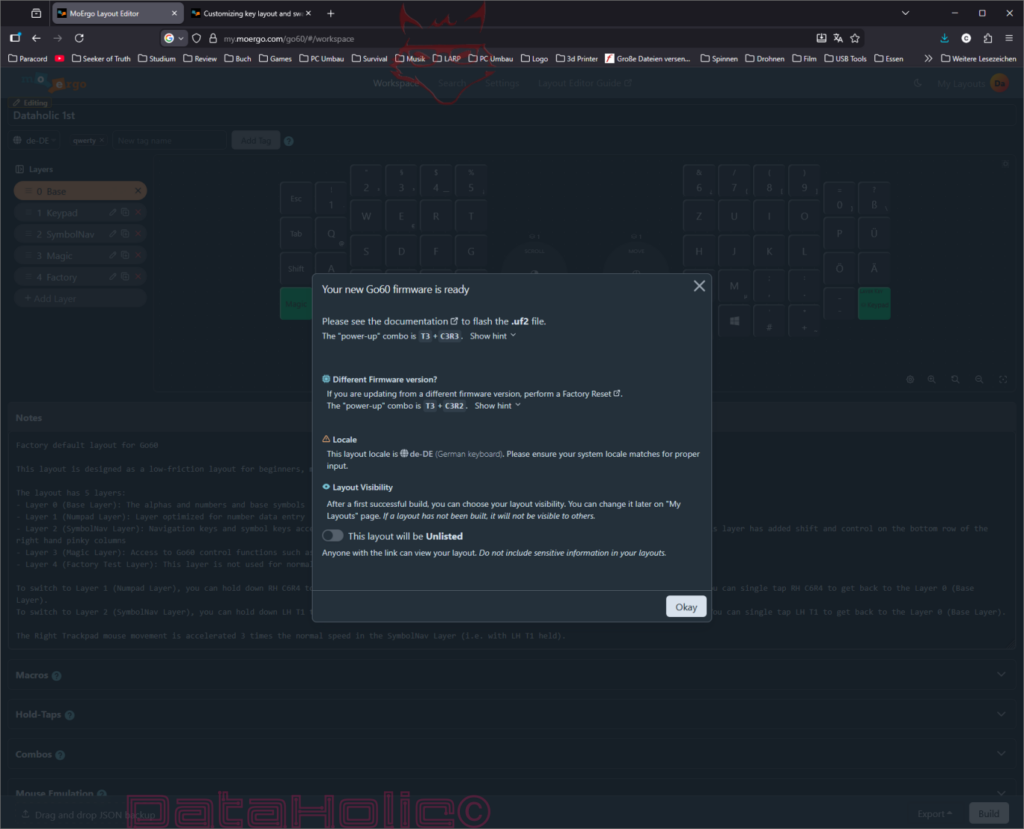
Once the changes are completed, the most important button in the entire process follows: Build or Save and Build. According to MoErgo, the layout editor creates a .uf2 file, which is the firmware file with the new layout. For saved layouts, “Build” is sufficient; for layouts that have just been edited, the editor uses “Save and Build”, meaning it saves first and then starts the build process. The firmware is generated by default according to the currently intended production version; alternative firmware versions can be selected via the settings.
After the build process, according to the documentation a dialog appears with the result and instructions for further installation. The generated file is downloaded in the process. The file name follows a fixed pattern consisting of layout ID, firmware version, and layout name. This is particularly practical if several variants exist later. It then becomes easier to recognize which file actually belongs to the desired configuration and which one is merely the digital fossil of a late-night experimental mood.
At this point a short safety thought is worthwhile: before flashing, MoErgo recommends a spare keyboard or an on-screen keyboard as a fallback option. This is not alarmism but simply reasonable. As soon as key assignments, layers, and special functions are modified, a small backup becomes extremely valuable. Nobody wants to discover in the worst moment that Enter now selects Bluetooth profile 2 and Backspace spontaneously greets the bootloader.
6. Important before flashing: both halves require the same firmware
One of the most common stumbling blocks is surprisingly simple: the Go60 consists of two halves, and both halves require the same new firmware file. MoErgo explicitly writes that the .uf2 file created by the layout editor must be loaded onto both Go60 halves. Updating only one side can lead to problems, such as inconsistent communication or incorrect behavior between the left and right halves. The bootloader documentation also indirectly warns about this because certain methods do not work reliably if both halves have different firmware versions.
Therefore the rule is: one file, two flash processes. First the right half, then the left half, or vice versa. The important thing is that they are identical. At this point the keyboard is surprisingly democratic: no half wants to be preferred, disadvantaged, or left alone on the software side.
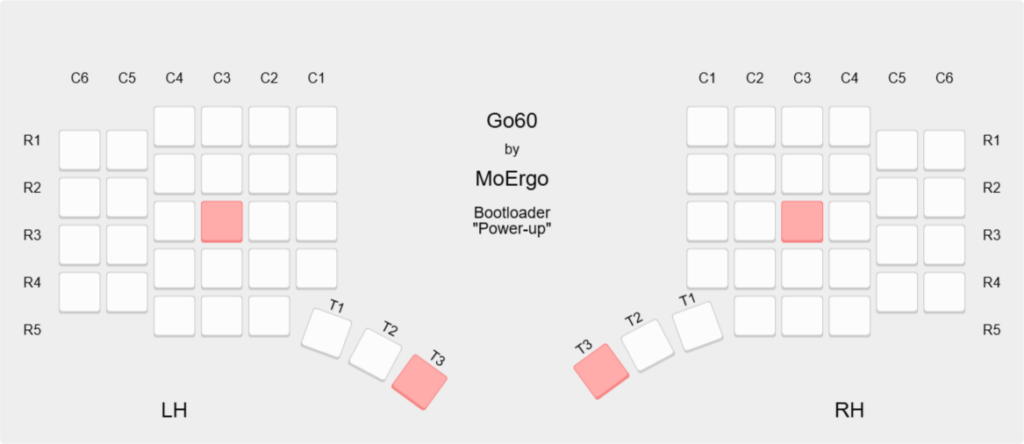
7. Putting the Go60 into bootloader mode
To install the new firmware, each half must be placed into bootloader mode. According to MoErgo there are two methods for this. The recommended and more reliable variant is starting the bootloader during power-up because this method also works when ZMK itself is not running correctly or both halves are currently not communicating properly with each other. For that reason, this method is best suited for a clear step-by-step guide.
MoErgo also describes the LED display of the bootloader:
- Slowly pulsing red LED: bootloader mass storage mode is active and ready for flashing
- Fast blinking red LED: bootloader is running but there is no USB connection to the host
- Red LED permanently on or off: the Go60 is not in bootloader mode
Putting the right half into bootloader mode
- Turn off the right half.
- Connect a USB-C cable between the right half and the computer.
- Hold the key combination T3 + C3R3. According to MoErgo, this corresponds to Alt + K on the standard layout.
- While holding both keys, turn on the right half.
Putting the left half into bootloader mode
- Turn off the left half.
- Connect a USB-C cable between the left half and the computer.
- Also hold T3 + C3R3. According to MoErgo, on the left side this corresponds to Ctrl + D on the standard layout.
- While holding the combination, turn on the left half.
If the mode is reached correctly, the respective keyboard half appears as a USB mass storage device. Under Windows, according to the documentation, drives with the names GO60RHBOOT for the right half and GO60LHBOOT for the left half appear.
This moment can feel a little strange the first time: a keyboard half suddenly appears like a USB drive. However, this is not an indication that vacation photos, spreadsheets, or an accidentally saved download folder should be stored there in the future. The mass storage device serves the firmware update, meaning the installation of the .uf2 file. MoErgo describes this mode exclusively as a bootloader mass storage device for loading new ZMK firmware.
8. Installing the firmware: simply drag the file into the root directory
Once the bootloader drive is visible, the pleasantly unspectacular part follows: the previously built .uf2 file is copied into the root directory of the displayed drive. According to MoErgo, any file with the .uf2 extension is sufficient; renaming it to CURRENT.UF2 is not necessary. After successful transfer, the drive disappears automatically. This disappearance is not a problem but the intended behavior because the Go60 processes the firmware and then restarts.
The process therefore looks very simple:
- Open the bootloader drive
- Copy the .uf2 file into the root directory
- Wait until the drive disconnects automatically
- The keyboard restarts
- Repeat the same process with the other half
At this point the installation is essentially already finished. No additional flashing tool, no terminal, no magic involved. The process is almost suspiciously uncomplicated. That is exactly why the brain sometimes tends to search for an “actual” final step. There is none. Copy the file, wait for the automatic restart, done.
9. Typical pitfalls and helpful hints
MoErgo mentions several points in the documentation that can be relevant during flashing. A common error is not caused by the keyboard but by the USB cable or a problematic USB hub. According to the manufacturer, there have been reports where cables or hubs could transmit normal input but still caused difficulties during firmware flashing. If the Go60 behaves strangely while loading, trying a different port or another cable is often worthwhile. This usually saves more time than any spontaneous theory building.
For macOS, MoErgo mentions two additional notes. First, the copy process can fail if the UF2 file name is too long. In that case, simply shortening the file name while keeping the extension helps. Second, it may happen that the operating system reports an error even though the drive has already closed. According to MoErgo, flashing was still successful in this case because the bootloader restarts faster than the operating system can properly confirm the transfer. In short: not every error message is a disaster. Some are simply the digital equivalent of someone shouting “Wait!” even though the train has already left the station.
10. Can data be stored on the Go60?
A clear classification helps here: the bootloader drives visible during flashing serve, according to MoErgo, to load new ZMK firmware. The documentation describes this USB mass storage mode as a method for installing the .uf2 firmware file. In practical terms, this means the Go60 is not a storage medium for normal user data such as texts, images, or other files. The visible drive is not a mini USB stick for private storage but a technical update channel for firmware. Anyone hoping to store the shopping list directly in the keyboard will unfortunately have to abandon that idea with polite finality.
11. Conclusion: surprisingly convenient for such a customizable keyboard
The software basics of the MoErgo Go60 are overall pleasantly accessible. Despite the high level of customization, the workflow remains clearly structured: log in online, choose a template, edit the layout, set the locale to the desired language if necessary, assign keys with letters, special characters, macros, or layer functions, then build a .uf2 firmware file and copy it to both keyboard halves one after another. The officially recommended power-up bootloader method additionally ensures that a clean path to the goal remains available even if the current layout has already become quite creative.
Especially for users who want a flexible ergonomic keyboard but have no interest in local toolchains, GitHub tinkering, and firmware building with side effects, this is a convincing approach. The Go60 requires a little familiarization but rewards it with a very individual key layout. And once the process is understood, the next layout update is no longer open-heart surgery but rather a routine pit stop with surprisingly little swearing.
Notice according to EU transparency regulations:
The MoErgo Go60 presented in this review was provided to us by MoErgo as a non-binding loan for testing purposes. This is not paid advertising.
MoErgo had no influence on the content, evaluation, or editorial independence of this article. All opinions expressed are based exclusively on our own practical experience.
We sincerely thank MoErgo for providing the keyboard and for the trust placed in dataholic.de.